background image

Page 9

User instructions

Care & maintenance


Important: 

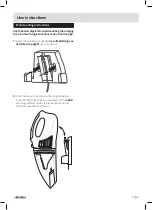
Always unplug the appliance from the power socket during cleaning and maintenance.

Never use any sharp instruments or abrasive substances, soap, household cleaner, detergent or wax polish for 
cleaning.
Clean the external surfaces with a damp soft cloth only.  Never use abrasive products or solvents as they may 
damage the appliance.

Purchasing replacement filters

Replacement filters are available for purchase. If you would like to purchase a filter please phone the below number 
between 

9am - 5pm Mon - Fri : 01327 308 729

Troubleshooting

In the unlikely event of difficulties with your appliance please follow the trouble shooting guide below.
If the problem persists, contact the retailer if the machine is still under guarantee.  
Customer 

helpline: 0870 600 3030

Problem

Reason(s)

Solution(s)

No Power

• Battery is drained

• Charge the battery fully

Low or no suction power

• Battery is drained
• Dust container is full
• Filter is clogged

• Charge the battery fully
• Empty the container (see page 6)
• Clean the filter (see page 6)

Dust leaking from the unit

• Dust container is full
• Dust container is not fitted to the 

motor section correctly

• Empty the container (see page 6)
• Re-fit the Dust container (see page 6)

Rechargeable battery disposal

DO NOT use ordinary batteries for replacements. These may leak and damage the Vacuum cleaner and cause 

personal injury.

In order to preserve the ecology please dispose of this unit properly so that it can be recycled.
Do not dispose of to unsorted waste.

For more detailed information about recycling of this product or battery, please contact your local Civic Office, your 
household waste disposal service or the shop where you purchased the product.

Technical specifications

Motor

• 7.2V 45W

Battery Charger

• Class II Transformer IP20

Battery Charger Rating

• 230-240V @ 50Hz

Battery Charger Voltage

• 9V DC 250 mA

Charging Rate

• 14 Hours (Approx)

Battery Pack

• Ni-MH   AA  7.2 V (1,2V x6)    1400mAh 

Summary of Contents for 406/7874

Page 1: ...lly before installing or using 406 7874 D BUSH 7 2VRechargeableHand HeldVacuumCleaner Theseinstructionscontainimportantinformationwhichwillhelpyougetthebestfromyourapplianceand ensuresafeandcorrectinstallation useandmaintenance Ifyouneedhelporhavedamagedormissingparts calltheCustomerHelpline 08706003030 MAX ...

Page 2: ...nformation 5 Instructionsbeforeuse 5 Operatinginstructions 5 Operatinginstructions cont 6 Cleaning maintenance 6 Wallmountinginstructions 7 Wallmounting fixings 8 Care maintenance 9 Purchasingreplacementfilters 9 Troubleshooting 9 Rechargeablebatterydisposal 9 Technicalspecifications 9 ProductCodes SLX225E MAX ...

Page 3: ...at isburningorsmoking suchas cigarettes matches Thisisafire risk 5 DonotusetheVacuumCleanerto pickupflammableorcombustible liquids 6 Donotuseinanareawhere dangerousitemsarestored 7 DonothandleorusetheVacuumor BatteryChargingAdapterwithwet hands 8 DonotusetheVacuumwhenitis pluggedintoamainssocket 9 DonotusetheVacuumwithouta filterinplace 10 Whilevacuuming donotblockthe air intake ortheexhaustventso...

Page 4: ...h thoroughlywithsoapandwater If liquidleakingfromabatterypack comesintocontactwithyoureyes immediatelyflushthoroughlywith waterandseeadoctor 24 TheVacuumCleanerisnotatoy keepawayfromsmallchildren 25 Donotabusethechargercable Nevercarrythechargerorbaseby thecableorpulltodisconnectfrom asocket Insteadgrasptheplug andpulltoremove 26 Keepthechargerawayfromhot surfaces 27 Donotinsertobjectsinto opening...

Page 5: ...Dust container Mains power adapter Accessory holders WALL MOUNTING BRACKET Liquid suction attachment Crevice tool attachment Carry handle LED indicator Spare filter Dust filter Ventilation openings Re charge dock jack Re charge dock Brush attachment fit s on end of crevice tool 1XSLX225EVacuum 1XSqueegee 1XInstructionmanual 1XDetachable Brush Crevice tool 1XMains adapter 1XWallBracket 1XSpareFilte...

Page 6: ...eFILTER Ensurethefilteris pushedfullyuptothestopsinsidethecontainer MAX 3 Installthewallmountingbracket see wallmounting instructions page7 anddocktheVacuumonce installed 4 See Recharginginformation sectionaboveforinitial subsequentcharginginstructions 5 WhenfullychargedyoucanremovetheVacuumand proceedtotheoperatinginstructions Operating instructions USAGE IN DRY CONDITIONS 1 LiftandremovetheVacuu...

Page 7: ...R itwillthenclickintoplace Cleaning maintenance cont CLEANINGTHEDUSTCONTAINER FILTER 1 RemovetheDUSTCONTAINER seestep1of removingthedustcontainer 2 RemovetheFILTERbyslidingtheentireplastic sectionoutofthelargestendoftheCONTAINER MAX 3 CleantheDUSTFILTERsectionandifrequiredthe insideoftheDUSTCONTAINER 4 Re fittheFILTERinsidetheCONTAINER Ensure thefilterispushedfullyuptothestopsinsidethe container a...

Page 8: ...therfixinginstructionscanbefoundonpg8 1 Insertthewallfixingssupplied orsuitablefixingsas describedonpage8 showntobelow 2 DocktheVacuumasshowonthediagrambelow EnsuretheChargingdockismountedwiththeJACK pointingverticallyupwardstoensuretheVacuum remainsseatedwhendocked MA X Userinstructions ...

Page 9: ...enotsure 2 Ensureyouusetherecommendeddrillbittomatchthewallplugandholesize 3 Ensureyoudrilltheholehorizontally donotforcethedrillorenlargethehole 4 Takeextracarewhendrillinghighwalls ceilingsandceramictiles Ensuretheplugisfittedbelowa ceramic tileto avoidsplittingorcracking 5 Ensurewallplugs arewellfittedandareatightfitinthedrilledhole Wall Mounting Fixings TypesofWalls Youcanuseoneofthefollowingt...

Page 10: ... Batteryisdrained Chargethebatteryfully Lowornosuctionpower Batteryisdrained Dustcontainerisfull Filterisclogged Chargethebatteryfully Emptythecontainer seepage6 Cleanthefilter seepage6 Dustleakingfromtheunit Dustcontainerisfull Dustcontainerisnotfittedtothe motorsectioncorrectly Emptythecontainer seepage6 Re fittheDustcontainer seepage6 Rechargeable battery disposal DONOTuseordinarybatteriesforre...

Page 11: ...antee does not cover accidental damage misuse cabinet parts knobs or consumable items The product must be correctly installed and operated in accordance with the instructions contained in this manual It must be used solely for domestic purpose The guarantee will be rendered invalided if the product is re sold or has been damaged by inexpert repair Specifications are subject to change without notic...

Reviews: