background image

9

Argos Product Support 01759 487838

User Instructions

Using the Hob

Ignition Button

Press and turn the control knob towards 

the large flame position.

Pressing the control knob down will 

engage the electronic ignition and allow 

the gas to flow.

Manual Ignition of the Gas Burners

In the case of electricity failure resulting 

in loss of electronic ignition  follow this 

procedure.

To ignite one of the burners, press and turn 

its knob clockwise so that the knob 

is in max. position, ignite with a match, 

taper or another manual aid to its upper 

circumference. Move the ignition source 

away as soon as you see a stable flame.

Flame failure device:

This cooker is equipped with a flame failure 

device.

In order for these to work correctly and to 

prevent the flame going out when you first 

ignite your burners, keep the knob pressed 

and hold for 10 seconds after the burner has 

ignited.

Control of the hob burners

The knob has 3 positions: Off (

l

), max (big 

flame symbol) and min (small flame symbol). 

After you ignite the burner in max. position you 

can adjust the flame length between max. and 

min. positions.

Do not operate the burners when the knob 

position is between max. and off positions.

After the ignition, check the flames visually. If 

you see yellow tips, lifted or unstable flames; 

turn the gas flow off, and check the assembly 

of burner caps and crowns. Also, make sure 

that no liquid has spilled into the burner caps.

If the burner flames go out accidentally, turn 

the burners off, ventilate the kitchen with fresh 

air, and do not attempt re-ignition for 90 sec.

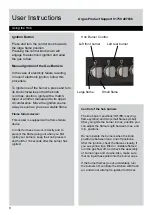
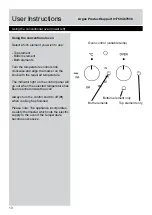
Left front burner

Left rear burner

Large flame

Small flame

Hob Burner Control

Summary of Contents for 7195444

Page 1: ... or have damaged or missing parts call Argos Product Support 01759 487838 Important Please read these instructions fully before installing or using Installation User Instructions Please keep for future reference Dual Fuel Range Cooker Cat no Model Cooker serial number place sticker here BCL100DFC CREAM 7369775 BCL100DFC CREAM 7396999 BCL100DFC CREAM 7399130 BCL100DFC CREAM 7195444 ...

Page 2: ...tructions Using the hob Cookware selection Using the fan oven Minute minder and clock Using the grill Using the conventional oven Care and Maintenance Troubleshooting Technical Specifications Disposal information A Guide to Wall Mounting Fixings Guarantee 2 3 4 5 8 6 7 9 9 12 9 10 11 11 12 13 15 16 17 17 18 19 ...

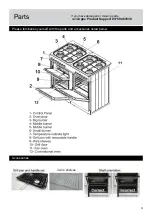
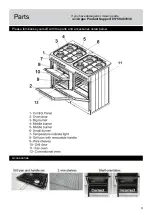
Page 3: ...4 If you have damaged or missing parts call Argos Product Support 01759 487838 Accessories Parts Please familiarise yourself with the parts and accessories listed below 4 wire shelves ...

Page 4: ... near the cooking surfaces or inside the oven IMPORTANT Do not try to lift or move this cooker by pulling on the door handle WARNING Ensure that the appliance is switched off before replacing the lamp to avoid the possibility of electric shock IMPORTANT Your appliance is produced in accordance with all applicable local and international standards and regulations IMPORTANT Maintenance and repair wo...

Page 5: ...4 If you have damaged or missing parts call Argos Product Support 01759 487838 Accessories Parts Please familiarise yourself with the parts and accessories listed below ...

Page 6: ... no permanent ventilation is required For rooms with a volume greater than 10 m no permanent ventilation is required Attention Regardless of room size all rooms containing the appliance must have direct access to the outside air via an openable window or equivalent The room containing the cooker should have an air supply in accordance with BS 5440 Part 2 Environment where your appliance will be in...

Page 7: ...ce to allow for ventilation and air circulation Positioning The furniture close to the cooker must be manufactured resistant to temperatures up to 100 C If the kitchen furniture are higher than the hob plate of the cooker it must be at least 10cm away from the cooker s side Surrounding furniture cabinets and extractor fans should be positioned in accordance with the diagram shown in figure 3 If fi...

Page 8: ...all using the chain kit provided Fix to the wall and the back of the cooker This will prevent the cooker from toppling forward if excess weight is placed on the oven door Since the chains must be attached to wall using fixings suitable for your wall type the wall fixings are not supplied with the cooker Figure 4 Please refer to the Guide to Wall Mounting and Fixings on page 18 Fixing to the cooker...

Page 9: ...must be connected to a dedicated circuit suitably rated for the load of the appliance see rating label at rear of appliance as shown in the wiring diagrams below It must be connected via a suitably rated cable to a double pole isolator cooker switch also suitably rated for the appliance 3 The electrical cable should not touch the hot parts of the appliance The electrical cable not supplied should ...

Page 10: ...e to work correctly and to prevent the flame going out when you first ignite your burners keep the knob pressed and hold for 10 seconds after the burner has ignited Control of the hob burners The knob has 3 positions Off l max big flame symbol and min small flame symbol After you ignite the burner in max position you can adjust the flame length between max and min positions Do not operate the burn...

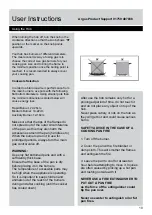
Page 11: ...rs are not in use for prolonged periods always turn the main gas control valve off WARNING Use only flat bottomed pans and with a sufficiently thick base Ensure that the base of the pan is dry before placing it on the burners The temperature of accessible parts may be high when the appliance is operating So it is important to keep children and animals out of the reach of the burners during and aft...

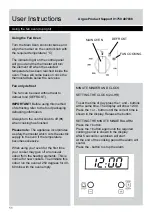
Page 12: ...hed Please note The appliance incorporates a safety thermostat which cuts the electric supply to the oven if the temperature becomes excessive When using your oven for the first time your cooker may give off an unusual odour from the heating elements This is normal for new cookers To eliminate this odour run the oven at 250 degrees for 40 60 mins with the oven empty DEFROST MAIN OVEN MINUTE MINDER...

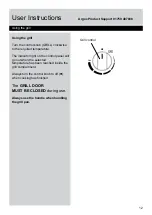
Page 13: ... to the required temperature The indicator light on the control panel will go out when the selected temperature has been reached inside the grill compartment Always turn the control knob to off l when cooking has finished The GRILL DOOR MUST BE CLOSED during use Always use the handle when handling the grill pan Grill control ...

Page 14: ...ign the marker on the knob with the required temperature The indicator light on the control panel will go out when the selected temperature has been reached inside the oven Always turn the control knob to off l when cooking has finished Please note The appliance incorporates a safety thermostat which cuts the electric supply to the oven if the temperature becomes excessive Oven control variable te...

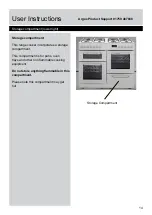
Page 15: ...ower right Storage compartment This range cooker incorporates a storage compartment This compartment is for pans oven trays and other non flammable cooking equipment Do not store anything flammable in this compartment Please note this compartment may get hot Storage Compartment ...

Page 16: ... make sure that the oven is cool Remove the bulb after removing the cover in front of the lamp Replace the old bulb with a new bulb resistant to 300 C 230 V 15 Watt Type E14 SES Replace the lamp s protective glass Your oven is now ready for use Burner Caps Periodically the enamelled pan support enamelled covers and burner heads must be washed with warm soapy water rinsed and dried After drying the...

Page 17: ...do not work Links may be missing in the rear connector box Refer to the Quick Start Installation Guide to check the correct placement of the links This must be done by a qualified competent person Nothing works completely dead Power is turned off at the isolation switch or the consumer unit Poor electrical connection Ensure isolation switch is on Check consumer unit has not tripped out Have the co...

Page 18: ... this product is disposed of correctly you will help prevent potential negative consequences for the environment and human health which could otherwise be caused by inappropriate waste handling of this product The symbol on the product or on the documents accompanying the product the crossed out wheelie bin symbol indicates that this appliance fitting may not be treated as household waste Instead ...

Page 19: ...check or screws do not become loose You can use one of the following types of wall plug if your walls are made of brick breeze block concrete stone or wood Important When drilling into walls always check that there are no hidden wires or pipes etc Hints 1 General rule Always use a larger screw and wall plug if you are not sure 2 Ensure you use the recommended drill bit to match the wall plug and h...

Page 20: ...nsumable items The product must be correctly installed and operated in accordance with the instructions contained in this manual It must be used solely for domestic purpose The guarantee will be rendered invalided if the product is re sold or has been damaged by inexpert repair Specifications are subject to change without notice The manufacturer disclaims any liability for the incidental or conseq...

Reviews: