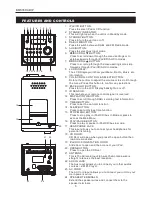
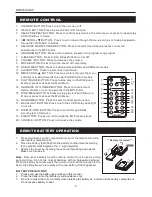
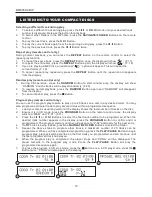
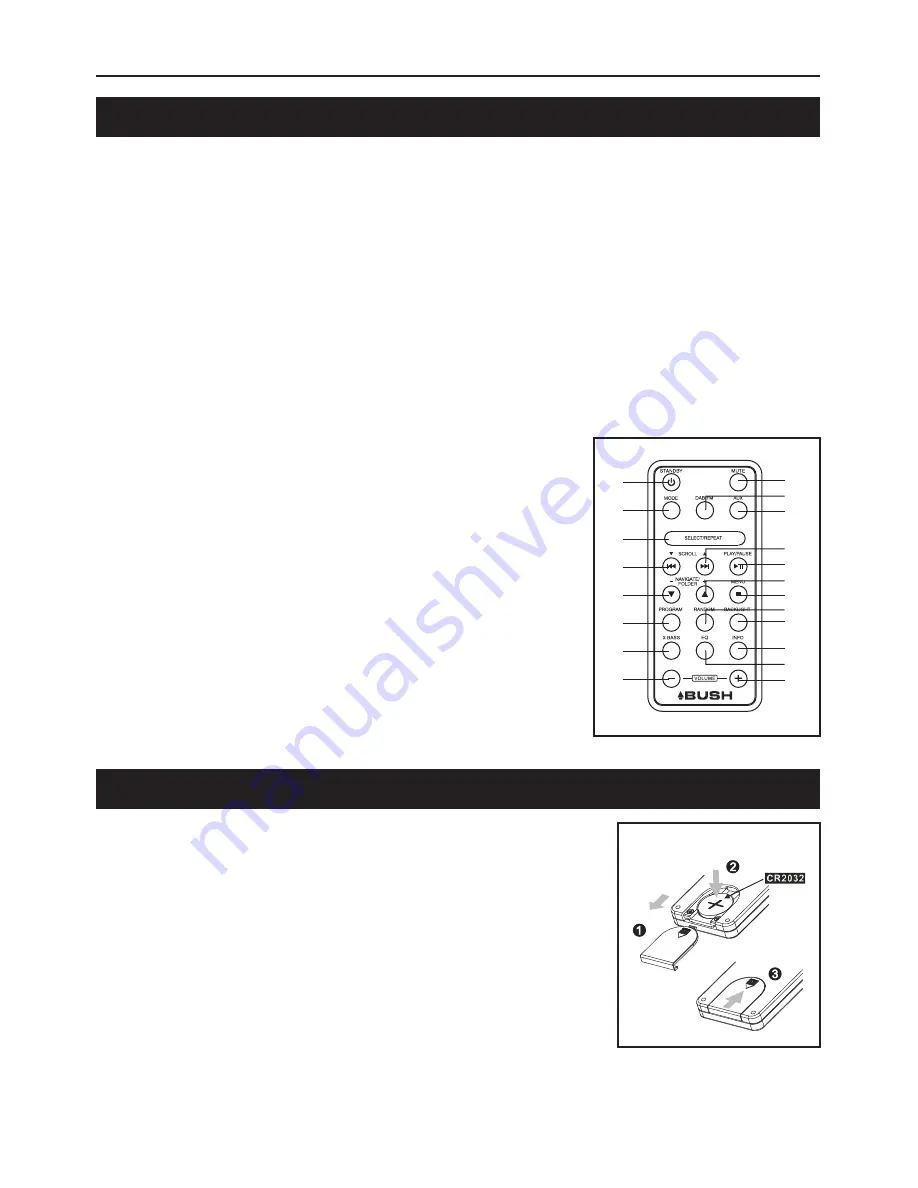
background image

BMS05DABIP

6

REMOTE CONTROL

1.    STANDBY BUTTON: 
2.    iPod/CD BUTTON: 
3.    SELECT/REPEAT BUTTON: 

4.    

SCROLL 

 BUTTON: 

5.    

6.    PROGRAM BUTTON: 

7.    X-BASS BUTTON: 
8.    VOLUME - BUTTON: 
9.    MUTE BUTTON: 
10.  DAB+/FM BUTTON: 
11.   AUX BUTTON: 
12.  

SCROLL

 BUTTON: 

13.  PLAY/PAUSE BUTTON: 

14.  

15.  STOP/MENU BUTTON: 

16.  RANDOM BUTTON: 
17.  BACKLIGHT BUTTON: 

18.  DISPLAY/INFO BUTTON: 

19.  EQ BUTTON:  
20.   BUTTON: 

Press to turn the unit on or off.

Press to select iPod or CD function.

Press to confirm selections in the main menu or press to repeat play 

       in CD/iPod/Aux In mode. 

Press to scroll down through the menu settings or to skip backwards 

       through iPod/CD/AUX In modes. 

NAVIGATE DOWN/FOLDER BUTTON: Press to recall stored station presets or to scroll 

       downwards in the MP3 folder. 

Press to store station presets or to program song playlist.

Press to turn X-Bass function on or off. 

Press to decrease the volume.

Press to turn the sound off completely.

Press to switch between DAB+ and FM Radio modes. 

Press to select Aux Input mode.

Press to scroll up through the menu 

        settings or to skip forwards through iPod/CD/AUX In modes. 

Press to stop play in iPod/CD/Aux In 

        Mode or press to access the Main Menu. 

NAVIGATE UP /FOLDER BUTTON: Press to recall stored 

       station presets or to scroll upwards in the MP3 folder.

Press to stop play in iPod/CD/Aux In 

        Mode or press to access the Main Menu. 

Press to select random play function.

Press to turn the LCD Display backlight 

        on or off.

Press to scroll through DAB+ 

       scrolling text information. 

Press ti scroll through the EQ Preset options. 

Press to increase the volume. 

I

◀◀

/

▶▶

I /

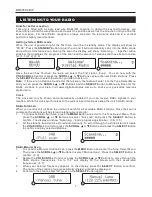
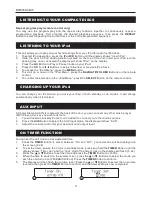
REMOTE BATTERY OPERATION

1.  


2.  


Place the battery (CR2032) into the battery compartment according 
to the polarity marking(place the “+” sign upwards).

3.  


Rep

Note:

  Remove the battery from the remote control if not in use for a long 

period  of  time.  Do  not  mix  normal  batteries  with  rechargeable  batteries. 
When the battery becomes weak, the remote control will not


function to the 

best of its ability. Be sure to replace with a new battery if that happened.

1.     Please only use the battery type outlined in this manual.
2.     Place the battery into the remote as outlined above only.
3.     
        Do not expose battery to heat.

Press downwards on the compartment cover of the remote control to 
open battery compartment.

lace the cover by inserting the cover and pressing downwards. 

Make sure it snaps in.

BATTERY PRECAUTIONS 

Be sure to follow the correct polarity when installing the battery as  indicated in the battery compartment. 


** Battery Included **

1

2

3

4

5

6

7

8

9

10

12

11

13

14

15

17

18

20

16

19

Summary of Contents for BMS05DABIP

Page 1: ...DAB CD Mico System with Universal Dock for iPod The Gold Technical Support Line 1902 215 259 Personal Product Support Charges will apply at 2 95 per minute BMS05DABIP ...

Page 2: ...s many features and to ensure you get the very best from your purchase Safety is important Your safety and the safety of others is important Please therefore ensure you read the Safety Instructions before you operate this unit Warranty In the unlikely event that your product fails to work normally please call the below free phone number to discuss the problem with one of our qualified service engi...

Page 3: ...rviceable parts in this unit If you have any issues with the operation of this unit please contact the Bush Service and Warranty number provided on the front page of this manual TO REDUCE THE RISK OF ELECTRIC SHOCK DO NOT REMOVE COVER OR BACK NO USER SERVICEABLE PARTS INSIDE REFER SERVICING TO QUALIFIED SERVICE PERSONNEL This unit is a conductor of dangerous voltage do not open or modify this unit...

Page 4: ...TED iPod DEVICES 14 WARRANTY 15 LISTENING TO YOUR RADIO STATION PRESETS remote control only FACTORY RESET LISTENING TO YOUR COMPACT DISCS LISTENING TO YOUR iPod CHARGING UP YOUR iPod ON TIMER FUNCTION SLEEP FUNCTION PRESET EQ remote control only X BASS FUNCTION remote control only MUTE FUNCTION remote control only BACKLIGHT FUNCTION 12 HEADPHONE INPUT SPECIFICATION ...

Page 5: ...ugh iPod CD AUX In modes The LCD Display will show your Menu Radio Music etc information Rotate the control to adjust the volume or to scroll through the menu Press this button to confirm any selections Press to turn the LCD Display backlight on or off This is where your remote control signal is received Press to scroll through DAB scrolling text information Press to set the on timer function Pres...

Page 6: ...LDER BUTTON Press to recall stored station presets or to scroll upwards in the MP3 folder Press to stop play in iPod CD Aux In Mode or press to access the Main Menu Press to select random play function Press to turn the LCD Display backlight on or off Press to scroll through DAB scrolling text information Press ti scroll through the EQ Preset options Press to increase the volume I I REMOTE BATTERY...

Page 7: ...o Clock The clock if you can receive DAB signals in your location While the clock synchronises to the current local time please keep the unit in DAB mode DAB Full Scan When you conduct a Full Scan the unit will search for all available DAB stations Once the scan is complete the stations will be stored in alphanumerical order 1 To conduct a DAB Full Scan press the MENU Button and scroll to the Tune...

Page 8: ...g titles album information etc Programme type This describes the style of the programme that is being broadcast If the information is not available the display will show No PTY Ensemble Multiplex Group name The Ensemble Multiplex is the station broadcaster information Note Press and hold the DISPLAY INFO Button for longer than 2 seconds to view the software information FM Radio 1 To switch to FM p...

Page 9: ...an read CD R and CD RW discs in addition to normal CDs the playability of CD R and CD RW discs may be affected by the type of software that was used to create the discs as well as the quality and condition of the blank media you are using This is not an indication of a problem with the player Playing a CD 1 Press the iPod CD Button to select CD function The display will show CD and NO DISC if you ...

Page 10: ...lay 3 To cancel random play press the Button Program play remote control only You can use the program play feature to play up to 20 tracks on a disc in any desired order You may also program a particular track to play several times within a programmed sequence 1 Load your disc as usual and wait until the display shows the total number of tracks on the disc 2 Ensure it is in CD mode press the PROGR...

Page 11: ...ly when it is docked You can set the unit to turn on at a selected time 1 Press the TIMER Button to select between On and Off your selection will be displayed on the screen F 22 2 To set the timer ensure the unit is in standby mode press and hold the TIMER Button until the display shows Timer Set and the hour digit of the timer clock on the display will flash F 23 3 Press the or Buttons to set the...

Page 12: ...on the remote control to turn this function on or off The display will show X BASS ON or X BASS OFF When the X BASS is on the bass sound is enhanced Press the MUTE Button on the remote control to turn the sound off completely The display will flash MUTE to show the function has been turned on To cancel mute and restore the sound press the MUTE Button again or the VOLUME Buttons and the MUTE will d...

Page 13: ...e the CD door so the lens is not contaminated by dust Do not touch the lens CORRECT INCORRECT FROM THE CENTRE TO THE EDGE COMPACT DISC SPECIFICATION POWER SUPPLY 230V 50Hz OUTPUT POWER 5W X2 UNIT DIMENSION 145 SPEAKER DIMENSION 125 WEIGHT 2 71 kg SPECIFICATION SUBJECT TO CHANGE WITHOUT FURTHER NOTICE L x 235 W x 130 H mm L x 168 W x 130 H mm RADIO SECTION FREQUENCY RANGE DAB 174 240 MHz FM 87 5 10...

Page 14: ...BMS05DABIP 14 SUPPORTED iPod DEVICES ...

Page 15: ...259 New Zealand and have your receipt of purchase on hand This warranty is subject to the following provisions It is only valid within boundaries of the country of purchase The product must be correctly assembled and operated in accordance with the instructions contained in the manual This product must be used solely for domestic purposes The warranty does not cover accidental damage The warranty ...

Page 16: ...BMS05DABIP 16 PO BOX 6287 Silverwater NSW 1811 www bushaustralia com au ...

Reviews: