background image


Installation 

Transportation 

Caution: 

2 people are required to 

unpack and handle the appliance, it is 

recommended that gloves are worn. 


y

 The appliance should be transported only in 

an upright position.  Do not tilt the appliance 

greater than 45

°

.  The packaging as supplied 

must be intact during transportation. 

y

 After transporting the appliance, leave it for at 

least 4 hours before switching on to allow the 

cooling system to settle.  Failure to comply 

could result in damage to the appliance. 

y

 Do not move the appliance by pulling the door 

or handle as it may damage your flooring and 

wall coverings etc. 

y

 Empty any water in the drain tray before 

moving. 

y

 Make sure that the defrost water pipe at the 

back of the product is fixed to the plastic 

evaporating pan on the top of the compressor, 

to avoid defrost water spillage on the floor. 

y

 Ensure the 

electrical

 cable is not caught under 

the appliance during and after moving. 

y

 Carefully remove all packaging materials 

including the foam base, dispose of correctly. 


y

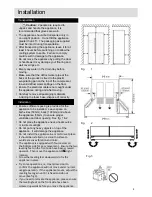
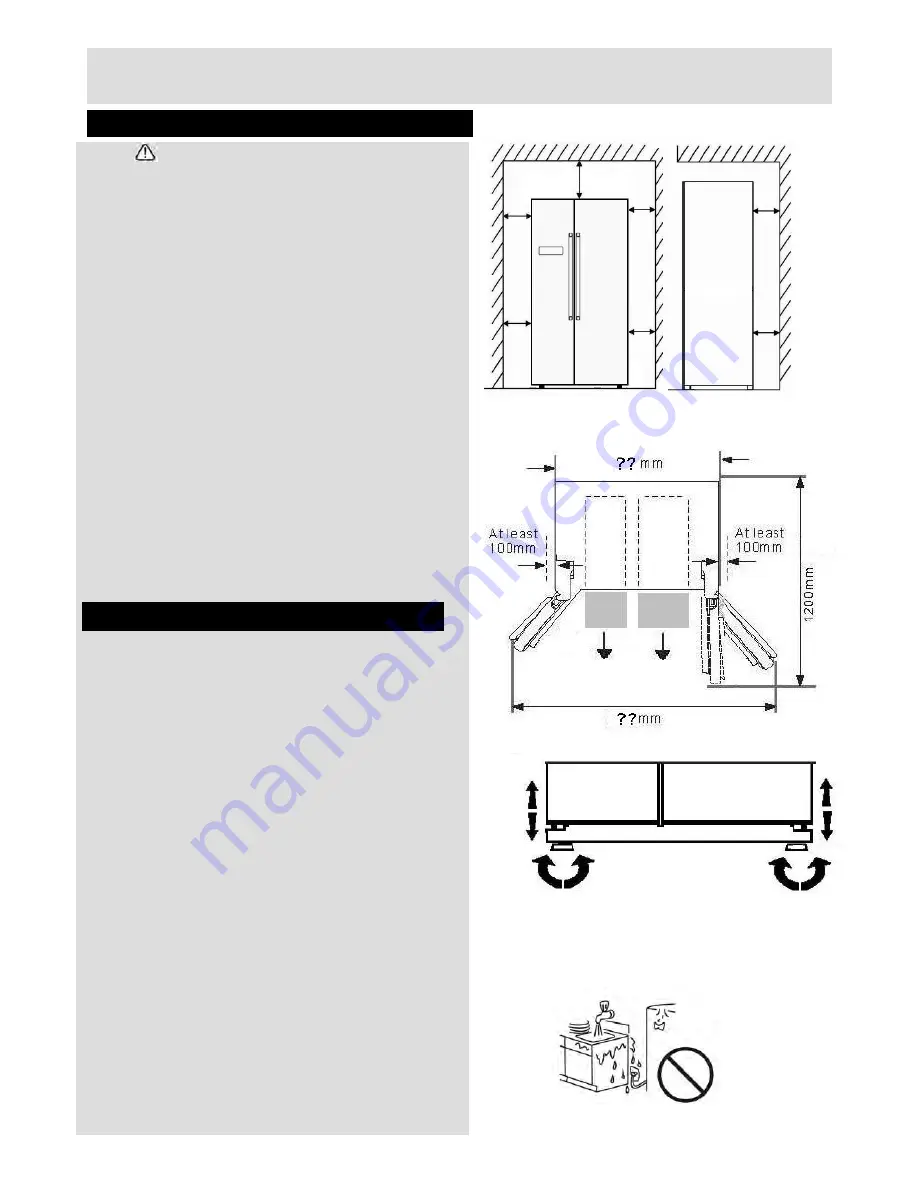
 Ensure sufficient spacing is provided for the 

appliance to be installed.  Leave space on 

both sides (

50

mm), back (

100

mm) and above 

the appliance (

50

mm) to ensure proper 

ventilation and door opening. See fig. 1 & 2 

y

 Do not place the appliance near a heat source 

or in direct sunlight. 

y

 Do not put any heavy objects on top of the 

appliance.  It will damage the appliance.  

y


y


 Fig. 

 Fig. 

Fig. 3 


Installation 

4

y


Do not install the appliance in

 a

 moist 

or

 wet place.


It should be installed on a smooth surface to 

avoid excessive vibration and noise. 
The appliance is equipped with four castors on 

the bottom side for easy movement.  Ensure the two 

leveling feet on the front side have been screwed 
upwards.  Then move the appliance to

ƚŚĞ

 right 

location.


Screw the leveling feet downwards to fix the 
appliance in place.  

Try some operations, i.e. Open/close door


to 

confirm the appliance will not move under normal 
usage/operation.  If 

the 

appliance moves

, adjust the 

leveling feet again until it is fixed and do not 
move (See fig.3). 
If you need to relocate the appliance, please ensure


the leveling feet on the front side have been 
screwed upwards before you move the appliance. 


Summary of Contents for BSBSFFB

Page 1: ...installing or using Issue 1 29 07 10 158 4044 These instructions contain important information which will help you get the best from your appliance and ensure safe and correct installation use and mai...

Page 2: ...Product codes Electrical connection 6...

Page 3: ...injury or damage to the appliance Do not allow children to play with the appliance to avoid the risk of entrapment and suffocation Keep ventilation opening in the appliance enclosure or in the built...

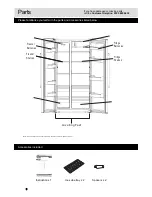
Page 4: ...x 1 Ice cube tray x 2 If you have damaged or missing parts call the Customer Helpline 0345 600 4632 Accessories included Spacers x 2 Freezer Balconies Freezer Shelves Fridge Balconies Fridge Shelves...

Page 5: ...foam base dispose of correctly y Ensure sufficient spacing is provided for the appliance to be installed Leave space on both sides 50mm back 100mm and above the appliance 50mm to ensure proper ventil...

Page 6: ...g plate that indicates the operating temperature range of the appliance The appliance may not work properly if it is left for a long period at a temperature outside the specified range Refer to sectio...

Page 7: ...socket is suitable for the maximum power of the machine fuses in the power circuit must be 13 amp The brown wire must be connected to the terminal that is marked with the letter L The supply voltage s...

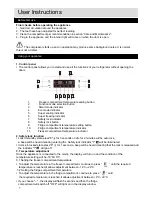
Page 8: ...zer compartment temperature indicator 3 Temperature adjustment Once the appliance is connected to the mains the display will turn on and the condition of the temperature setting will be 18 C 5 C 3 1 S...

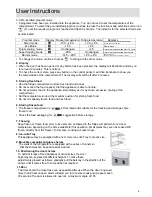
Page 9: ...e temperature knob at the medium position for storing fresh food y Do not mix already frozen food and fresh food 6 Storing frozen food y The freezer compartment is 4 Star rated and suitable for the fr...

Page 10: ...at cold air can circulate freely Higher cold setting will use more energy Do not set to maximum cold if it is not necessary Cool the hot warm food to room temperature before putting them into your fri...

Page 11: ...possible to thaw only the quantity required wrap up the food in aluminium foil or polythene and make sure that the packages are airtight do not allow fresh unfrozen food to touch food which is alread...

Page 12: ...h an LED light It can be used for a long time If the LED light is blown it must be replaced by a qualified person to avoid any hazard Contact the service agent at 0345 600 4632 In case there is a powe...

Page 13: ...d making scratching the surface Care and Maintenance Moving your appliance Disassembly assembly the door Moving Refer to section Transportation under Installation y In case there is problem with a doo...

Page 14: ...has not settled after transportation yDoors not closed properly y Doors frequently opened yLoading too much food yLow temperature setting yDoor seal dirty or sticky yLeave the appliance at least 4 ho...

Page 15: ...r its packaging indicates that this product may not be treated as household waste Instead it should be handed over to the applicable collection point for the recycling of electrical and electronic equ...

Page 16: ...parts knobs or consumable items The product must be correctly installed and operated in accordance with the instructions contained in this manual It must be used solely for domestic purpose The guaran...

Reviews: