background image

9

TROUBLESHOOTING

PROBLEM

POSSIBLE CAUSES

SOLUTIONS

There is an accessory
missing

1. A part(s) is missing from box

1. Check the ‘KNOW YOUR MACHINE’ page
of your instructions

The vacuum cleaner
does not switch on

1. The unit is not plugged into a mains socket
2. The power button on the unit has not
been depressed
3. The thermal motor cut out has been activated
4. There is no electricity to the power
socket

1. Ensure the plug is firmly in socket and
switched on
2. Depress the power switch on the unit
3 If the unit has cut out during use, disconnect
the unit from the wall socket, allow to cool for
one hour, clean the filters, empty bin/dust bag
and check the hose/accessories for blockages
4. Seek expert help from a qualified electrician

The vacuum cleaner won’t
pick up

1. The accessories are not correctly fitted

2. There are blockages in the hose/accessory
3. The dirt container/dust bag is full
4. The filters are blocked/clogged
5. The carpet height adjust slider setting is not
correct
6. The belt is broken/brushbar not rotating

1. Check hose/tools are correctly attached to the
machine/hose/tube; refer to ‘OPERATION’ section
2. Check the air paths of the hose/accessory are
not obstructed by blockages
3. Check dirt container/dust bag and if necessary
empty/replace
4. Frequently cleaning filters will maintain
performance; see ‘MAINTENANCE’ section
5. See ‘OPERATION’ section for correct carpet
height setting for your carpet
6. Disconnect the unit from the power supply,
remove the floor head cover and check the belt
has not detached from the motor spindle or that
the belt is not worn/damaged; see
‘MAINTENANCE’ section

Dust is escaping from the
vacuum cleaner

1. The filters/dust bag/dirt container are not
fitted correctly
2. The filters/dust bag are damaged.

1. See ‘ASSEMBLY’ and ‘MAINTENANCE’ sections.
2. If the filters/dust bag are damaged these will
need to be replaced

Accessories wont pick up
dust/debris

1. The wrong tool is fitted for the task
2. The tools are blocked
3. The filters are blocked
4. The dirt container/dust bag is full
5. The hose/tubes are blocked

1. See ‘KNOW YOUR MACHINE’ section
2. Check the air paths of the tools are not
obstructed by blockages
3. Frequently cleaning filters will maintain
performance; check ‘MAINTENANCE’ section
4. Check and empty the dirt container/replace
dust bag
5. Check the air paths of the hose/tubes are not
obstructed by blockages

The blockage indicator (if
applicable to model)
activates

1. The filters/dust bag/dirt container are blocked
2. The dust bag/dirt container is full
3. The accessories/hose/tube are blocked

1. Frequently cleaning filters will maintain
performance; check ‘MAINTENANCE’ section
2. Check and empty dirt container/replace dust
bag
3. Check the air paths of the accessories/hose/
tubes are not obstructed by blockages

For help, spares or assistance please call 0845 6042377
or visit www.bagsandfilters.com

BU-203 Guide (amend Jan 2010).qxd:Value

13/1/10  14:33  Page 11

Summary of Contents for BU-203

Page 1: ...ht Vacuum Cleaner Instruction Manual Please keep for future reference BU 203 For help spares or assistance please call 0845 6042377 or visit www bagsandfilters com BU 203 Guide amend Jan 2010 qxd Value 13 1 10 14 32 Page 1 ...

Page 2: ...BU 203 Guide amend Jan 2010 qxd Value 13 1 10 14 32 Page 2 ...

Page 3: ...aterials lighter fluid petrol kerosene etc or use in the presence of explosive liquids or vapours 14 Do not vacuum up harmful or toxic material chlorine bleach ammonia drain cleaner etc 15 Do not vacuum up hard or sharp objects such as glass nails screws coins etc 16 Do not use without ALL of the filters in place 17 Take extra care when vacuuming on stairs 18 Keep vacuuming area well lit 19 Store ...

Page 4: ...irt container 6 Cleaning the HEPA central filter 6 Cleaning the pre motor filter 7 Replacing the belt 7 CLEARING BLOCKAGES 8 Removing debris from the hose 8 Removing debris from the brushbar 8 TROUBLESHOOTING 9 TECHNICAL SPECIFICATIONS 10 PRODUCT GUARANTEE 11 BU 203 Guide amend Jan 2010 qxd Value 13 1 10 14 32 Page 4 ...

Page 5: ...ndle 3 Extension tube 4 Carpet height adjuster 5 Hose 6 Dirt bin release button 7 HEPA central filter 8 Power cord 9 Dirt container 10 Cable clip 11 On off pedal 12 Handle release pedal 13 2 in 1 tool dusting brush upholstery tool 14 Upper hose storage carry handle 15 Lower hose storage 16 Lower hose tool connector 17 Upper cord wrap BU 203 Guide amend Jan 2010 qxd Value 13 1 10 14 32 Page 5 ...

Page 6: ...4 ASSEMBLY Assembling your vacuum cleaner 1 2 3 4 5 6 7 8 9 10 11 12 13 14 NOTE Do not over tighten screw BU 203 Guide amend Jan 2010 qxd Value 13 1 10 14 33 Page 6 ...

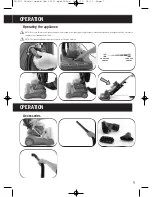
Page 7: ...e this vacuum cleaner on hard floors Intended for all carpet types only Brushbar continually rotates when in upright position Do not leave in one place for extended period of time NOTE The carpet height adjust must be set before reclining the machine BU 203 Guide amend Jan 2010 qxd Value 13 1 10 14 33 Page 7 ...

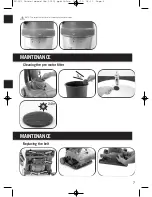
Page 8: ...AX level and performance reduces it is necessary to empty clean the dirt container TAP 24hr NOTE Failure to keep filters clean will result in loss of performance WARNING To reduce the risk of electric shock turn the vacuum cleaner off and unplug from the electrical outlet before performing maintenance troubleshooting checks BU 203 Guide amend Jan 2010 qxd Value 13 1 10 14 33 Page 8 ...

Page 9: ...ENANCE Cleaning the pre motor filter 7 MAINTENANCE Replacing the belt TAP 24hr NOTE To re attach the lid to the dirt container align arrows as shown BU 203 Guide amend Jan 2010 qxd Value 13 1 10 14 33 Page 9 ...

Page 10: ...debris from the brushbar Removing debris from the hose NOTE Disconnect the hose from the vacuum cleaner and remove any blockages found and then reconnect the hose securely BU 203 Guide amend Jan 2010 qxd Value 13 1 10 14 33 Page 10 ...

Page 11: ...ON section for correct carpet height setting for your carpet 6 Disconnect the unit from the power supply remove the floor head cover and check the belt has not detached from the motor spindle or that the belt is not worn damaged see MAINTENANCE section Dust is escaping from the vacuum cleaner 1 The filters dust bag dirt container are not fitted correctly 2 The filters dust bag are damaged 1 See AS...

Page 12: ... 203 is manufactured in compliance with the following Directives Safety 2006 95 EC Low Voltage Directive EMC 2004 108 EC Electromagnetic Compatibility Directive Waste electrical products should not be disposed of with household waste Please recycle where facilities exist Check with your Local Authority or retailer for recycling advice BU 203 Guide amend Jan 2010 qxd Value 13 1 10 14 33 Page 12 ...

Page 13: ...cover accidental damage misuse cabinet parts knobs or consumable items The product must be correctly installed and operated in accordance with the instructions contained in this manual It must be used solely for domestic purpose The guarantee will be rendered invalid if the product is re sold or has been damaged by inexpert repair Specifications are subject to change without notice The manufacture...

Page 14: ...This page has been left intentionally blank BU 203 Guide amend Jan 2010 qxd Value 13 1 10 14 33 Page 14 ...

Page 15: ...This page has been left intentionally blank BU 203 Guide amend Jan 2010 qxd Value 13 1 10 14 33 Page 15 ...

Page 16: ...BU 203 Guide amend Jan 2010 qxd Value 13 1 10 14 33 Page 16 ...

Reviews: