background image

Specification

5

Specification

Model Number

•  BVC1401

Power Supply

•  Power supply                240V AC 50Hz

•  1400W maximum power output

Filtration

•  5 Stage filtration

Features

•  1400 watt cylinder bagless vacuum cleaner

•  Aluminum telescopic tube

•  Floor brush

•  Crevice tool/brush

•  Automatic cord rewind

•  2L capacity

Summary of Contents for BVC1401

Page 1: ...INSTRUCTION MANUAL BVC1401 Cylinder Bagless Vacuum Cleaner BUSH Helpline 1800 509 394 Australia BUSH Helpline 0800 450 259 New Zealand ...

Page 2: ...ilar product but do please take time to read these instructions they have been written to ensure you get the very best from your purchase Safety is important To ensure your safety and the safety of others please ensure you read the Safety Instructions before you operate this vacuum cleaner Keep this information in a safe place for future reference Introduction Introduction 2 ...

Page 3: ... vacuum 7 Servicing 7 Parts Identification 8 Extension Tube 9 Crevice tool brush 9 Crevice tool storage fixings 9 Floor brush 10 Using Your Vacuum Cleaner 11 Preparing for use 11 Assembly 11 Switching on 11 Suction control 12 Cord rewind 13 Storage 13 Emptying the dust container 14 Clearing blockages 15 Service and Maintenance 16 Dust Container Filter Replacement 16 Pre motor Filter Replacement 16...

Page 4: ...Contents 4 Troubleshooting 18 Thermal cut out 18 Disposal 18 Guarantee 19 ...

Page 5: ...BVC1401 Power Supply Power supply 240V AC 50Hz 1400W maximum power output Filtration 5 Stage filtration Features 1400 watt cylinder bagless vacuum cleaner Aluminum telescopic tube Floor brush Crevice tool brush Automatic cord rewind 2L capacity ...

Page 6: ...leaner to pick up large objects that are likely to cause blockage and damage to the vacuum cleaner Do not stand the cleaner on its rear face while cleaning Do not run over the mains cable with your vacuum cleaner For domestic use only Industrial or commercial use invalidates the warranty Most new carpets have a running in period in which only light vacuuming is recommended This appliance is not in...

Page 7: ...serviceable parts in the vacuum cleaner Contact the BUSH helpline on 1800 509 394 in Australia or 0800 450 259 in New Zealand if you are in any doubt about the installation operation or safety of your vacuum cleaner Ensure you replace the filters when necessary Always empty the dust container when indicated on the vacuum cleaner The plug of the power cord must be removed from the wall socket befor...

Page 8: ...torage fixings 4 Crevice tool brush 5 Aluminum telescopic tube 6 Extension locking catch 7 Floor brush 8 Floor type selector 9 Hose connector release button 10 Dust container 11 Transportation wheel 12 Power On Off button 13 Floor brush storage catch 14 Carry handle 15 Cable rewind button 16 Dust container release button 17 Hose 17 ...

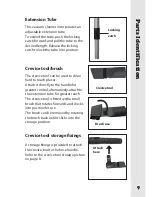
Page 9: ...laces Attach it directly to the handle for greater control alternatively attach to the extension tube for greater reach The crevice tool is fitted with a small brush that rotates forwards and clocks into position for use The brush can be removed by rotating the brush back until it clicks into the storage position Crevice tool storage fixings A storage fixings is provided to attach the crevice tool...

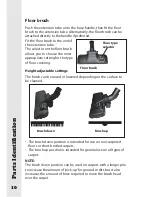
Page 10: ...type of floor covering Height adjustable settings The brush can be raised or lowered depending on the surface to be cleaned The brush down position is intended for use on non carpeted floors or short bristled carpets The brush up position is intended for general use on all types of carpet NOTE The brush down position can be used on carpets with a longer pile to increase the amount of pick up for g...

Page 11: ...for use Carefully remove your vacuum cleaner from the box You may wish to store the packaging for future use This unit is supplied with the dust container fitted Once assembled it is ready for use Assembly Push the hose connector into the hose inlet socket until it clicks into place To release the hose connector press the release buttons on top of the connector and pull it out of the hose inlet so...

Page 12: ... switch the unit On 4 After use press the Power On Off button to switch your vacuum cleaner Off then unplug from the mains supply ALWAYS UNPLUG YOUR VACUUM CLEANER WHEN NOT IN USE Suction control A thumb operated suction control is located on the hose handle This allows you to reduce or increase the amount of suction to suit the vacuuming task Maximum suction gives the best results during normal v...

Page 13: ...D TO WHIP Caution Always ensure that your vacuum cleaner is unplugged from the mains supply before using the cord rewind button Holding the power cord in one hand press the carry handle cord rewind button and carefully feed the cable back into the cleaner Storage There is a storage position for the floor brush which can be utilised when storing the vacuum cleaner Cord rewind button ...

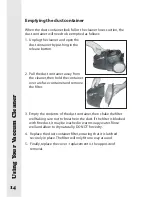
Page 14: ...er then hold the container over a refuse container and remove the filter 3 Empty the contents of the dust container then shake the filter well taking care not to breathe in the dust If the filter is blocked with fine dust it may be washed in warm soapy water Rinse well and allow to dry naturally DO NOT force dry 4 Replace the dust container filter ensuring that it is latched securely in place The ...

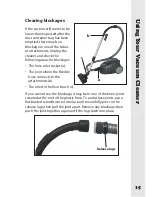
Page 15: ...ges The hose inlet socket a The joint where the flexible hose connects to the attachments b The inlet to the floor brush c If you cannot see the blockage it may be in one of the knee joints situated at the end of the plastic hose To undo these joints use a flat bladed screwdriver or similar tool to carefully press in the release lugs then pull the joint apart Remove any blockage then push the join...

Page 16: ...1 Follow the instructions on page 14 and empty the dust container 2 Hand wash the container in cool soapy water 3 Rinse thoroughly under running water to remove all particles and soap 4 Allow to dry naturally NOTE Do not machine wash the dust container and do not attempt to dry using any kind of heated appliance 5 Refit the container when dry Pre motor Filter Replacement The pre motor filter shoul...

Page 17: ...haust Filter The exhaust filter should be cleaned regularly and replaced every six to nine months depending on usage 1 Press the catch on the back of the filter housing to remove the exhaust filter cover 2 Lift out the filter from the back of the exhaust filter cover Wash the cloth filter in warm soapy water rinse thoroughly and allow to dry naturally DO NOT force dry 3 Replace the filter and refi...

Page 18: ... 3 Unblock the hose empty the dust container and clean the filters if required 4 Wait for approximately 30 40 minutes to allow the motor to cool 5 After 30 40 minutes plug in the vacuum cleaner and switch it on The vacuum cleaner should now work 6 If it still does not work wait another 20 minutes and try again If your cleaner is still not functioning correctly please contact the BUSH helpline on 1...

Page 19: ...94 in Australia or 0800 450 259 in New Zealand Have your receipt of purchase on hand This guarantee is subject to the following provisions It is only valid within the boundaries of the country of purchase The vacuum cleaner must be correctly assembled and operated in accordance with the instructions contained in this manual The vacuum cleaner must be used solely for domestic purposes The guarentee...

Page 20: ...BUSH Helpline 1800 509 394 Australia BUSH Helpline 0800 450 259 New Zealand PO BOX 6287 SILVERWATER NSW1811 www bushaustralia com au ...

Reviews: