background image

For any help concerning set up and use of your TV please call the Customer Helpline: 0345 604 0105 

17


General TV Operation


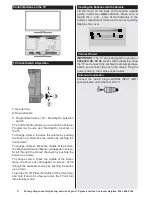
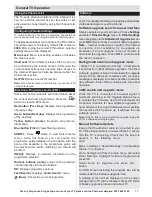
Using the Channel List


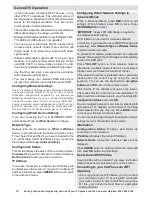
The TV sorts all stored stations in the Channel List. 
You  can  edit  this  channel  list,  set  favourites  or  set 
active stations to be listed by using the Channel List 
options.


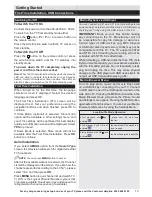
Configuring Parental Settings


To  prohibit  viewing  of  certain  programmes,  channels  and 
menus can be locked by using the parental control system.


To display parental lock menu options, the PIN number 
should be entered. The factory default PIN number is 

0000

. After coding the correct PIN number, parental 

settings menu will be displayed.


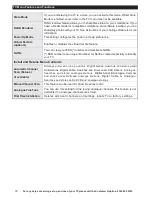
Menu Lock

: Menu lock setting enables or disables


the menu access.


Child Lock

: When Child Lock is set, the TV can only 

be controlled by the remote control. In this case the 
control  panel  buttons  will  not  work. Also,  access  to 
the Internet Browser will also be  blocked whilst the 
Child Lock is active.


Set PIN

: Defines a new PIN number.


Note: 

If the Country option is set to France, you can use 4725 

as the default code.


Electronic Programme Guide (EPG)


Some,  but  not  all  channels  send  information  about


the current and next programmes. Press the 

“       ”


button to view the EPG menu.


Red  button  (Prev  Day): 

Displays  the  programmes 

of previous day.


Green button (Next day): 

Displays the programmes 

of the next day.


Yellow  button  (Zoom)

:  Expands  programme


information.


Blue button (Filter): 

Views filtering options.


SUBTTL: 

Press 

“  ” 

button  to  view  Select  Genre 

menu.  Using  this  feature,  you  can  search  the 
programme  guide  database  in  accordance  with  the 
genre.  Info  available  in  the  programme  guide  will 
be  searched  and  results  matching  your  criteria  will 
be listed.


INFO(

İ): 

Displays,  in  detailed,  information  on  the 

programme selected.


Numeric  buttons  (Jump)

:  Jumps  to  the  preferred


channel directly via numeric buttons.


OK: 

Displays programme options.


Text (Search): 

Displays 

Guide Search

” menu.


(Now) 

: Shows the current programme.


Software 
Upgrade


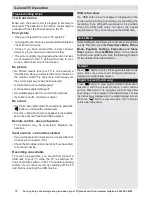
Your TV is capable of finding and updating automatically 
via the Aerial signal or over the Internet.


Software upgrade search via user interface


Simply navigate on your main menu. Choose 

Settings 

and select 

Other Settings 

menu. In 

Other Settings 

menu navigate on to the 

Software for Upgrade 

item and 

press 

OK 

button to check for a new software upgrade. 

Note  : 

Internet connection is needed. If an internet 

connection  is  not  available,  try  to  upgrade  via 
broadcast.  If  a  new  upgrade  is  found,  it  starts  to 
download the upgrade. Press 

OK 

to continue with 

the reboot operation.


Background search and upgrade mode


• While TV is connected to Internet, in background 
it searches for critical software upgrades. If a critical 
software upgrade is found it downloads the upgrade 
silently.  When  download  completes  with  success  a 
message is displayed for reboot operation to activate 
new software. Press OK to continue with the reboot 
operation.


3 AM search and upgrade mode


While  the  TV  is  connected  to  an  aerial  signal.  If 
Automatic  scanning  in  the  Upgrade  Options  menu 
is enabled, the TV wakes up at 03:00 and searches 
broadcast  channels  for  new  software  upgrades.  If 
new software is found and downloaded successfully, 
the next time the TV powers up , it will have the new 
software version.


Note: 

If the TV fails to come on after the upgrade unplug the 

TV for 2 minutes and plug in again.


Manual Software Update


Ensure that the ethernet cable is connected to your 
TV. If the ethernet cable is connected to the TV, ensure


that  the  TV  is  receiving.  Check  that  the  Good  is


present  in  the  following  menu 
path:


Menu -> Settings -> Network Settings -> Configuration


Status -> Connected


Go  to  Settings  tab  from  the  main  menu  and  select 
Other  Settings.  Highlight  Software  Upgrade  and 
press OK.


Select  Scan  for  Upgrade  and  press  OK 
button.


An  OSD  screen  including  the  progress  bar  will  be


visible under the Software 

upgrade” title.


A  warning  screen  will  be  displayed  on  the  screen, 
stating that the TV will be rebooted. Press OK button 
to finalize upgrade process and reboot TV.


Summary of Contents for LED24127DVDCNTD

Page 1: ...tions contain important information which will help you get the best from your television and ensure safe and correct installation and operation For any help concerning set up and use of your TV please call the Customer Helpline 0345 604 0105 Lines open 9am 8pm Monday to Saturday and 10am 4pm Sunday For any help concerning set up and use of your TV please call the Customer Helpline 0345 604 0105 I...

Page 2: ...taching the Stand 11 Connections 12 Switching On Off 13 First Time Installation 13 Media Playback via USB Input 13 Media Browser Menu 13 TV Menu Features and Functions 14 General TV Operation 17 Using the Channel List 17 Configuring Parental Settings 17 Electronic Programme Guide EPG 17 Software Upgrade 17 Troubleshooting Tips 18 Quick Menu 18 Teletext 18 Digital Teletext for UK only 18 Connectivi...

Page 3: ... the device is not used as intended or unauthorized modifications have been made To operate your LED TV in extreme ambient conditions may cause the damage of the device WARNING Never let people including children with physical sensory or mental abilities or lack of experience and or knowledge unsupervised use electrical device Children may not recognize dangers right The swallowing of batteries ca...

Page 4: ...ones can cause hearing loss please take care Wall Mounting optional To prevent injury this TV must be securely attached to the wall in accordance with the installation instructions if the option is available Cleaning Before cleaning unplug the TV from the wall socket Do not use liquid or aerosol cleaners Only use a soft dry cloth Batteries Warning Incorrect installation of batteries may cause batt...

Page 5: ...he remote control to the TV set NOTE The TV set should be stored in a dry and dust free room Symbols in this Instruction Book The following symbols are used in the Instruction Book as a marker for restrictions and precautions and safety instructions Note such information for security reasons WARNING If you do not pay attention to such a marked warning it can cause serious injury or death Note thes...

Page 6: ... parts including that lost remote control Any other technical issues you may need assistance with Call us today 0345 604 0105 Local call rates applies Lines open 9am 8pm Monday to Saturday and 10am 4pm Sunday Calls to Argos enquiry lines may attract a charge and set up fee from residential lines depending on your call plan tariff Mobile and other providers costs may vary see www bt com pricing for...

Page 7: ... aerial or HDMI source for 5 minutes the TV will go into standby When you next switch on the following message will be displayed Standby Cause No Signal Press OK to continue 2 If the TV has been left on and not been operated for a while the TV will go into standby When you next switch on the following message will be displayed Standby Cause No Operation Press OK to continue Features Remote control...

Page 8: ...middle of the button twice the source list will appear on screen Scroll through the available sources by pushing the button up or down To turn the TV off Press the middle of the button down and hold it down for a few seconds the TV will turn into standby mode Inserting the Batteries into the Remote Lift the cover on the back of the remote upward gently Install two AAA batteries Make sure to match ...

Page 9: ...ions quickly This menu includes Power Save Mode Picture Mode Equalizer Settings Favourites and Sleep Timer options Press Q MENU button on the remote control to view quick menu See the following chapters for the details of the listed features Notification HDMI the HDMI logo and High Definition Multimedia Interface are trademarks or registered trademarks of HDMI Licensing LLC SRS TruSurround HD is a...

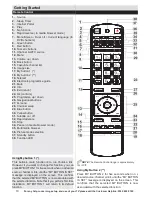
Page 10: ...ff 32 Rapid advance 33 Stop 34 Pause in media browser mode 35 Multimedia browser 36 Picture mode selection 37 Standby button 38 Function LED Using My button 1 This button s main function is to run Youtube link However if you want to change this function you can press MY BUTTON 1 for five seconds when on a desired source channel or link until the MY BUTTON IS SET message is displayed on the screen ...

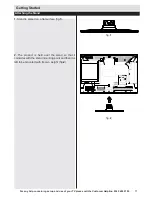
Page 11: ...stomer Helpline 0345 604 0105 11 Getting Started Attaching the Stand 1 Stand is placed on a flat surface fig 1 fig 1 2 The product is held over the stand so that it coincides with the stand mounting point and then it is left to be mounted with its own weight fig 2 fig 2 ...

Page 12: ...upplied USB Connection side CI Connection side CAM module Getting Started Connections SIDE AV SIDE AV NOTE When connecting a device via the YPbPr or Side AV input you must use a connection cables to enable connection See the illustrations above To enable PC audio you will need to use the SIDE AV CONNECTION cable s WHITE RED inputs If an external device is connected via the SCART socket the TV will...

Page 13: ...stations are stored the Channel List will be displayed on the screen If you like how the channels are sorted according to the LCN please select Yes and than press OK Press MENU button to quit channel list and watch TV LCN is the Logical Channel Number system that organizes available broadcasts in accordance with a recognizable channel sequence if available Media Playback via USB Input You can conn...

Page 14: ...red picture size from picture zoom menu Note Auto Only available in Scart mode with SCART PIN8 high voltage low voltage switching Film Mode Films are recorded at a different number of frames per second to normal television programmes Turn this feature on when you are watching films to see the fast motion scenes clearly Skin Tone Skin tone can be changed between 5 and 5 Colour Shift Adjust the desi...

Page 15: ... the TV after a certain time Sets timers for selected programmes Date Time Sets date and time Sources Enables or disables selected source options Network Settings Optional Displays network settings Optional Other Settings Displays other setting options of the TV set Menu Timeout Changes timeout duration for menu screens Scan Encrypted Channels When this setting is on the search process will locate...

Page 16: ... feature Netflix You can view your ESN number and deactivate Netflix ESN number is an unique ID number for Netflix created especially to identify your TV Install and Retune Menu Contents Automatic Channel Scan Retune If available Displays automatic tuning options Digital Aerial Searches and stores aerial DVB stations Digital Cable Searches and stores cable DVB stations Analogue Searches and stores...

Page 17: ...earch menu Now Shows the current programme Software Upgrade Your TV is capable of finding and updating automatically via the Aerial signal or over the Internet Software upgrade search via user interface Simply navigate on your main menu Choose Settings and select Other Settings menu In Other Settings menunavigateontotheSoftware for Upgrade itemand press OK button to check for a new software upgrad...

Page 18: ...selected If you cannot select an input source it is possible that no device is connected if not Check theAV cables and connections if you have tried to connect a device Recording unavailable To record a programme you should first connect a USB disk to your TV while the TV is switched off You should then switch on the TV to enable recording feature If you cannot record try switching off the TV and ...

Page 19: ...tly to the network wall outlet Connecting to a Wireless Network IMPORTANT Veezy 200 USB dongle sold separately is required to use wireless network feature To make your modem s SSID visible you should change your SSID settings via modem s software The TV cannot connect to the networks with hidden SSID For connecting to a wireless LAN network you should perform the following steps 1 Connect broadban...

Page 20: ... end an active connection IP Address If an active connection is available the IP address will be displayed on this section If you want to configure IP address preferences press GREEN button and switch to the advanced mode Configuring Wired Network Settings in Advanced Mode While in Advanced Mode press RED button to edit settings When finished press OK to save Press RETURN BACK to cancel IMPORTANT ...

Page 21: ...rmation visit www dlna org DLNA standard allows you to view and play photos music and videos stored in the DLNA media server connected to your home network Step 1 Nero Media Home DLNA function cannot be used if the server program is not install to your PC Please prepare your PC with the provided Nero Media Home programme For more information about the installation please refer to Nero Media Home I...

Page 22: ...nd Language data correctly in the First Time Installation for the proper operation of the internet portal Press button on your remote control and the portal application options will be displayed The application options will be displayed in a manner similar to the template below Note on PIP Window If you switch to portal mode while watching TV channels current programme will be displayed on the PIP...

Page 23: ...determine languages to be installed and to choose the installation path 7 Use Typical installation and click the Next button The Prerequisites screen is displayed The Nero MediaHome installation wizard checks the availability of required third party software on your PC If applications are missing they are listed and must be installed before continuing installation 8 Click the Install button As soo...

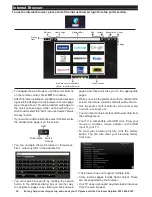
Page 24: ...s on the screen Add pages and these will take you to the appropriate pages When you scroll the pointer down to the middle of the screen the remote control s shortcuts will be shown Use the zoom shortcut buttons or the zoom menu to zoom in or zoom out You can clear cookies or clear all browser data from the settings menu Your TV is compatible with USB mice Plug your mouse or wireless mouse adaptor ...

Page 25: ... to see the Terms of Use about Skype The TV must be connected to a network for Skype connection The Skype app will alert you when someone calls whilst you are watching your TV or operating the Skype application A Skype camera can be sold separately is required to get the full benefit of Skype s features If you do not already have one you will need to purchase a camera compatible with Vesca100 to g...

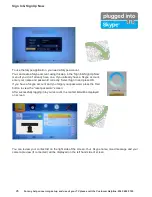
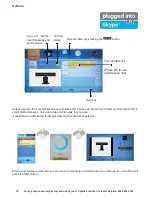
Page 26: ...f you already have a Skype account enter your name and password correctly Select Sign In and press OK If you have a Skype account and you forgot your password press the Red button to view the reset password screen After successfully logging in to your account the contact list will be displayed on screen You can review your contact list on the right side of the screen Your Skype name mood message a...

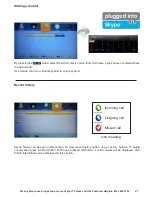
Page 27: ...ail address to find and add Use remote control or virtual keyboard to enter keyword Recent history Incoming call Outgoing call Missed call Icon meaning Skype history can be seen in this section To view recent history option use p and p buttons To delete conversation press the Red button When you pressed OK button contact review will be displayed Also Profile information can be displayed in this se...

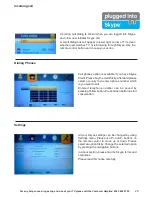
Page 28: ... list Press Ok to use video voice call Help bar Select a person from contact list screen and press OK Choose an action from the list and then press OK to start selected process Voice and video call is ready for your use If available you will see the thumbnail view of yours and other person s While conversation is activated you can mute microphone or hold the person on the line To end of the call p...

Page 29: ...ttings Call phones option is available if you have Skype Credit Please buy the credit firstly Afterward please select a country then enter a phone number which is you want to call Entered telephone number can be saved by pressing Yellow button Press Green button to start conversation All your Skype settings can be changed by using Settings menu Please use P and P buttons on the remote control to m...

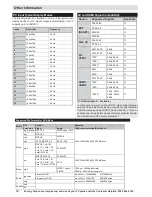
Page 30: ...some of the typical video display modes Your TV may not support all resolutions Your TV supports up to 1920x1080 X Not Available O Available In some cases a signal on the LCD TV may not be displayed properly The problem may be an inconsistency with standards from the source equipment DVD Set top box etc If you do experience such a problemplease contact your dealer and also the manufacturer of the ...

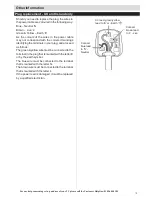
Page 31: ...oured markings identifying the terminals in your plug and proceed as follows The green yellow wire must be connected to the terminal in the plug that is marked with the letter E or by the earth symbol The blue wire must be connected to the terminal that is marked with the letter N The brown wire must be connected to the terminal that is marked with the letter L If the power lead is damaged it must...

Page 32: ...ir ducts or leave it in a car parked in direct sunlight as the temperature can rise quickly and damage the disc After playing store the disc in its case On cleaning Before playing clean the disc with a cleaning cloth Wipe the disc from the center out Do not use solvents such as benzine thinner commercially available cleaners or anti static spray intended for vinyl LPs Licence Notification This pro...

Page 33: ... Stop playing disc Eject or Load the disc Note You cannot eject the disc via the remote control While playing a file you should press STOP button three times to eject Overview of the Remote Control 1_Play 2_No function 3_Rapid reverse 4_Language selection 5_Repeat 6_Zoom 7_Numeric buttons 8_TV Menu 9_Back 10_Display DVD Menu 11_Search mode 12_Info 13_OK Select 14_Navigation buttons 15_Title 16_Roo...

Page 34: ...he scene from different angles if available Changes slide effect depends on the content X Clears digit if available My Button 1 Displays time Views main setup menu INFO İ Time counter mode selection during playback Press repeatedly to switch between modes LANG Auto language X X MENU Displays TV menu OK SELECT Enter View Play REPEAT Displays repeat options RETURN Returns back to the previous menu i...

Page 35: ...port Picture File Format smi sub ssa ass Compatible disc types Disc Types Logos Recording Types Disc Size Max Playing Time Characteristics Audio Video 12cm Single sided 240 min Double sided 480 min DVD contains excellent sound and video due to Dolby Digital and MPEG 2 System Various screen and audio functions can be easily selected through the on screen menu Audio 12cm 74 min AnLPisrecordedasanana...

Page 36: ... initial settings If this language is not recorded on the disc only the available language on the disc will be heard 10 Some DVDs may not contain root and or title menus 11 Reverse stepping is not available 12 For your convenience If you attempt to enter a number greater than the total time of the current title the time search box disappears and Input Invalid message appears on up left corner of s...

Page 37: ... spare parts including that lost remote control Any other technical issues you may need assistance with Call us today 0345 604 0105 Local call rates applies Lines open 9am 8pm Monday to Saturday and 10am 4pm Sunday Calls to Argos enquiry lines may attract a charge and set up fee from residential lines depending on your call plan tariff Mobile and other providers costs may vary see www bt com prici...

Page 38: ...e does not cover accidental damage misuse cabinet parts knobs or consumable items The product must be correctly installed and operated in accordance with the instructions contained in this manual It must be used solely for domestic purpose The guarantee will be rendered invalided if the product is re sold or has been damaged by inexpert repair Specifications are subject to change without notice Th...

Page 39: ...BUSH C Product No 10084837 D Model No LED24127DVDCNTD E Energy efficiency class A F Visible screen size diagonal approx inch cm 24 inches 61 cm G On mode average power consumption Watt 25 H Annual energy consumption kWh annum 36 I Standby power consumption Watt 0 5 J Off mode power consumption Watt 0 K Display resolution px 1920 x 1080 ...

Page 40: ...Home Retail Group 489 499 Avebury Boulevard Saxon Gate West Central Milton Keynes MK9 2NW ...

Reviews: