background image

12

13

11

12

13

11

18                                     

Installing your refrigerator


Installing your refrigerator

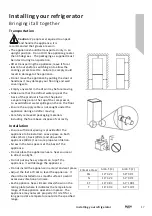
Bringing it all together

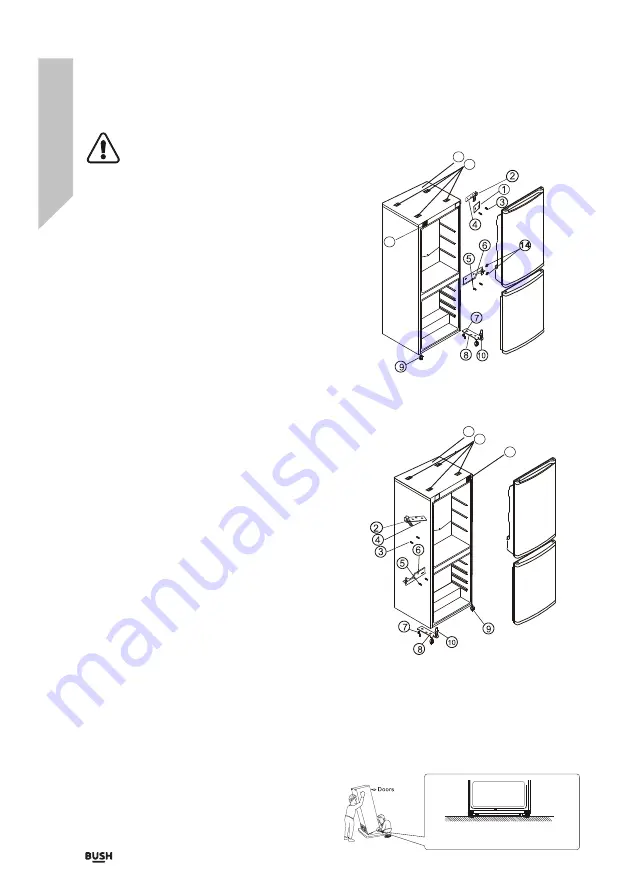
  Door Reverse

               Warning: 

Remove the main plug before 

               reversing the door.  2 people may be 
required to reverse the door. The refrigerator 
has the capability of opening the door from 
either the left or the right side. The unit is 
delivered to you with the door opening from 
the left side. To change the opening direction, 
please follow these instructions. 

Note:

 Before reversing the door swing, unplug 

the appliance from the mains or disconnect the 
electrical power supply.
 

1

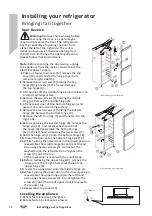
.Take out four screw cover(12),remove the top 

    cover(13),and transfer the hinge cover from 
    left side to right side(11).

2

.Remove the two screws (3) holding the top 

    hinge(4)(right side) to the frame. Remove 
    the top hinge (4).

3

.Lift the door off the middle hinge pin and place it on             

    a non-scratching surface.

4

.Remove the two screws (5) holding the middle 

    hing (6). Remove the middle hinge (6).

5

.Lift the lower door off the bottom hinge pin and 

    place it on a non-scratching surface.

6

.Remove the two screws (7) holding the bottom                    

    hinge (8). Remove the bottom hinge (8).

7

.Remove the left front leg (9) and transfer it to the                           

    right side.

8

.Before replacing the bottom hinge (8), remove the                    

    hinge pin (10)   and reverse the direction of 
    the hinge (8).Reassemble the bottom hinge 
    (6) on the left hand side using the two screws (7).

9

.Refit the hinge pin (10) into the bottom hinge (8).

10

. Lower the door onto the bottom hinge pin (10).

11.

While holding the lower door in the closed position,                           

      reassemble the middle hinge (6) on the left hand 
      side using the two screws (5). Do not put the 
      washer(14)on the left side. Do not tighten the 
      screws (5) until the top                           
      of the lower door is level with the counter top

12.

Before replacing the upper hinge (4), remove the                          

       hinge pin (2) from right hole to left hole of the 
       upper hinge (4).

13. 

Lower the upper door onto the middle hinge pin.

14.

While holding the upper door in the closed position, 

      reassemble the upper hinge (4)on the left hand 
      side using the two screws (3). Do not tighten the 
      screws (3) until the top of upper door is level with 
      the counter top.
15.Reassemble top cover(13).    

Door opening from left side

Door opening from right side

Levelling the appliance

1.

Rotate feet clockwise to heighten.

2.

Rotate feet anti clock wise to lower. 

Summary of Contents for M55152SB

Page 1: ......

Page 2: ...M55152SW M55152SB...

Page 3: ...step guidance to get you up and running quickly Sound good Then let s get started Help and Guidance We re here to help you get the most from your refrigerator Should you require any guidance a simple...

Page 4: ...our refrigerator Parts Transportation 17 Installation 17 Door Reverse 18 Electrical Connection 19 Before first use 22 Using your appliance 22 Useful information 22 Care and Maintenance General 26 Ligh...

Page 5: ......

Page 6: ...Safety information 1...

Page 7: ...Safety information Important Please read these instructions fully before installing or operating 6 Safetyinformation Before use...

Page 8: ...Safety information 7 Safety information Important Please read these instructions fully before installing or operating...

Page 9: ...8 Safetyinformation Safety information Important Please read these instructions fully before installing or operating...

Page 10: ...Safety information 9 Safety information Important Please read these instructions fully before installing or operating...

Page 11: ...10 Safetyinformation Safety information Important Please read these instructions fully before installing or operating...

Page 12: ......

Page 13: ...Getting to know your refrigerator 2...

Page 14: ...tain important information which will help you get the best from your refrigeratorand ensure safe and correct installation and operation If you require any further assistance our technical experts are...

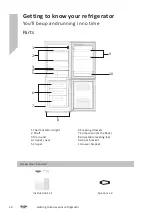
Page 15: ...be up and running in no time 1 Thermostatand light 2 Shelf 3 Drain port 4 Crisper cover 5 Crisper 9 Spacers x 2 Accessories included Instructions x 1 Parts 10 1 2 3 4 5 6 7 8 6 Freezing drawers 7 Comp...

Page 16: ......

Page 17: ...Installing your refrigerator 3...

Page 18: ...the floor Ensure the supplycable is notcaught under the appliance during and after moving Carefully removeall packaging materials including the foam base dispose of correctly Installation Ensure suffi...

Page 19: ...movethe two screws 7 holdingthe bottom hinge 8 Remove the bottomhinge 8 7 Remove theleft frontleg 9 andtransfer itto the right side 8 Beforereplacing the bottomhinge 8 remove the hinge pin 10 and reve...

Page 20: ...dapters multipleconnectors or extension cablesare not recommended The appliance mustbe connected toa 220 240 volt 50Hz ACsupply by meansof a threepin socket suitablyearthed and protected by a13 amp fu...

Page 21: ......

Page 22: ...Using your refrigerator 4...

Page 23: ...sive cooling of the compartment Set thetemperature knob at mediumposition for storing fresh food Do not mix alreadyfrozen food andfresh food 3 Storing frozen food Thefreezer compartmentis 4 Starrated...

Page 24: ...ainers in a coolplace for temporary storage Using your refrigerator Getting the most from your appliance Energy saving tips Place your fridge away fromdirect sunlight your oven orany other heatsources...

Page 25: ......

Page 26: ...Care and Maintenance 5...

Page 27: ...d to remove the dustevery year Shelves are allremovable forcleaning purpose Important Care must betaken while cleaning carrying the appliancenot to touch the bottomof the condensermetal wires at the b...

Page 28: ...aste Instead itshould be handedover to theapplicable collection point for the recyclingof electrical andelectronic equipment By ensuring this productis disposed of correctly you will helpprevent poten...

Page 29: ......

Page 30: ...Product support 6...

Page 31: ...hermostat to a coolersetting Cool warmfood beforeplacing in therefrigerator The appliance isnear a heatsource Positionthe refrigeratoraway froma heat source Question Interiorlight does notwork Answer...

Page 32: ...tes applies Line open 8am 7pmMonday to Saturday and10am 4pm Sunday For security andtraining purpose telephone calls toand from customerservice centres maybe recorded andmonitored Call fromRepublic of...

Page 33: ...8pm 365 days ayear Callmay be recorded and monitored YourBush Guarantee The guaranteeis subject to the following provisions The guaranteedoes not cover accidental damage misuse cabinet parts knobs or...

Page 34: ...Contact www bush support com Helpline 0345 257 7271 CKBSH S02 E CKBSH S02 E...

Reviews: