background image

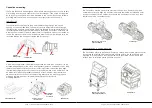
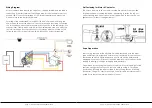
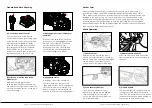
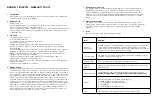
Preparation before Winching

Connect each end of the remote 

control lead to the corresponding plugs 

on the remote control and control box, 

ensuring correct alignment. Tighten 

collars to ensure reliable connections. 

For wireless controller, press and hold 

the POWER Button for 3 seconds to 

activate controller. Always disconnect 

the remote control when not in use.

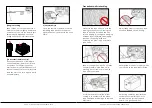
Wear appropriate gloves when 

handling rope. Hold Pull Strap and pull 

or power out enough rope to reach the 

anchor point. Keep tension on the rope 

when unspooling.

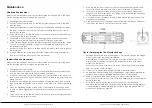
Turn the clutch handle in a clockwise 

direction to the “Disengaged” position. 

The rope is now free to be unwound 

from the drum by hand. Never 

disengage the clutch while the rope 

is under load. Do not disengage the 

clutch if powering out in Step 3.

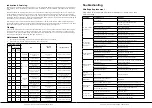
To engage, turn clutch handle in a 

counter-clockwise cirection to the 

“Engaged” position. Never engage the 

clutch while the drum is rotating. The 

drum may need to be rotated slightly 

by hand to ensure proper engagement.

1) Connect the remote control

3) Pull or Power Out the rope to the 

anchor point

2) Disengage the clutch (for freespool 

operation) 

4) Engage the clutch  

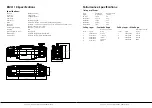
ISOMETRIC VIEW

N.T.S.

FLAT PATTERN

.

SCALE 

ISOMETRIC VIEW

N.T.S.

FLAT PATTERN

.

SCALE 

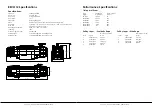
ISOMETRIC VIEW

N.T.S.

FLAT PATTERN

.

SCALE 

ISOMETRIC VIEW

N.T.S.

FLAT PATTERN

.

SCALE 

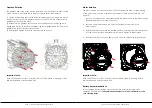
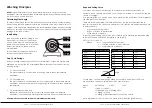
Anchor Point

Winch Operation

When choosing an anchor point, select a firm point such as a tree, stump or 

rocks. DO NOT WRAP THE ROPE AROUND THE ANCHOR POINT AND BACK ONTO 

ITSELF. Always use a tree trunk protector strap to prevent ring barking the tree and 

damage to the rope. If using a winch to retrieve another stranded vehicle, the 

rescue vehicle is considered the anchor point and should be made secure. The 

anchor point must be strong enough to hold the gross weight of the vehicle and 

be positioned to keep the fleet angle between the centre of the anchor point and 

the wire rope maintained at less than 15°. 

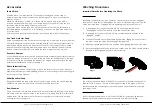
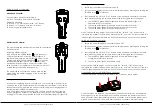
Before winching, ensure the rope is 

wound on the drum evenly. If unevenly 

wound, there is a possibility of damaging 

the rope when under load. Visually 

check rope for any signs of damage.

Lay a recovery damper or heavy 

blanket over the rope in the middle 

third of its length. If a rope failure 

occurs, the damper can prevent the 

rope from whipping.

Use a shackle to lock both ends of the 

tree trunk protector and then attach to 

the hook.

The recovery vehicle’s engine should be 

running to provide maximum power to 

the winch. The transmission should be set 

in neutral and the hand brake applied to 

prevent the vehicle from moving. 

1) Check the rope

3) Use a Recovery Damper 

 2) Attach shackle and hook  

4) Prepare Vehicle

| REVO VEHICLE RECOVERY WINCH

|REVO VEHICLE RECOVERY WINCH

Page 17

Page 18

Summary of Contents for REVO 10

Page 1: ...REVO 10S REVO 10W REVO 12S REVO 12W ...

Page 2: ...e time of print We reserve the right to make changes without notice because of continued product improvement Your Bushranger winch has been designed to give safe and dependable service if operated according to the instructions Please read and understand this manual before installation and operation of the winch Careless winch operation can result in serious injury or property damage When requestin...

Page 3: ... below 15 in the horizontal plane to straighten up the vehicle or load Always use appropriate gloves when handling the wire rope 1 It is highly recommended that prior to using this off road vehicle recovery winch that users undertake off road training including vehicle recovery Recovering immobilised vehicles is a potentially dangerous exercise and this winch is to be used with great care 2 The wi...

Page 4: ...ing Ensure the pin of the hook is secured using a correctly installed split cotter pin Fleet Angle Rope Centreline of anchor point WRONG FITMENT CORRECT FITMENT Overwound Underwound Installation It is highly recommended that installation is performed by an authorised technician familiar with this product The winch is provided with a range of bolts to suit the different mounting options Note Four 4...

Page 5: ...move the plastic control box cover by loosening 2 screws each side then align the steel mounting bracket with the 4 holes in the base plate of the control box Use 4 x M5 bolts to fasten the bracket to the base as shown below then reinstall the plastic control box cover Secure the mounting bracket to the mounting surface using appropriate bolts not included fitted through the slots in the mounting ...

Page 6: ...is may lead to stripping of bolt threads and head of socket head bolt Motor Rotation The motor can be rotated to 3 positions in 90 increments to allow for repositioning of the poles to best suit the installation requirements These positions are 0 90 and 270 Loosen and remove the 6 x bolts that secure the motor cover to the drum support Remove the motor cover from the winch Loosen and partially rem...

Page 7: ...ified torqueas outlined in the diagram below Attempting to fasten the top nut without locking the bottom nut could result in damage to the studs Do not tighten top nut without locking bottom nut Nut Fastening for Motor Contactor Rope Preparation Prior to using the rope for the first time it must be tensioned onto the drum under load to ensure a tight and uniform wrap is achieved A rope that is not...

Page 8: ...s with constant load Temperature equilibrium is never reached Starting current has little effect on temperature rise FULL DRUM MAX SPEED MIN LOAD HALF DRUM MED SPEED MED LOAD FIRST LAYER MIN SPEED MAX LOAD Required Pulling Force Your winch must be powerful enough to overcome the resistance caused by an obstacle such as moving water mud snow sand or on a steep hill as well as pulling the vehicle s ...

Page 9: ...d the load of the recovery across two points on the vehicle requiring assistance Can be used in both Snatch Strap or Winching recoveries Only bow shackles that are load rated should be used for vehicle recovery Load ratings are visible on the shackle and will be in the form of WLL working load limit or SWL safe working load The shackles or any other recovery equipment used should be sized correctl...

Page 10: ... holding the POWER button for 3 seconds 3 Press and hold the IN and OUT buttons on the new hand controller at the same time While continuing to press both buttons the following process will happen 1 Ensure that the wireless receiver is turned OFF 2 Turn on the new wireless hand controller in wireless mode by pressing and holding the POWER button for 3 seconds 3 Press and hold the IN and OUT button...

Page 11: ...ERN SCALE ISOMETRIC VIEW N T S FLAT PATTERN SCALE Anchor Point Winch Operation When choosing an anchor point select a firm point such as a tree stump or rocks DO NOT WRAP THE ROPE AROUND THE ANCHOR POINT AND BACK ONTO ITSELF Always use a tree trunk protector strap to prevent ring barking the tree and damage to the rope If using a winch to retrieve another stranded vehicle the rescue vehicle is con...

Page 12: ... winching area clear Do not allow people to remain in the area while winching Never step over a live wire rope whilst under load Avoid the remote control lead from coming in to contact with the winch rope or fairlead as damage to the lead may result Never guide a rope onto the drum with your hand Use the supplied Pull Strap A winching operation requires extra consumption of battery power so always...

Page 13: ...ross the drum and tape the end down to hold it in place Lightly tighten the set screw to squeeze the rope Do not over tighten 6 Fit the clevis hook to the thimble end of the rope and ensure the split cotter pin is correctly installed to secure the pin Wire Rope Replacement Synthetic Rope Replacement 7 Wind the red section of rope onto the drum tightly and evenly under hand tension to have a minimu...

Page 14: ...es O Synthetic rope Broken strands Visual measuring Two or more adjacent strands are cut O O Decrease in rope diameter Visual measuring 25 of nominal diameter max O Fused or melted fibres Visual Existence of abnormalities O Fastening condition of end Visual Existence of abnormalities O Clutch assembly Damaged clutch assembly Visual evidence of wear Free of wear or damage O Motor Staining damage Vi...

Page 15: ...3 64 x 92 63 5mm x 224mm 2 5 x 8 8 254mm x 114mm 10 x 4 5 IP67 24 5kg 54lb Synthetic 33kg 73lb Wire 44kg 97lb Synthetic 37kg 81 5lb Wire 49kg 108lb Performance Specifications 1st Layer of Drum Pull by Layer Synthetic Rope Pull by Layer Wire Rope Load kg lb No load 1816 4000 2724 6000 3632 8000 4540 10000 Layer 1 2 3 4 5 Layer 1 2 3 4 Line Speed mpm fpm 15 49 3 6 11 8 2 9 9 5 2 4 7 9 1 3 3 kg lb 45...

Page 16: ...arbox Side 1 43 Fourth Stage Retaining Socket Head Cap Screw M5 20 8 44 Input Shaft Bearing 1 45 Winch Mounting Nut M10 4 46 Drum Bearing 2 47 Drum Support Seal 2 48 Shaft Coupler 1 Item No Description Qty 49 Synthetic Rope 10mm x 28mm 1 50 Motor Output Shaft 1 51 Tie Bar Socket Head Cap Screw M8 25 4 52 Tie Bar Spring Washer Ø8 4 53 Tie bar 2 54 Contactor Mounting Flange Nut M5 2 55 Aluminium Haw...

Page 17: ...Bearing Anti Wear Washer 1 24 Needle Roller Bearing 1 Item No Description Qty 25 3rd Stage Rotating Ring Gear 1 26 Clutch Pin 1 27 Clutch Pin O Ring Small 1 28 Clutch Pin O Ring Large 1 29 Clutch Cam 1 30 Clutch Spring 1 31 Clutch Handle Socket Cap Screw M4 x 10mm 1 32 Clutch Spring Washer Ø4 5 33 Clutch Handle 1 34 Clutch Cam Button Head Cap Screws M4 x 12mm 4 35 Clutch Cam Flat Washer Ø4 4 36 An...

Page 18: ... Control Box Electrical Socket 1 67 Drum Assembly 1 68 Drum Support Motor Side 1 69 Motor Coupling 1 70 10K Motor Cover 1 71 Motor Cover Socket Head Cap Screw M5x50mm 6 72 10K Motor Assembly 1 73 Motor End Cover 1 74 Control Box Mounting Bracket 1 75 Wire Rope 3 8 Hook 1 76 Spring Washer Ø10 6 77 Flat Washer Ø10 6 78 M10 x 40mm Button Head Cap Screw for foot down mounting 2 79 M10 x 45mm Button He...

Page 19: ...16 8 5 185 7 3 164 9 6 5 160 6 3 63 2 5 227 8 9 602 23 7 92 3 6 254 10 0 180 5 162 3 114 3 4 5 4 HOLES 11 0 43 Performance Specifications 1st Layer of Drum Pull by Layer Synthetic Rope Load kg lb No load 1816 4000 2724 6000 3632 8000 4540 10000 5443 12000 Layer 1 2 3 4 5 Line Speed mpm fpm 16 52 4 3 2 10 5 2 4 7 9 1 9 6 2 1 5 4 9 1 3 3 Motor Current amps 47 180 230 280 320 420 kg lb 5443 12000 419...

Page 20: ...earbox Side 1 43 Fourth Stage Retaining Socket Head Cap Screw M5 20 8 44 Input Shaft Bearing 1 45 Winch Mounting Nut M10 4 46 Drum Bearing 2 47 Drum Support Seal 2 48 Shaft Coupler 1 Item No Description Qty 49 Synthetic Rope 11mm x 24m 1 50 Motor Output Shaft 1 51 Tie Bar Socket Head Cap Screw M8 25 4 52 Tie Bar Spring Washer Ø8 4 53 Tie bar 2 54 Contactor Mounting Flange Nut M5 2 55 Aluminium Haw...

Page 21: ...ch Cam Cross Pin 1 21 Gearbox Housing Second Stage 1 22 Handheld controller 1 23 Bearing Anti Wear Washer 1 24 Needle Roller Bearing 1 Item No Description Qty 25 3rd Stage Rotating Ring Gear 1 26 Clutch Pin 1 27 Clutch Pin O Ring Small 1 28 Clutch Pin O Ring Large 1 29 Clutch Cam 1 30 Clutch Spring 1 31 Clutch Handle Socket Cap Screw M4 x 10mm 1 32 Clutch Spring Washer Ø4 5 33 Clutch Handle 1 34 C...

Page 22: ...t Cover 1 Item No Description Qty 66 Control Box Electrical Socket 1 67 Drum Assembly 1 68 Drum Support Motor Side 1 69 Motor Coupling 1 70 12K Motor Cover 1 71 Motor Cover Socket Head Cap Screw M5x50mm 6 72 12K Motor Assembly 1 73 Motor End Cover 1 74 Control Box Mounting Bracket 1 75 Wire Rope 1 2 Hook 1 76 Spring Washer Ø10 6 77 Flat Washer Ø10 6 78 M10 x 40mm Button Head Cap Screw for foot dow...

Page 23: ... information and all relevant vehicle safety and compliance laws b use the Kingsley product for the purpose for which it was originally designed and in accordance with the product information and all relevant vehicle safety and compliance laws 3 Exclusions Our warranty doesn t cover a normal wear and tear b wear from the use of synthetic or wire ropes c surface finish from use d fitting the Kingsl...

Page 24: ......
Page 25: ...bushranger com au Free Call 1800 654 767 Australia only International 61 2 8700 0400 Fax 61 2 8700 0499 Email sales kingsleyenterprises com au Address 6A Brooks Road Ingleburn NSW 2565 ...

Reviews: