www.buyersproducts.com
Phone (440) 974-8888
Fax 800-841-8003
2
NEVER OPERATE THE WINCH WITHOUT INSTALLING
THE ROLLER FAIRLEAD :
Operator injury or winch damage can result if a fairlead is
not installed.
STAY ALERT:
Watch what you are doing. Use common sense. Do not
use this winch when you are tired, stressed or
WHEN
UNDER THE INFLUENCE OF DRUGS, ALCOHOL OR
MEDICATION.
DISCONNECT SWITCH:
Unplug switch when not in use.
REPLACEMENT PARTS & ACCESSORIES:
When servicing, use only Buyers Products replacement
parts. Use of any other parts will void the warranty.
WINCH WARNINGS & PRECAUTIONS
1.
Keep hands and body away from Fairlead (cable intake
slot) when operating.
2.
Secure vehicle in position before using winch.
3.
Do not exceed winch load weight capacity (see
specifications on Page 8).
4.
Make sure the winch is properly bolted to a structure
(or vehicle) that can hold the winch load.
5.
Always use proper couplings when connecting winch
cable hook to load.
6.
Do not lift items vertically. The winch is designed for
horizontal use only.
7.
Do not use inappropriate attachments to extend the
length of the winch cable.
8.
Never lift people or hoist loads over people.
9.
Never come in between the winch and the load when
operating.
10.
Do not apply load to winch when cable is fully
extended. Keep at least 5 full turns of cable on the reel.
11.
After moving an item with the winch, secure the item.
Do not rely on the winch to hold it for an extended period.
12.
Examine winch before using. Components may be
affected by exposure to everyday weathering, chemicals,
salts, and rust. Replace any worn or damaged parts
before using winch.
13.
Never fully extend cable while under load.
Keep 5
complete turns
of cable around the winch drum.
14. When loading a boat onto a trailer without reel or
side hull rollers, make sure the trailer is submerged in the
water when the boat is loaded by the winch. Attempting
to drag the boat onto the trailer while on land can cause
winch failure and possible injury.
15.
Never operate winch if cable shows any signs of
weakening, is knotted or kinked.
16.
Winch does not have a locking mechanism. Secure
load after moving.
17.
Do not cross over or under the cable while in use.
18.
Do not move vehicle with cable extended and
attached to load to pull it. The cable could snap.
19.
Use wheel chocks when parking the vehicle on an
incline.
20.
Do not hit the motor housing when the winch stalls or
stops during operation.
21.
Re-spool cable properly.
INSTALLATION
NOTE: Depending on your level of knowledge regarding
electrical wiring, you may wish to have this procedure
performed by a qualified technician.
1.
Select a mounting site: on front of vehicle, the bed of a
truck, trailer, or other suitable location
CAUTION
It may be required to use steel reinforcement plates
(not included), and/or to weld on additional bracing (not
included), depending on the desired mounting location.
Remember that the winch is designed for horizontal pull,
not vertical.
2.
Mount the Roller Fairlead to the Mounting Frame (not
included) using hardware.
3.
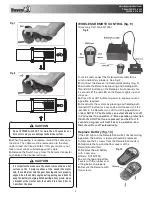
Mount Electric Winch to the Mounting Fame using
supplied hardware. (See Fig. 1)
Mounting Frame
Roller
Fairlead
Fig. 1
4.
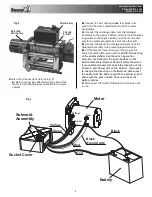
Mount Solenoid Assembly to the winch.
A.
Solenoid assembly can be mounted on top of tie
bars or over the motor. Hardware for both options is
included (See Fig. 2)
B.
When mounting solenoid assembly over the motor,
wrap plastic strap over bracket #32 and around the
motor. Clip extra material. This will help to better
secure solenoid assembly in this position.


