Quality since
1946
9049 Tyler Blvd. • Mentor, Ohio 44060
Phone (440) 974-8888 • Fax (440) 974-0165
Toll-Free Fax 800-841-8003 • buyersproducts.com
Installation Instructions
LT25
Water Cooler Rack
for Utility Landscape Trailers
—continued on other side
1
3000050
1
Water Cooler Rack, Weldment
2
3004710
2
Strap, 60" Lashing w/Cam Buckle
3
-
6
Washer, Flat 3/8 USS Zn
4
-
3
Screw, HHC 3/8-16 x 1-1/4 Gr 5 Zn
5
-
3
Nut, Nylock 3/8-16 x 7/16 Zn
ITEM
PART NO.
QTY.
DESCRIPTION
Bill of Materials
Important!
Before you begin installing:
1.
Read and understand these instructions
completely.
2
. Verify that you have received all the parts
listed in the bill of materials.
CAUTION:
Always wear safety glasses when using power tools.
WARNING! Check under the trailer and/or
fender for locations of brake lines and electrical
wiring etc., before drilling any holes. Any dam-
age to trailer during installation is installer’s
sole responsibility.
Note: The water cooler rack must be mounted
with back and bottom support or back support.
This rack is not to be mounted with bottom sup-
port only.
Utility Trailer Installation Instructions
Tools Required:
•Two 9/16" wrenches and/or sockets
•Electric drill
•13/32" drill bit
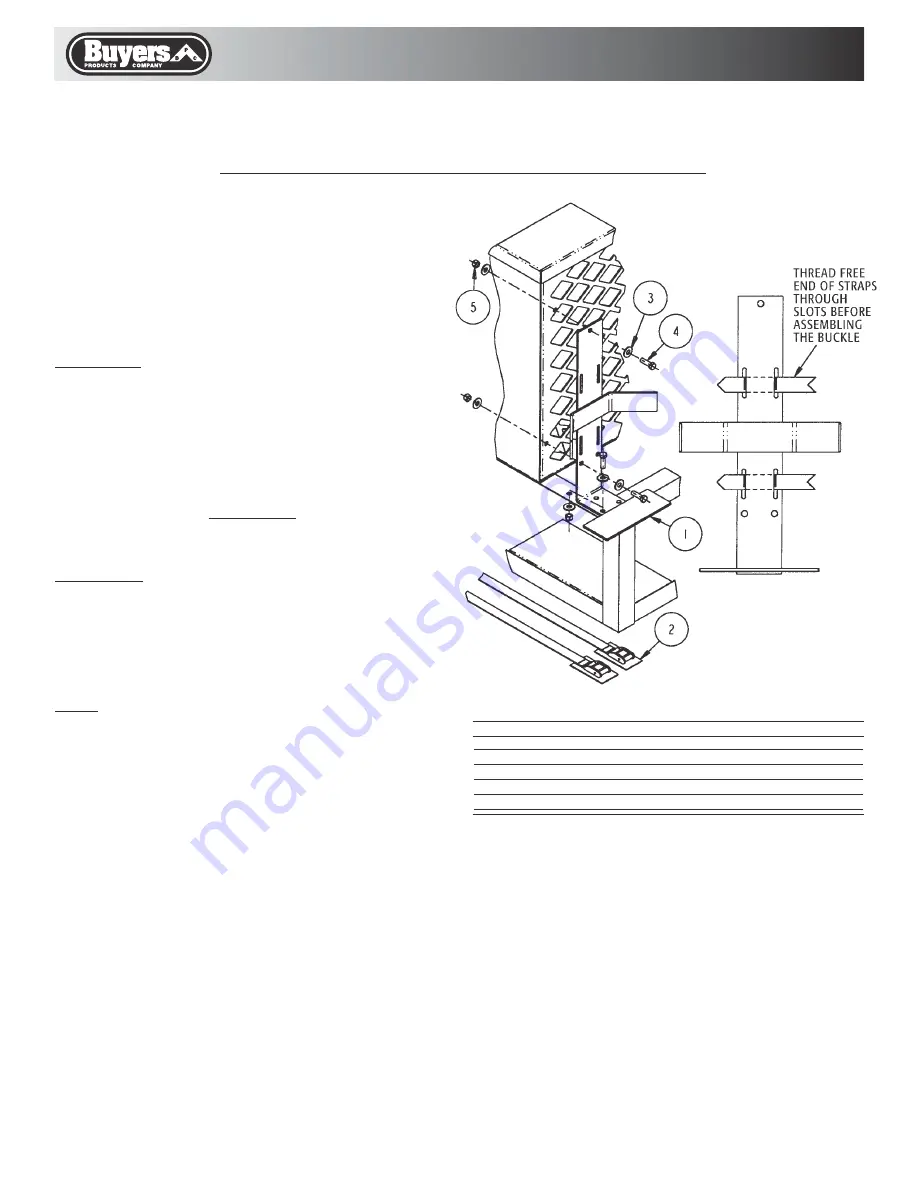
1.
Find a location on your trailer where the water
cooler rack can be mounted with back and bottom
support or back support.
Make sure the rack does
not extend past the widest part of the trailer.
Holding the rack level mark three hole locations.
2.
Drill 13/32" holes in the positions marked.
3.
Thread straps through the slots in the rack
and then the buckle as shown in the illustrations.
4.
Bolt the rack to the trailer with three 3/8-16
x 1-1/4 screws, six 3/8" flat washers, and three
3/8-16 nylock nuts and tighten.
5.
Assemble the water cooler into the rack
and tighten straps. Cut off the end of each strap
approximately 6-8" from buckle and carefully burn
the ends with a cigarette lighter to prevent fraying.


