25
GasAlertQuattro
Replacing the Sensor Filter
a
WARNING
To avoid personal injury and/or property damage, only use
sensors that are specifically designed for the detector.
Replace the sensors in a non-hazardous area.
Note: Detectors that are configured for 1, 2, or 3 gases may
contain a dummy sensor in one of the four sensor locations.
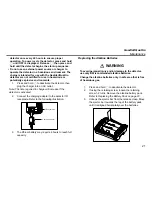
To replace a sensor or sensor filter, refer to the illustration
Replacing the Sensors on page 24
and the following
steps #1-8.
1.
Press and hold
C
to deactivate the detector. Press
the release latch, and remove the battery pack.
2.
Remove the six machine screws from the rear shell.
3.
Remove the front shell.
4.
Remove the spent sensor(s). Ensure no damage
occurs to the LCD.
5.
Insert the new sensor(s).
6.
Before reassembling the detector, ensure the sealing
surfaces on the front and rear shells is free of debris
and moisture.
7.
Reassemble the detector. Press the front and rear
shells together firmly to ensure a proper seal. Ensure
the front and rear shells have a tight, uniform 1/16 in.
(1.5 mm) seal on all sides of the detector.
8.
Replace the six machine screws using 3-4 in. lbs
torque. Do not overtighten the screws. Replace the
battery pack.
9.
New sensors must be calibrated prior to use. Wait a
period of time before calibrating in order to allow
stabilization. Calibrate the new sensor(s). Refer to
Calibration on page 10
.
Replacing the Sensor Filter
To replace the filter, refer to the illustration
Replacing the
Sensors on page 24
and the following steps #1-6.
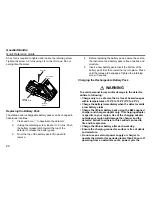
1.
Press and hold
C
to deactivate the detector. Press
the release latch, and remove the battery pack.
2.
Remove the six machine screws from the rear shell.
3.
Remove the front shell. Remove the sensor filter.
4.
Refer to the previous illustration before inserting the
new filter. Ensure the filter is laying flat and that the
holes are correctly aligned over the filter posts.
5.
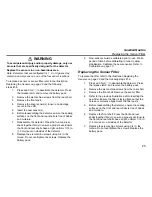
Before reassembling the detector, ensure the sealing
surfaces on the front and rear shells is free of debris
and moisture.
6.
Replace the front shell. Press the front and rear
shells together firmly to ensure a proper seal. Ensure
the front and rear shells have a tight, uniform 1/16 in.
(1.6 mm) seal on all sides of the detector.
7.
Replace the six machine screws using 3-4 in. lbs
torque. Do not overtighten the screws. Replace the
battery pack.
Summary of Contents for GasAlertQuattro 1
Page 1: ...Quick Reference Guide 1 2 3 and 4 Gas Detector ...
Page 4: ......
Page 11: ...7 GasAlertQuattro Screen Elements Screen Elements ...
Page 45: ......
Page 46: ......
Page 47: ......
Page 48: ...50104941 536 EN Rev F 2017 BW Technologies by Honeywell All rights reserved ...


