

MAINTENANCE OF VEHICLES
EPS14Pi
USER MANUAL
6
6
6
7
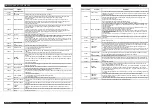
02A26
CURRENT SENS.
KO
02A27
PHASE KO
Check whether the connection among U/V/W is normal.
02A28
PUMP VMN LOW
Cause: When the machine starts, the low-end voltage of MOS transistor is 10% higher than
that of normal battery or the phase voltage is 50% higher than battery voltage.
Possible causes:
1. The wiring of the motor is incorrect or a fault is found in the circuit of the motor; check
whether the three-phase connection is correct; check whether there is electric leakage in the
motor connecting to the ground; check whether the coil of the motor is broken.
2. Replace the controller.
02A29
PUMP VMN HIGH
Cause: When the machine starts, the low-end voltage of MOS transistor is 10% higher than that
of normal battery or the phase voltage is 50% higher than battery voltage.
Possible causes
:
1. The wiring of the motor is incorrect or a fault is found in the circuit of the motor; check
whether the three-phase connection is correct; check whether there is electric leakage in the
motor connecting to the ground; check whether the coil of the motor is broken.
2. Replace the controller.
02A30
vmn low
Check the three-phase line of the motor.
02A31
vmn high
Cause: When the machine starts, the low-end voltage of MOS transistor is 10% higher than
that of normal battery or the phase voltage is 50% higher than battery voltage.
Possible causes
:
1. The wiring of the motor is incorrect or a fault is found in the circuit of the motor; check
whether the three-phase connection is correct; check whether there is electric leakage in the
motor connecting to the ground; check whether the coil of the motor is broken.
2. Replace the controller.
02A32
PUMP VMN NOT
OK
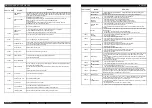
02A37
contactor closed
Check whether the master contactor adheres.
02A38
contactor open
1. The circuit of the master contactor coil disconnects.
2. The main contactor is broken.
02A40
AUX DRIV.SHRT.
Check whether the short circuit or low impedance push-pull output exists between A16 and
–BATT.
If a circuit fault appears in the driver of the logic card, replace the controller.
02A41
WRONG
BATTERY
When starting, check battery voltage with the controller and determine whether it reaches what is
allowed.
1.
Check whether the value of BATTERY VOLSIGNE on the TESTER menu is consistent with
that on the voltmeter. If not, use ADJUST BATTERY function and change the battery voltage to
match the measured value.
2.
Replace the battery.
02A42
AUX DRIV.OPEN
The driving circuit of the auxiliary coil can’t drive load. The device itself or driving coil is broken.
Replace the controller.
02A47
EVP2 NOT OK
Check whether the input voltage of NAUX2 is normal. If not, re-mark the maximum and
minimum values of NAUX2 and restart the key. Then the fault disappears.
02A48
EVP1 NOT OK
Check whether the input voltage of NAUX1 is normal.
If not, re-mark the maximum and minimum values of NAUX1 and restart the key. Then the fault
disappears.
02A49
LIFT + LOWER
1. Operation is inappropriate.
2. It is blamed for faults of lifting and descending switches.
3. Replace the controller.
i=0 ever
If the three-phase connection is correct, replace the controller.
02A50
EVP1 COIL OPEN
Check whether the coil of NAUX1 is set as the open circuit or whether the type of EVPI is set
correctly.
02A51
EVP2 COIL OPEN
Check whether the coil of NAUX1 is set as the open circuit or whether the type of EVPI2 is set
correctly.
TILLER
OPEN
When the handle input switch disconnects, the master contactor will disconnect and report an
alarm after about 30 seconds. The alarm will not disappear until the master contactor runs
again.
02A52
PUMP I=0
EVER
Check whether it is correct in the connection among power lines of the oil-pump motor; if yes,
replace the controller.
02A53
STBY I HIGH
The signal output from the current sensor, detected by the microcontroller, exceeds what is
allowed by the inactive current. Since the fault is irrelevant with peripheral components, just
replace the controller.
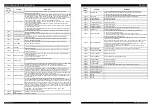
WRONG ZERO
When it starts, the feedback value on the high-end voltage of VMN is not around 2.5V. The
circuit of the controller
is broken.
Fault analysis: recommend to check the following items.
Connection inside the motor.
Connection among motor power cables.
Drain current between the motor and the forklift housing.
If the
connection of the motor is
good, check the controller and replace it.
02A54
LOGIC FAILURE
#1
It is a fault caused by low-voltage or over-voltage protection. Under a 24V system, the
controller detects that the voltage is over 45V or below 9V; while under a 45V system, it is
over 65V or below 11V.
Possible causes:
1. Check whether a short circuit appears in the circuit system, such as DC-DC, brake coil, or
check whether the input power of the controller is connected well.
2. Check whether the battery voltage is too low or too high.
3. Detect B+ and B, and check whether the power cable over the binding post of the master
contactor is tightened well.
4. Check whether calibration parameters of controller voltage are consistent with those of
actual voltage.
For the hardware circuit fault with overvoltage protection on the logic card, replace the
controller.
02A55
LOGIC FAILURE
#2
For it is a fault on the phase-voltage feedback hardware circuit of the logic card, replace the
controller.
02A56
PUMP I NO
ZERO
Replace the controller
02A60
CAPACITOR
CHARGE
When the electric lock is turned on, the controller will charge the capacitance through a power
resistor and
detect whether the capacitance is overcharged in the regulated time. If the capacitance is
in insufficient
power and voltage thereof
is still 20%
lower than that of the battery, the controller will alarm and thereby the
master contactor will not closed down. Possible causes:
1.
If peripheral devices such as DC-DC and motor, or other devices interfere with the charging of the
controller,
interference on these devices should be eliminated.
2.
If the charging resistance disconnects and faults are found in the charging circuit and
power models, the
controller should be replaced. The output signal of temperature sensor of the controller exceeds what is
allowed.
02A61
THERMIC SENS.
KO
The output signal of temperature sensor of the controller exceeds what is allowed. Since the
fault is irrelevant with peripheral components, just replace the controller.
high temperature
Measure the temperature of the controller board.
02A62
TH.
PROTECTION
Drop the temperature of the controller below 85°. If the fault still exists, it may be blamed for
the temperature sensor or the logic board of the controller itself. Replace the controller at this
time.
02A64
TILLER ERROR
Replace the controller.
02A65
MOTOR
TEMPERAT.
1. The fault appears when the temperature digital switch of the motor turns on or when the
analog signal exceeds the switch-off value.
2.When the temperature of the motor reaches 120
℃
, the controller will alarm. By this time, the
forklift still can move, but the maximum current is cut and the performance of the forklift is
reduced. When the temperature of the motor reaches 125
℃
, the motor stalls working where it
should be cooled down.
3. If the fault still exists when the motor cools down, check the circuit. If necessary, replace the
controller.
02A67
SENS MOT
TEMP KO
The output signal of temperature sensor of the controller exceeds what is allowed.
Check the value of the sensor and the connection of cables. Otherwise, it should be blamed for
the inside of the controller.
NO CAN MSG.
It is a fault about CAN communication between the steering and traction. Check the setting of
CAN connection and the software, and version information.
FAULT
CODE
ALARM
REMEDY
FAULT
CODE
ALARM
REMEDY
OM-
EPS14Pi
2019001-EN