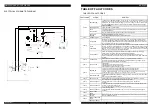


MAINTENANCE OF VEHICLES
EPS14Pi
USER MANUAL
70
71
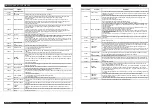
02A89
POWER MOS
SHORT
The software will check the power bridge before the master contactor closes down wherein
the power bridge will be converted into low-end power and phase voltage will be reduced to
–BATT (rise to +BATT). If the phase voltage value doesn’t vary with the indicator, the fault
signal will occur. Replace the controller.
PUMP VACC NOT
OK
Detecting time: the standby state
The alarm displays that the voltage of the accelerator is at least1V higher than the
minimum value set in the accelerator signal
(
PROGRAM VACC
)
.
Possible causes:
The upper and lower voltage limits of the accelerator are not collected. Enter the
PROGRAM VACC menu and Recollect again.
pev not ok
Not included in BYD system.
02A90
PUMP VACC
RANGE
1.
The upper and lower voltage limits of the accelerator are not collected.
Enter the PROGRAM VACC menu and Recollect again.
2.
Check whether the lift speed-sensor is connected correctly.
lift+lower
Check whether the signal of the handle switch is normal.
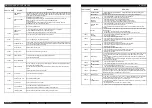
02A91
lift low active
Check the lowering switch triggered at startup.
02A92
CURRENT GAIN
The maximum current gain parameter is the factory set value, showing that the program of
maximum current adjustment parameter has not been enabled. Solutions: ZAPI technicians
set the current gain parameters correctly.
canbus ko tiller
Handle communication fault.
02A93
wrong battery
Check whether the battery works normally.
02A94
data acquistion
It is not allowed to change the set of controller parameters
when the controller works.
02A95
INPUT ERROR #2
02A96
ANALOG INPUT
When A/D input by analog signals is converted into a fixed value, the fault signal appears
where delay time exceeds 400ms.
The function is used to detect A/D converter fault or analyze conversion fault of analog
signal.
If the fault persists, replace the controller.
02A97
input error#1
Check whether A13 input is normal.
02A98
reload hm from mdi
input error#2
Check whether A14 input is normal.
02A99
SLIP_PRO
FILE
Parameter selection of SLIP PROFILE is wrong.
Check values of these parameters in hardware setup parameters.
checkup
needed
Please consult the after-sale personnel during maintenance time.
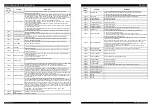
STEER HAZARD
1
、
Reduce the turning angle and restart it
.
2
、
Change the internal angle parameter setting of the
steering controller;
EMERGENCY
Close the interlock switch again after emergency reverse to eliminate this fault.
WAITING DATA
1
、
Check if CAN BUS communication cable is connected well;
2
、
Check if the communication baud rate is consistent;
EPS NOT
ALIGNED
1
、
Check if the zero-position proximity switch is in place;
2
、
Check if the selection of zero-position proximity switch is correct;
3
、
Check if the output data of zero-position proximity switch is correct;
WAITING FOR
TRAC
1
、
Check if CAN BUS communication cable is connected well;
2
、
Check if the interlock switch cable is correct;
3
、
If the interlock switch is controlled by the handle, TILLER SEITCH should be set to
HANDLE;
KEYOFF
1
、
Check whether the key switch voltage receives a low voltage pulse when the external
load is turned on;
2
、
Check if B +, B- are connected to the controller firmly;
3
、
Replace the controller if this fault is reported every time you open the key;
06A01
HIGH
CURRENT
1
、
Check if the steering controller matches the motor
;
2
、
Replace the controller
;
06A02
POWER FAILURE
#1
1
、
Check if the controller vital is normal;
2
、
Check if the power cord is firmly connected to the controller;
3
、
Check if the controller's W phase wire is connected well;
4
、
Replace the controller;
06A03
POWER FAILURE
#2
1
、
Check if the controller vital is normal;
2
、
Check if the power cord is firmly connected to the controller;
3
、
Check if the controller's U phase wire is connected well;
4
、
Replace the controller;
06A04
POWER FAILURE
#3
1
、
Check if the controller vital is normal;
2
、
Check if the power cord is firmly connected to the controller;
3
、
Check if the controller's V phase wire is connected well;
4
、
Replace the controller
;
06A05
STBY I HIGH
The controller checks whether the motor current is zero in the standby state of the vehicle.
If not, the fault will
occur and the vehicle will stop working immediately. The possible
causes are:
1
、
The terminal end is directly connected to another load rather than to a walking motor,
such as a lifting motor.
2
、
Current sensor or logic card were damaged. Replace the logic card first. If the fault still
exists, replace the power part.
06A06
D LINE SENSOR
KO
1
、
Check if the stepper motor cable is intact;
2
、
The resistance between the D line and B- is too small (close to 30Ω)
06A07
Q LINE SENSOR
KO
1
、
Check if the stepper motor cable is intact;
2
、
The resistance between the Q line and B- is too small (close to 30Ω);
06A08
EEPROM KO
If the vehicle does not walk,there is a problem with the parameter storage area,which
stops the vehicle from working. If the fault still
exists after
repeatedly closing the electric
lock, replace the logic card. If the fault disappears, the originally stored parameters will be
replaced by the wrong parameters and need to be reset.
06A09
VMN NOT OK
Replace the controller;
06A10
HIGH
TEMPERATURE
At this time, the maximum current of the controller decreases as the temperature
increases. When the temperature is 105
℃
, the controller current is reduced to zero.
The fault occurs when the chopper is in the cold state:
1. The temperature calibration parameters of the logic card are incorrect so you need to
check the parameters.
2. The temperature sensor inside the controller is faulty.
3. Check whether the temperature sensor itself is damaged.
06A00
Not included in BYD system.
FAULT
CODE
ALARM
REMEDY
FAULT
CODE
ALARM
REMEDY
OM-
EPS14Pi
2019001-EN