Section 2
– Mockup and Fit Check
BONGO bass Section 2- 5 -
a.
Mark the rear Strap Pin hole so that it is centered on the Neck/Bridge and the forward
Pin on the most forward point on the top of the Body.
b.
Drill starter holes with a 1/16 drill bit.
2.9
Check Tuner Alignment
Each tuner assembly consists of the tuner and hole collar. The tuners are attached to the headstock with
small wood screws (#8 on list of materials).
1.
Insert tuners (item #7 on Material List) into the Neck
Headstock from the back. There are two types of tuners: four
for top mount and one for bottom mount – they are not
interchangeable.
2.
Insert hole collar the over each tuner shaft from the front of
the Headstock. The collars are used for alignment and need
not be fully inserted in the Headstock – they will be glued in
place during assembly.
3.
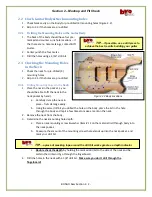
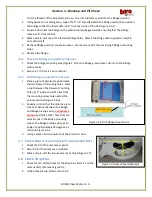
As the Headstock is curved, ensure that the Tuner shaft
alignment follows the curvature Headstock (Fig. 2.9).
4.
Check alignment of set screw holes (4) and tuner base.
5.
If alignment is incorrect or holes are not drilled, mark a single
hole location, drill a starter hole with 1/16 drill bit: recheck the alignment then mark and drill
the remaining holes.
6.
Repeat step #3-5 for the remaining 4 tuners.
2.10
String Tee Position
The hole required for the installation of String Tee will be made during the guitar final assembly.
2.11
Nut Check
No, there is no error here! The Neck should have the Nut installed – check for the nut at the junction of
the Headstock and the Neck – please contact BYO Guitar if you are short a Nut!
2.12
Mockup and Fit Check complete!
Carefully disassemble the Mockup and move on to the next step: applying the finish to your guitar!
Figure 2.9 Tuner Alignment
TIP…
the
holes may need to be widened with a peghead reamer or a round file. DO
NOT widen the holes too much
—the tuners should fit snug

