Section 4
– Assembly
BONGO bass Section 4
- 2 -
4
Assembly
After your finish has been applied and thoroughly dried, we can now assemble your guitar. In this
section we will permanently install all of the components and solder the wiring for the bridge and neck
pickups. Remove all of the protective tape from neck and the neck cavity that you might have used
during the Finishing process. Use patience and caution as you assemble your guitar as hardware and
tools will likely not enhance the finish of your guitar!
4.1
Assembling the Neck and Body
1.
Insert the Neck into the Body – the Neck should fit snugly but not forced. If you encounter
difficulty, check for finish build-up on the Neck and/or the Neck cavity. Carefully sand the build
up until the fit is proper.
2.
Using the four mounting screws & washers (#12 on material list), attach the Neck to the Body.
Use caution as to not over tighten the screws.
4.2
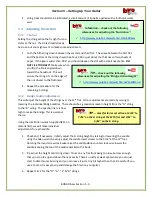
Installing the Tuners (Figure 4.2)
Each tuner consists of the tuner and collar. The tuners are
attached to the headstock with
3/8”
wood screws (refer to
Section 2.9).
1.
Place a small amount of wood glue on the inside of
the tuner hole then insert the hole collar – if the fit is
snug, use two pieces of scrap wood (1 under the
headstock, 1 on top of the collar) and gently tap with
a hammer, or compress with a “C” clamp.
2.
Repeat #1 on the remaining four tuner collars.
3.
Promptly remove any excess glue with a damp rag.
4.
Place a tuner into the hole from the back of the
headstock and secure to the guitar headstock with
the supplied screws (#8 on material list). (
Note
: one tuner is reverse from the other 4 – place it
below the headstock)
5.
Repeat #4 on the remaining four tuners.
4.3
Install the Pickguard
After removing the clear protective sheet from the Pickguard, carefully slide it around the Neck and
attach with the supplied screws (# 4 on the material list).
4.4
Installation of the Electronic Components
TIP…
use a blanket or large towel on your work area to protect your guitars’ finish
Figure 4.2 Tuners


