background image


BG-BFS 


User Manual                                                                                                                                       


Summary of Contents for BG-BFS

Page 1: ...BG BFS User Manual...

Page 2: ...d following is the polarity of the power supply drawing Handle with care Never move the camera by seizing the camera head Never rotate camera head by hand mechanical damage will occur Never power on b...

Page 3: ...ernal Interface 8 2 4 2 RS 485 interface 8 3 APPLICATION INSTRUCTION 9 3 1 VIDEO OUTPUT 9 3 1 1 Power On Initial Configuration 9 3 1 2 Video output 9 3 2 MENU SETTING 9 3 2 1 Main menu 9 4 NETWORK CON...

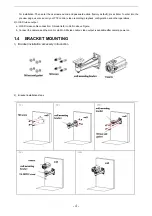
Page 4: ...od screw hole 11 2 Tripod screw hole 1 2 Power on Power on connect DC12V power supply adapter Then the power indicator light on and it is always mode 1 3 Video output 1 Video output from LAN a Network...

Page 5: ...ol video recording playback configuration and other operations 2 3G SDI video output a 3G SDI video cable connection S model refer to No5 in above Figure b Connect the camera and the monitor via 3G SD...

Page 6: ...5 2 Product overview 2 1 Product introduction 2 1 1 Dimension...

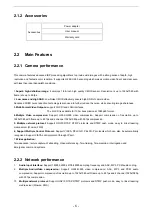
Page 7: ...ort H 264 H 265 video compression Support compression of resolution up to 1920x1080 with frame up to 60 fps and 2 channel 1920x1080p with 30 fps compression 5 Multiple network protocol Support ONVIF R...

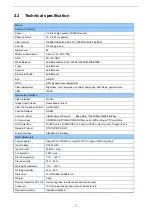
Page 8: ...utput Video Compression Format H 264 H 265 Control Interface RS 485 Control Protocol VISCA Pelco D Pelco P Baud Rate 115200 9600 4800 2400bps 5 Control Keys UP DOWN LEFT RIGHT CONFIRM keys for OSD set...

Page 9: ...8 2 4 Interface instruction 2 4 1 External Interface 1 RS485 interface alarm input output audio input interface 3G SDI output LAN DC12V power interface auto iris interface 2 4 2 RS 485 interface...

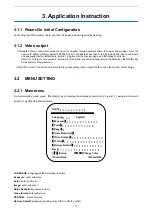
Page 10: ...restore the default by the RESET key at the bottom of the machine 2 3G SDI output Connect the monitor with the corresponding video output interface then the monitor output image 3 2 MENU SETTING 3 2 1...

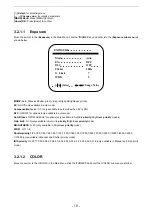
Page 11: ...or options only available in Auto Iris priority Brightness priority modes Gain limit 0 15 only available in Auto Iris priority Brightness priority mode BRIGHTNESS 0 23 only available in Brightness pri...

Page 12: ...yle Default style1 4 Color temp high middle low 3 2 1 3 IMAGE Move the pointer to the IMAGE in the Menu click the HOME and enter into the IMAGE sub menu as follow Brightness 0 14 IMAGE Brightness 6 Co...

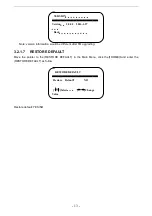
Page 13: ...TION Close 1 8 Dynamic Hot Pixel Close 1 5 3 2 1 5 Video Format Move the pointer to the Video Format in the Menu click the HOME and enter the Video Format as follow 3 2 1 6 Version Move the pointer to...

Page 14: ...rading 3 2 1 7 RESTORE DEFAULT Move the pointer to the RESTORE DEFAULT in the Main Menu click the HOME and enter the RESTORE DEFAULT as follow Restore default YES NO RESTORE DEFAULT Restore Default NO...

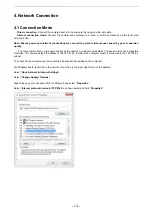
Page 15: ...ubnet as the camera to connect successfully The device will not be accessible otherwise The camera default IP address is 192 168 5 163 therefore the computer must be connected to the 192 168 5 x subne...

Page 16: ...this screen and click the bubbles for Obtain an IP address automatically and Obtain DNS server automatically to restore internet connectivity to your computer Also make sure to reconnect any ethernet...

Page 17: ...d log off NOTE There is no configuration rights for normal user login 4 2 3 Configuration Click Configuration to enter into the device parameters setting page There are the following options Local con...

Page 18: ...fect primary secondary stream default H 264 H 265 optional Video Size Set video image resolution save and reboot to take it effect main stream default 1920 1080 or 1280 720 optional default secondary...

Page 19: ...a state of brightness priority default 7 0 23 optional c Color White balance saturation color white balance sensitivity color temperature gain red and blue gain can be set White balance modes Set the...

Page 20: ...will be valid when display Save successful 4 2 5 Network configuration 1 Network port Data port set the data port the device will restart automatically after changed default 3000 0 65535 optional Web...

Page 21: ...default Optional Time Zone Set the time zone default East eight districts other time zones optional Time Type Set the time types default 24 hours optional 12 hours Time setting Set time mode to choos...

Page 22: ...art automatically 4 2 7 Logout Point Logout pop up Confirmation dialog select Yes or No choose Yes to exit the current page and return to the user login interface again 5 Camera Maintenance and Troubl...

Page 23: ...ual industry to innovate while keeping the customer in mind AV solutions can cost a pretty penny and new technology only adds to it We believe everyone deserves to see hear and feel the advancements m...

Reviews: