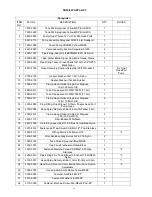
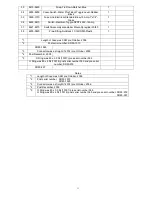
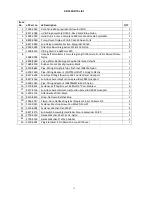
background image


16 

 
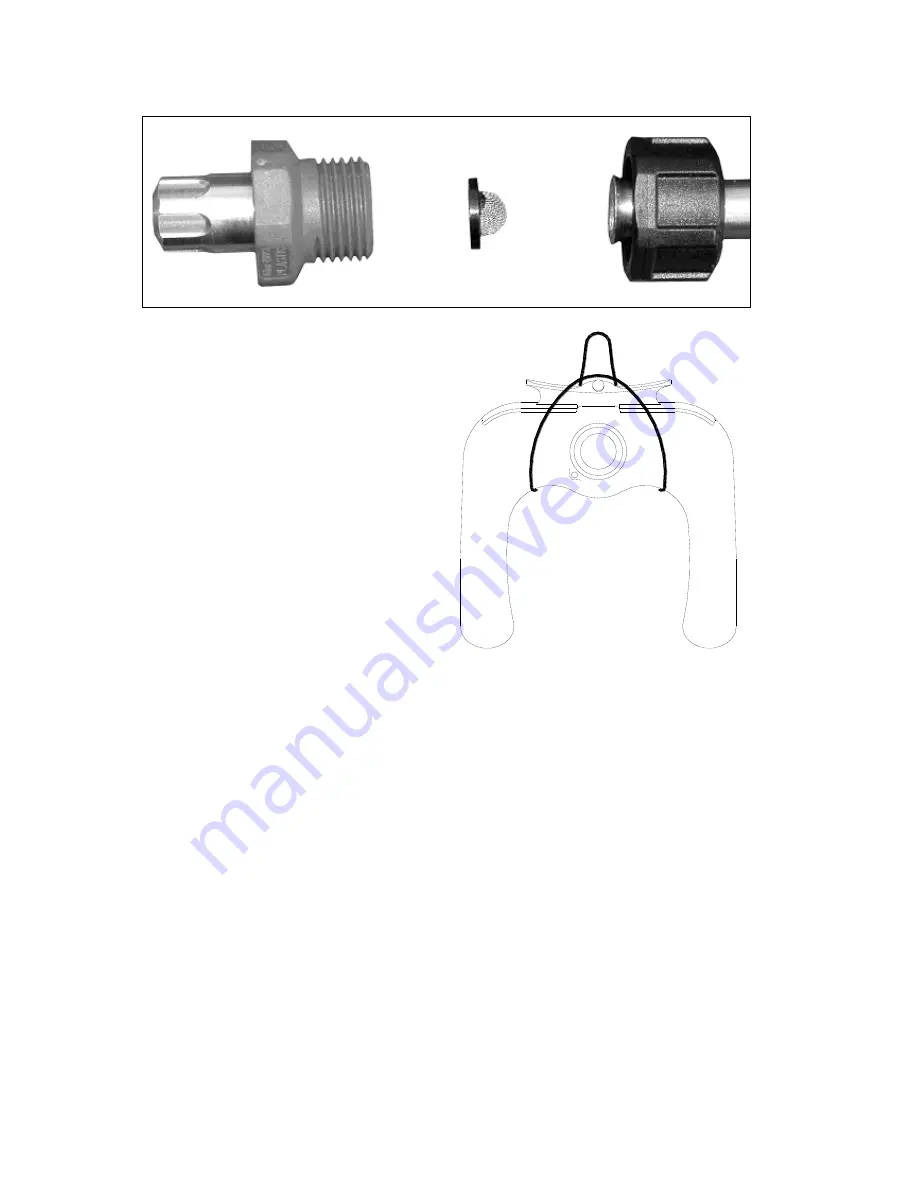
Each HGSR spray gun has a built-in filter in the spray tip. Unscrew the red spray tip holder from the lance nut to 
expose the tip filter. Pull the lance nut back to reveal the filter. Rinse under a hose and replace the filter element 
in the spray tip (the dished side faces toward the trigger). 


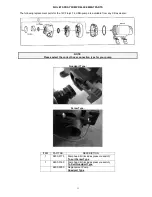
Removal of the Sprayrider™ 

1. 

Unplug  the  switch/battery  cable  at  the 
tank connector. 

2. 

Release the ratchet strap. 

3. 

Lift the Sprayrider™ off the vehicle. 

4. 

Place  the  tank  on  a  suitable  support  so 
that  the  legs  do  not  have  to  support  the 
weight  of  the  tank.  The  tank  can  be 
conveniently  hung  on  a  wall  using  a  loop 
of string around the center of the tank. 


Lubrication of the Spray Lance 

For trouble-free operation of the spray lance it is recommended that the trigger valve be lubricated with rubber 
grease  (lanolin)  at  regular  intervals.  Unscrewing  the  black  knob  on  the  topside  of  the  spray  gun  handle 
accesses the trigger valve. The interval should reflect the usage of the lance. 


Care of Protective Clothing


Protective clothing should be properly cared for. Rinse heavily contaminated clothes in the open before washing 
in the laundry. Wash and dry these clothes every day and keep them separate from other washing. 
 
Respirators need special care. Clean the respirator after spraying. Use soapy water then rinse and allow to dry 
completely  before  storing  in  a  clean  plastic  bag.  Replace  canisters  in  respirator  after  eight  hours  use.  Never 
store used canisters with the respirator. 

 
The minimum requirements for personal safety are that the operator avoids spray inhalation and does 
not allow chemicals or spray mixture to contaminate the eyes or skin.


Summary of Contents for SPRAYRIDER Generation 2

Page 1: ...R S MANUAL FOR THE SPRAYRIDER G e n e r a t i o n 2 ATV MOUNTED SPRAYERS C Dax Ltd PO Box 1010 145 Harts Road Tiritea Palmerston North Ph 06 354 6060 Fax 06 355 3199 E Mail sales c dax co nz www c dax...

Page 2: ...UFACTURERS RECOMMENDED OPERATING PRESSURES PLEASE NOTE THAT FILLING THE SPRAY TANK OR OTHER EQUIPMENT COMPLETELY AND OR THE ATTACHMENT OF ADDITIONAL EQUIPMENT TO THE ATV MAY EXCEED THE ATV S MAXIMUM L...

Page 3: ...itting the Tank 10 Ratchet Strap Vacuum Release Valve 11 Spray Gun 12 Theory of Operation Operating Instructions 13 Hand Washing Chemical Application Chemical Advice 14 Operating Hints 15 Routine Main...

Page 4: ...VDC 6A Nominal Pump 12 VDC Flojet 7 6LPM 60PSI Tanks Non Corrosive medium density UV stabilised polyethylene Ergonomically designed for maximum comfort low center of gravity and ease of filling and ev...

Page 5: ...AUS UK DTK50 Pt No 1003 DTK80 Pt No 1004 Flat Fan Tip An alternative to the adjustable tip on the spray gun Order Pt No 5300 7700 HG2 Pistol Spray Gun An alternative to the standard spray lance Order...

Page 6: ...remote controls NZ AUS UK HYD2 Pt No 1023 Double band HYD3 Pt No 1024 Triple band QuickSmart Attachment Frame C Dax s QuickSmart Attachment Frame is a universal mounting system that allows implements...

Page 7: ...he equipment misused or misapplied the equipment or the equipment has been subjected to any unusual excessive or non recommended use service or handling including as set out in this manual b where the...

Page 8: ...nting to front carriers may cause tank failure INSTALLATION All Models Unpack the sprayer and check the contents The following parts are included Some parts are packed inside the tank Tank unit with p...

Page 9: ...on onto the handlebars of the ATV Mounting the switch on the left hand side leaves your right hand free to operate the throttle control WARNING To avoid the risk of fire do not remove the fuse holder...

Page 10: ...e of the tank as possible The tie down hooks must not be located where they can rub against the tank and cause damage NB Tiedown goes through the cavity at the rear of the SR35 Vacuum Release Valve Lo...

Page 11: ...the hosetail connected to the spray hose ensure it is secured tightly so that the handle does not leak when operated do not use thread tape as this may cause the trigger handle to split Secure the sp...

Page 12: ...ition When the tank is refilled the vacuum is released by momentarily manually opening and closing a valve located at the top of the tank The tank valves will reset to the open position and allow flui...

Page 13: ...quential or otherwise arising directly or indirectly from the use of this equipment Chemical Advice C Dax Ltd or their agents cannot make recommendations or give advice as to the use of chemicals and...

Page 14: ...ll automatically bypass fluid Using the Sprayrider with a Spray Boom NOTE SR35 is a spot sprayer only and is not suitable for boom spraying All spray booms supplied by C Dax as 12Volt Sprayer accessor...

Page 15: ...lean the strainer before filling the tank with spray solution The C Dax valve assembly at the base of each leg has a stainless steel mesh filter for straining the fluid before it reaches the pump Unsc...

Page 16: ...nce it is recommended that the trigger valve be lubricated with rubber grease lanolin at regular intervals Unscrewing the black knob on the topside of the spray gun handle accesses the trigger valve T...

Page 17: ...position 5 Unscrew the four mounting screws hold the pump in place SR35 only 6 Lift out the pump Installing the Pump CAUTION To prevent leaks never use thread tape on the suction or delivery hose conn...

Page 18: ...If split found replace hose 3 If all above fails replace filter valve s Tank only partially empties One of the internal suction hoses has developed a leak Remove lid and inspect internal suction hose...

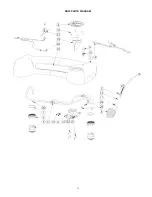
Page 19: ...19 SR50 80 PARTS DIAGRAM...

Page 20: ...13MM 100PSI 1 15m 1 14 2000 2017 Clamp Hose Oetiker Single Ear Stepless 16 6 19 8mm S S 4 15 6200 2980 Pipe Fitting Flojet Elbow 10 13mm ShankxQuad Port Pump Nylon 1 16 4100 0008 Hose Spray Delivery 4...

Page 21: ...0 5M pre October 2006 2 Post serial number SR50 1573 SR80 1925 3 Connector was a straight 14014 pre October 2006 4 Post December 2005 5 O Ring was 83 x 3 5 NI 10357 pre serial number 366 O Ring was 8...

Page 22: ...22 SR35 PARTS DIAGRAM...

Page 23: ...Tube Push Inx1 4BSPM Nylon 1 12 6200 7320 Pipe Fitting Reducer 1 2NPTMx1 4NPTF Straight Plastic 1 13 8427 6600 Sub Pipe Fitting Elbow Asy SR35 Outlet Flojet Quadport 1 14 8427 4146 Sub Hose Assembly S...

Page 24: ...n SR Nozzle Nut Red Polypropylene 3 1 4000 5020 Hand Gun SR Connector Hose Shank 10mmx1 2BSPM Black Nylon 4 1 4000 5024 Hand Gun SR Handle With Blue Trigger 25 Bar 1 2 BSPF 5 1 4000 5026 Hand Gun SR N...

Page 25: ...rom any C Dax dealer NOTE Please select the correct hose connection type for your pump Quadport Type Screw Type ITEM PART NO DESCRIPTION 1 6800 5170 Pumphead Kit includes pressure switch To suit Screw...

Reviews: