RETENTION PENSTOCK
FL SERIES
C.M.O.
Amategui
Aldea
142,
20400
Txarama
‐
Tolosa
(SPAIN)
MAN
‐
FL.ES00
Tel.
National:
902.40.80.50
Fax:
902.40.80.51
/
Tel.
International:
34.943.67.33.99
Fax:
34.943.67.24.40
cmo@cmo.es
http://www.cmo.es
page 9
REPLACING
THE
SEALING
JOINT
1.
Make
sure
there
is
absolutely
no
pressure
or
fluid
in
the
facility.
2.
Place
the
flap
(2)
in
completely
open
position.
3.
Secure
the
flap
(2)
in
this
position
using
more
than
one
system.
4.
Unscrew
and
remove
the
screws
(8)
from
the
flange
(4)
and
the
seal
(3).
5.
Remove
the
flange
seal
(4)
and
finally
the
deteriorated
seal
(3).
6.
Clean
the
seal
housing
(3).
7.
Fit
a
new
sealing
joint
(3)
with
the
same
dimensions
as
the
old
one.
8.
Return
the
flange
(4),
checking
that
it
is
correctly
fitted
and
the
seal
(3)
has
not
been
damaged
in
the
process.
9.
Remove
the
systems
to
secure
the
flap
(2)
in
open
position,
and
carefully
position
it
in
closed
position.
10.
Before
starting
up
the
installation,
check
that
the
flap
(2)
swivels
freely
on
its
turning
point;
also
check
that
the
flap
(2)
sits
perfectly
on
the
closing
seal
(3)
when
the
penstock
is
closed.
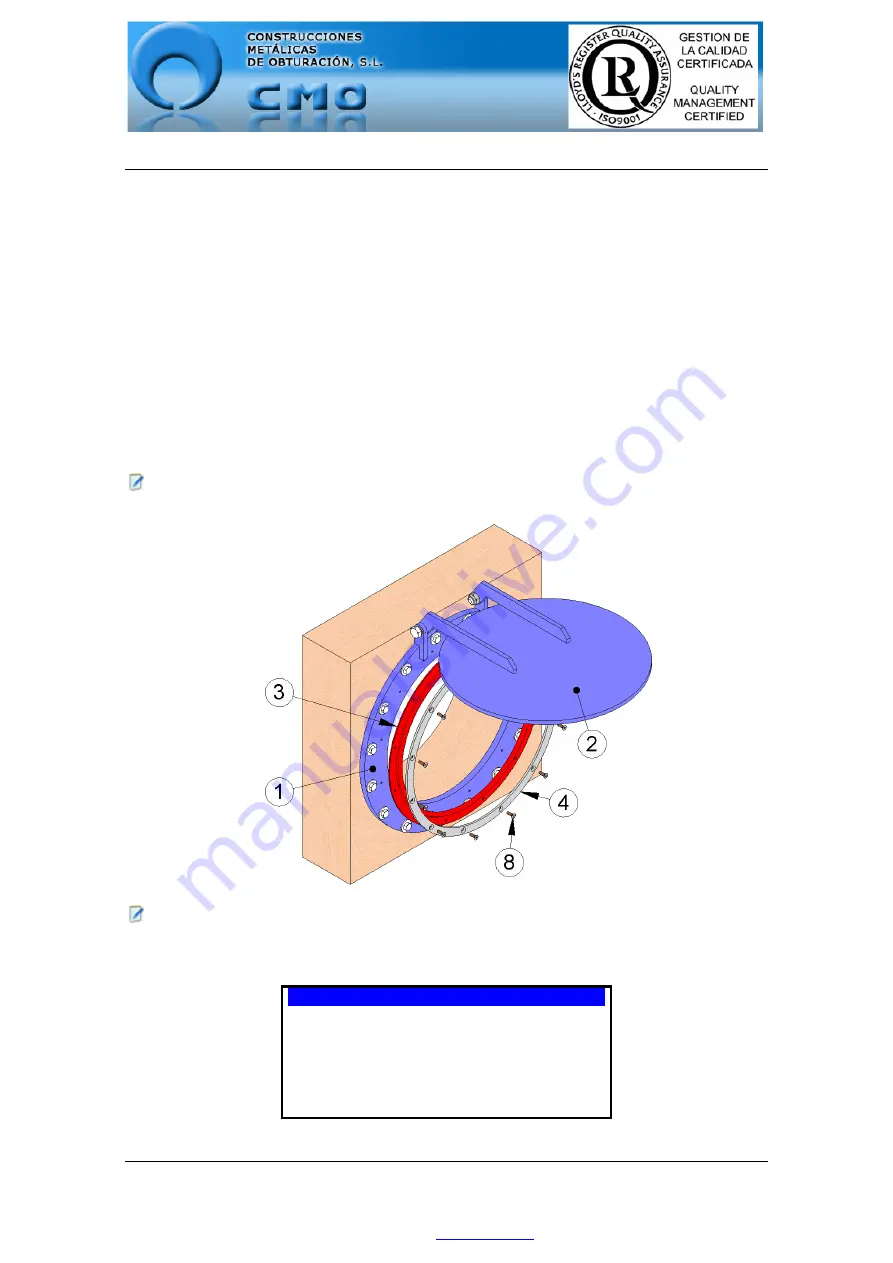
Note:
The
numbers
in
brackets
refer
to
fig.
11.
Note:
During
the
assembly
of
the
new
sealing
joint,
it
is
recommended
to
apply
petroleum
jelly
to
the
joint
to
facilitate
the
assembly
process
and
the
correct
operation
of
the
penstock
(do
not
use
oil
or
grease);
table
1
below
shows
details
of
the
petroleum
jelly
used
by
CMO:
PETROLEUM
JELLY
Saybolt
Colour
ASTM
D
‐
156
15
Melting
point
(
º
C)
ASTM
D
‐
127
60
Viscosity
at
100
º
C
ASTM
D
‐
445
5
Penetration
25
º
C
mm./
10
ASTM
D
‐
937
165
Silicone
content
None
Pharmacopea
BP
OK
table
1
fig.
11


