background image


5.


Installation 


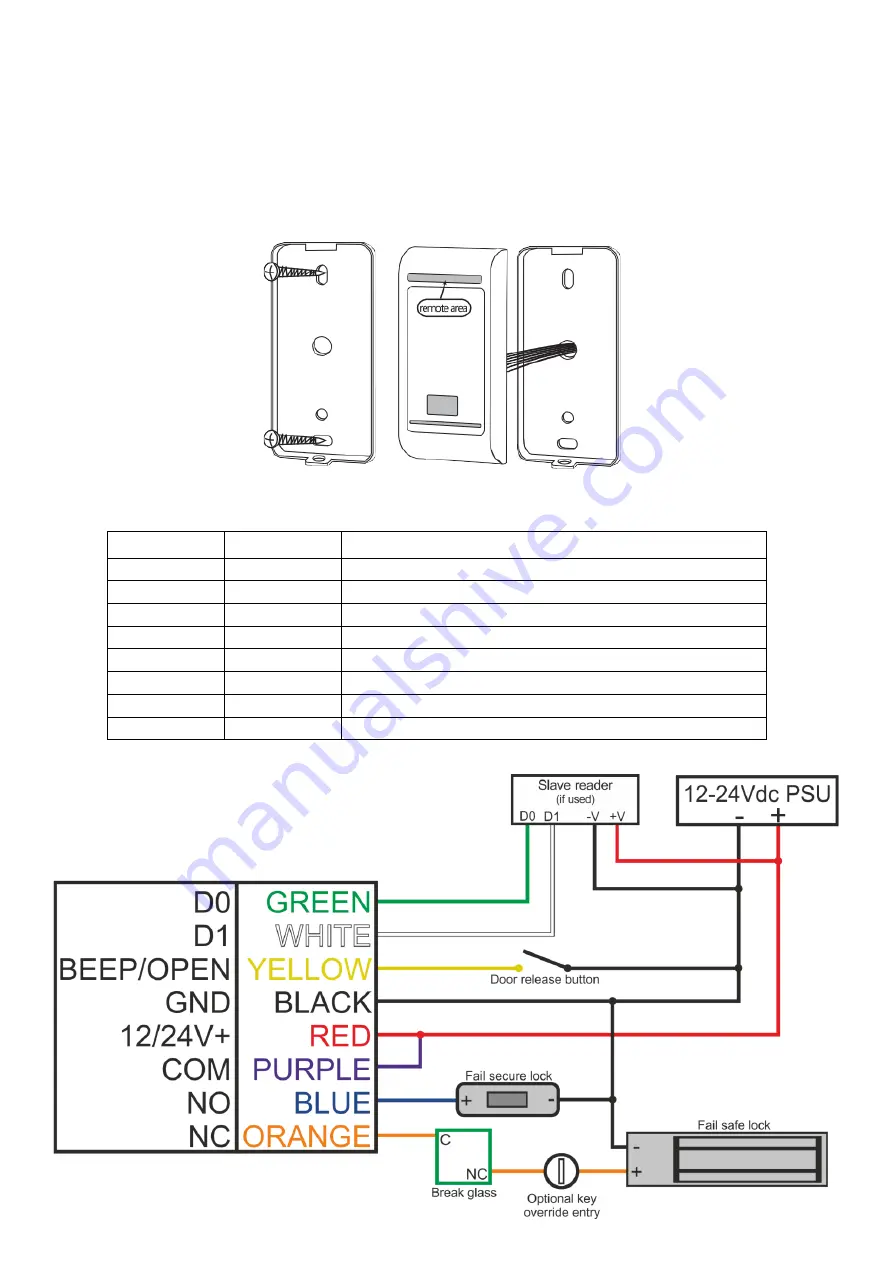
Remove back plate from the reader using security driver supplied, and use it (or the template) to 
mark the two fixing holes and one cable hole. 


Drill the cable and fixing holes. 


Secure back plate to the wall using fixing screws provided. 


Thread cable through the hole and connect wires needed, wrap unused wires with insulating tape 
to prevent short circuit. 


Fit the reader into the back plate and replace retaining screw. 


6.


Wiring 

Colour 

Function 

Description 

Green 

D0 

Wiegand input D0 (Wiegand output in reader mode) 

White 

D1 

Wiegand input D1 (Wiegand output in reader mode) 

Yellow 

OPEN/BEEP 

Exit button one end (Beeper input reader mode) 

Red 

12/24V + 

12/24V + DC regulated power input 

Black 

GND 

12/24V 

 DC regulated power input 

Blue 

NO 

Relay normally open 

Purple 

COM 

Relay common 

Orange 

NC 

Relay normally closed 


Standalone mode 

Summary of Contents for Quntek PN10

Page 1: ...t 11 Callywhite Business Park Callywhite Lane Dronfield S18 2XP 44 0 1246 417113 sales cproxltd com www quantek co uk Access Control Proximity Reader PN10 User Manual Please read the manual carefully...

Page 2: ...including altering the relay time It has low power consumption and door release button connection all these make it convenient safe and reliable 3 Features Zinc alloy anti vandal shell Waterproof con...

Page 3: ...ed wires with insulating tape to prevent short circuit Fit the reader into the back plate and replace retaining screw 6 Wiring Colour Function Description Green D0 Wiegand input D0 Wiegand output in r...

Page 4: ...a factory reset 8 Sound light indication Operation LED indicator Buzzer Standby Red Operation successful Green One Long beep Operation failed Three short beeps Admin card enter programming Two short b...

Page 5: ...ed after completing programming Note that to undertake the following programming the administrator must be logged in To add a card user Method 1 User ID number is automatically generated 1 Read card C...

Page 6: ...the administrator must be logged in To set multi card access Entry by single card default Entry by multiple cards 3 0 default 3 2 10 2 10 is the number of cards that must be read one after another to...

Page 7: ...ssue record It is highly advised to make a note of the User ID number and card number to allow for individual deletion in the future It is always best to keep a digital copy of the issue record especi...

Reviews: