background image

Service Manual

This product has passed CE certifications, including GMP Taiwan,
ISO9001, and ISO13485.

In case of any discrepancy between the illustrations and accessories in this manual

and the actual Scooter, the actual Scooter shall prevail.

The Company reserves the right to design and modify this scooter.

HS-928

S81201-92800

Summary of Contents for HS-928

Page 1: ...ding GMP Taiwan ISO9001 and ISO13485 In case of any discrepancy between the illustrations and accessories in this manual and the actual Scooter the actual Scooter shall prevail The Company reserves th...

Page 2: ...t maintenance 5 7 Main power switch maintenance 5 8 charging port maintenance 6 1 Steering frame repair 6 2 Maintenance of front cover of front box 6 3 Front shroud upper cover maintenance 6 4 Front c...

Page 3: ...ls please refer to the torque specification to prevent damage to the scooter In case of any discrepancy between the illustration in the repair manual and the actual scooter the actual scooter shall pr...

Page 4: ...om being rinsed with high pressure water in order to prevent electronic components and wiring from becoming wet and causing accidents It is strictly forbidden to clean the scooter with corrosive solve...

Page 5: ...2 Front frame parts 2 03 Rear shroud parts 2 04 Rear frame parts 2 05 Seat parts 2 06 Front wheel parts 2 07 Rear wheel parts 2 08 Brake set parts 2 09 Front slanting parts 2 10 Steering parts 2 11 Op...

Page 6: ...ONT SHROUD ASSEMBLY 1 2 C 335110 92800 COVER BUMPER FRONT 1 2 C 335110 92821 COVER BUMPER FRONT 1 3 C 313300 92820 BATTERY 12V 100Ah 1 3 C 313300 92830 BATTERY 12V 100Ah 1 3a C 313300 92800 BATTERY AS...

Page 7: ...C 336215 56000 BALLS SET 1 5 526680 52800 PADLOCK 1 6 C 331160 91500 HOLDER SEAT LOWER BRACKET 1 7 C 315618 92801 Battery Thermal Circuit Breaker 1 7a C 315300 92800 WIRE HARNESS BATTERY OUTPUT 1 8 C...

Page 8: ...2100 92820 RD2 SHROUD REAR COMP 1 2 C 345100 92800 COVER BUMPER REAR ASSEMBLY 1 2 C 345100 92810 COVER BUMPER REAR ASSEMBLY 1 2 C 345100 92820 COVER BUMPER REAR ASSEMBLY 1 2 C 345100 92831 COVER BUMPE...

Page 9: ...07 NO ITEM NUMBER DESCRIPTION QTY 1 C 341310 92800 BRACKET SUSPENSION 1 2 C 341210 92800 CUSHION COMP REAR 1 2 C 341210 92810 CUSHION COMP REAR 1...

Page 10: ...08 NO ITEM NUMBER DESCRIPTION QTY 1 571400 92801 SEAT COMP 1 2 372100 83801 SEAT BRACKET ASSEMBLY 1 3 C 372200 68600 SLIDE ASSEMBLY 1 4 C 372410 92801 HOLDER GUIDE 1...

Page 11: ...0 SUSEPNSION ASSEMBLY FRONT WHEEL L 1 4 C 334110 92800 AXLE COMP FRONT WHEEL R 1 5 C 334120 92800 AXLE COMP FRONT WHEEL L 1 6 C 333210 92800 CUSHION COMP 1 7 C 333130 92800 FRONT ROD ASSEMBLY 1 7 C 33...

Page 12: ...EMBLY 15km 1 2 C 311100 91531 MOTOR ASSEMBLY 15km 1 2 C 311100 91521 MOTOR ASSEMBLY 12 8km 1 2 C 311100 91541 MOTOR ASSEMBLY 12 8km 1 2 C 311100 92881 MOTOR ASSEMBLY 18km 928 1 2 C 311100 91550 MOTOR...

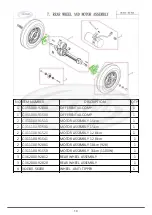
Page 13: ...11 NO ITEM NUMBER DESCRIPTION QTY 1 565310 92800 CABLE 1 2 C 365110 92801 PANEL REAR BRAKE CAM R 1 3 C 365210 92801 PANEL REAR BRAKE CAM L 1...

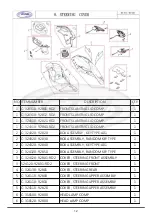
Page 14: ...92830 BOX ASSEMBLY RANDOM KEY TYPE 1 2 C 324320 92840 BOX ASSEMBLY KEY TYPE A01 1 2 C 324320 92850 BOX ASSEMBLY RANDOM KEY TYPE 1 3 C 324120 92801 RD2 COVER STEERING FRONT ASSEMBLY 1 3 524120 92801 RD...

Page 15: ...TURN SIGNAL R 1 7 C 318320 92800 LAMP ASS Y FRONT TURN SIGNAL R 1 8 C 318400 92800 LAMP ASS Y FRONT TURN SIGNAL L 1 8 C 318420 92800 LAMP ASS Y FRONT TURN SIGNAL L 1 9 525210 61500 COVER STEERING JOIN...

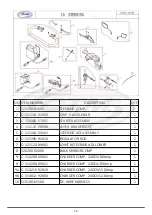
Page 16: ...5 C 325300 89003 STEERING ADJ ASSEMBLY 1 6 C 325390 92810 REGULATOR ROD 1 7 C 325120 89001 JOINT B STEERING ADJ LOWER 1 8 326200 92800 BACK MIRROR COMP 1 9 C 314280 89001 CHARGER COMP 24DCV 8 0Amp 1 9...

Page 17: ...1 6 379830 92800 GOLF HOLDER ASSEMBLY 1 7 C 331160 72800 LIFTING GEAR ASSEMBLY 1 8 7 ABL0 SHROUD TOUCH UP PAINT BL0 1 8 7 ABU1 SHROUD TOUCH UP PAINT BU1 1 8 7 ABU4 SHROUD TOUCH UP PAINT BU4 1 8 7 ABU6...

Page 18: ...16 8 7 ASG1 SHROUD TOUCH UP PAINT SG1 1 8 7 ASG5 SHROUD TOUCH UP PAINT SG5 1 8 7 AWH1 SHROUD TOUCH UP PAINT WH1 1...

Page 19: ...r switch set maintenance 5 8 charging port maintenance 6 1 Steering frame repair 6 2 Maintenance of front cover of front box 6 3 Front shroud upper cover maintenance 6 4 Front cover maintenance 6 5 Ce...

Page 20: ...ove the scooter power connector 1pcs Power cut off is completed Please follow the above steps in reverse for reassembly Sleeve Tool 10 x 1pcs Cross Tool 1 Refer to 3 1 Powering off the battery to firs...

Page 21: ...der otherwise there is a risk of danger If parking the scooter for a long time more than one week please fully charge the battery unplug the power supply and pay attention to the placement of the powe...

Page 22: ...ully charged the charging indicator light will turn green but do not stop charging immediately In order to fully charge the battery you may charge it again Charger failure and troubleshooting The powe...

Page 23: ...0 5 cells Loop displayric quantity 90 6 cells Loop display 100 6 cells Constantly on Cell number status display Charging indication Incremental frequency Remarks Action characteristics 0 5 seconds The...

Page 24: ...urn off When the warning light is on if the main power is turned off and the warning light remains on C Mode switching Please refer to the next page for detailed setting steps D Buzzer The buzzer sets...

Page 25: ...setting unit When km h is displayed it means kilometers hour When MPH is displayed it means miles hour When h is displayed no speed is displayed The display unit of mileage accumulation and trip accum...

Page 26: ...control cable connector Buzzer switch connector VR initiator controller connector Cyclometer transmission wiring connector B A A B C S C D If you have problems with the control panel please reconnect...

Page 27: ...ps in reverse for reassembly and replacement 4 6 Steering cover maintenance Cross tool x 1pcs 1 Refer to 3 1 Powering off the battery to power off the scooter 2 Turn and remove the head adjustment han...

Page 28: ...se steps in reverse for reassembly and replacement 5 2 Box back cover maintenance Cross tool x 1pcs 1 Refer to 3 1 Powering off the battery to power off the scooter 2 Please refer to 5 1 Front slantin...

Page 29: ...to 3 1 Powering off the battery to power off the scooter 2 Please refer to 5 1 Front slanting maintenance to remove the front slanting 3 Remove the turning deceleration set connector 4 Remove the lock...

Page 30: ...en reassembling to prevent it from loosening 4 3 5 5 Headlight maintenance Cross tool x 1pcs 1 Refer to 3 1 Powering off the battery to power off the scooter 2 Please refer to 5 1 Front slanting maint...

Page 31: ...ease first check whether the steering light connectors and the cable are abnormal If they have no issues the bulb may be burnt out Please replace with a new one immediately 5 7 Main power switch set m...

Page 32: ...e now can be removed Please follow the above steps in reverse for reassembly replacement 3 If the charging cover is damaged it is recommended to replace with a new one to ensure that the charging base...

Page 33: ...ove steps in reverse for reassembly and replacement 6 2 Maintenance of front cover of front box Cross tool x 1pcs 1 Refer to 3 1 Powering off the battery to power off the scooter 2 Please refer to 5 1...

Page 34: ...lower cover screws M4 x12L x2pcs 6 Remove the pedal screws M6 x 16L x 4pcs 7 The entire front shroud upper cover can now be removed Please follow the above steps in reverse for reassembly and replacem...

Page 35: ...he front end of the whole scooter This should be done with two or more people even with the aid of a mechanical hoister 33 6 5 Center bar maintenance Hex wrench 10 x 1pcs Hex wrench 8 x 2pcs Hex wrenc...

Page 36: ...the fixing screw set of the seat holder M10 x55L x 1pc 4 The entire set of the seat holder can now be removed Please follow the above steps in reverse for reassembly and replacement 4 3 5 If the seat...

Page 37: ...onnector 4 Motor pole connector 3 Remove the main controller fixing screw 4 x 25L x 2pcs 4 The entire set of controllers can now be removed Please follow the above steps in reverse for reassembly and...

Page 38: ...1 Powering off the battery to power off the scooter 2 Refer to 8 1 Front wheel maintenance to remove the right front wheel 3 Loosen the meter gear wire 4 Remove the motor gear set Please follow the ab...

Page 39: ...37 When reassembling the meter gear please note the direction of the slot before fixing If the upper control shows an abnormal rotating speed please first check whether the connectors on both ends of...

Page 40: ...10 x 1pcs 1 Refer to 3 1 Powering off the battery to power off the scooter 2 Refer to 8 3 Rear wheel maintenance to remove the rear wheel 3 Loosen the right brake plate adjustment screw It is the sam...

Page 41: ...over 3 Remove the fixing screws 3 x 10L x 2pcs on the rear cover and tail lights Please follow the above steps in reverse for reassembly and replacement 3 6 If the tail light of the scooter is damaged...

Page 42: ...scooter motor while running may be related to the motor differential mechanism Please check that first 40 9 1 Motor maintenance 9 2 Electromagnetic brake maintenance Cross tool x 1pcs 1 Refer to 3 1...

Page 43: ...bsorber set can now be removed The left right rear shock absorber can be disassembled in the same way Please follow the above steps in reverse for reassembly and replacement 3 4 5 4 The vibration of t...

Page 44: ...the battery connector 4 4 Panel wiring instruction to remove the panel wiring 4 6 Steering cover maintenance to remove the cover 5 1 Front slanting maintenance to remove the internal connector 6 3 Fro...

Page 45: ...oller connector and equipment If there is no abnormality check the main line and replace it with a new one When the main line is reassembled or replaced be sure to retie the cut open fixing straps as...

Page 46: ...bar bead bowl nut and cuts the upper fixed strap x 1pcs 5 The trace extends to the right side of the lower front frame and cuts the upper fixed strap x 1pcs 6 The brake trace goes separately from the...

Page 47: ...ease fix the fixing screws 8 1 Front wheel maintenance 8 3 Rear wheel maintenance 9 1 Motor maintenance 3 5 Charging operation instruction 7 1 Seat board maintenance 3 4 Battery connection cable disas...

Reviews: