background image

23

3 Implementing

3.16 

Adjusting the Vacuum

Via the negative pressure the label is fixed to the applicator. This vacuum needs to be strong enough to hold the 

label and cover all suction apertures. It may not be strong enough to hinder the transport of the from the printer to the 
applicator. This is dependent on the label material used. 

The default value of the vacuum is -0.6 bar.

i

Note! 
By adjusting the vacuum it is possible to prevent the label from being applied to the product. If the vacuum 
is too strong the label will not be released by the pad.  

If the vacuum is set too high the advancement of the label can be stopped before it reached the pad 
propperly.

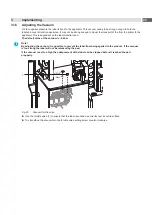
support air

vacuum

1

Fig. 20 

 Vacuum throttle valve


Use the throttle valve (1) to ensure that the label is sucked up correctly over its entire surface. 


To strengthen the vacuum turn the throttle valve setting screw counter-clockwise.

Summary of Contents for 4712

Page 1: ...Assembly Instructions 4712 Made in Germany Flag Applicator...

Page 2: ...ww cab de for the latest update Terms and conditions Deliveries and performances are effected under the General conditions of sale of cab Assembly Instructions for the following product Germany cab Pr...

Page 3: ...ence and sensors 14 3 9 Mounting the Suction Pads 15 3 10 Mounting the Blow Tube 15 3 11 Preparing the Tamp Assembly for Adjustments 16 3 12 Adjusting the Pad 17 3 12 1 Moving the Pad in Y Direction 1...

Page 4: ...1 2 Intended Use The device is manufactured in accordance with the current technological status and the recognized safety rules However danger to life and limb of the user or third parties and or dama...

Page 5: ...thorized interference with electronic modules or their software can cause malfunctions Other unauthorized work on or modifications to the device can also endanger operational safety Always have servic...

Page 6: ...e of device m m n i m 70 at cylinder stroke 300 up to mm 260 Immersion depth tongs mm 55 up to mm 1 02 Compressed air bar 4 5 Cycle time1 approx labels min 15 1 Calculated with print speed 100 mm s 2...

Page 7: ...ig 3 Product Overview 1 Cover 2 Compressed air connector 3 Shutoff valve 4 Short stroke cylinder tamp flag 5 Main stroke cylinder 6 Cylinder peel position 7 Compact cylinder Pliers 8 Tamp group 9 Blow...

Page 8: ...ure regulation unit 4 Documentation and test protocol 4 Fig 4 Content of Delivery i Note Please keep the original packaging in case the applicator must be returned Attention The device and printing ma...

Page 9: ...gon key L wrench 0 8 To adjust the sensors in contents of delivery 2 5 For matched norm parts in contents of delivery 4 Pad adjustments Changing pad Flat round nose straight To mount dismount tubes an...

Page 10: ...ghten the thumbscrew 5 5 Keep the external compressed air supply closed and close the shut off valve 10 on the applicator see illustration 6 Insert external compressed air supply 8 into the plug conne...

Page 11: ...cover 2 5 Tighten the screw 3 to fix the cover 2 in place Fig 7 Cover 3 5 Releasing the Transportation Lock Before the applicators are delivered a transportation lock 4 is mounted on the rod 1 For th...

Page 12: ...cle The flag applicator will activate in the mode of operation Blow pursued around all necessary parameters and to be able to modify The application modes can be further modified by delay settings i N...

Page 13: ...onsequently avoids faults when the label is being picked up from the printer 0 ms Support delay off Setting the switch off delay max 2 5 s for the supporting air between the end of label forwarding an...

Page 14: ...the starting position when the printer is switched on an error message will appear on the display Press the continue button on the printer to cancel the error state The applicator will move into the...

Page 15: ...nt tool 6 downwards The lower surfaces must now be aligned at an angle of 0 and at a height to each other 6 By repeatedly pressing the button the motion sequence of the applicator is run through Then...

Page 16: ...port is part of the scope of delivery Service Manual Changes can be made to the setting of the strength of the supporting air and the vacuum in order to adapt it to the label material used 3 11 Prepar...

Page 17: ...xactly on the pad 4 3 1 2 5 6 Fig 13 Aligning the pad to the dispensing plate 1 Loosen the knurled screw 3 and the set screw 4 2 Screw in the knurled screw 3 until the stamp edges 5 are aligned parall...

Page 18: ...le valve 5 The cylinder extends by spring force and is in the label transfer position 2 Loosen screws 1 on the cross beam 2 3 Move cylinder assembly 4 with the pad and crossbeam 2 along the guiding ra...

Page 19: ...essed air and pull the tube out of the throttle valve 4 The cylinder extends by spring force and is in the label transfer position 1 Loosen screw 3 on the binder 2 2 Turn the setting screw 1 so that t...

Page 20: ...he pad 6 As reference use the provided graduation ruler on the crossbeam Orientation Graduation 2 and Marking 1 3 Tighten screw 3 text side 1 text side 2 L L D x Pi D L V P Fig 17 Label parameter A mi...

Page 21: ...labelling cycles by alternately pressing the button and Enter button 4 1 Test Mode without a Print Job X X In the submenu Labelling Peel off position adjust the Peel off position in such a way that t...

Page 22: ...ve air pressure can be turned on its own axis to optimize the support for the label acquisition 1 Loosen screw 1 2 Insert the blow tube 1 into the blow tube slot B 2 Turn the blow tube so that the air...

Page 23: ...alue of the vacuum is 0 6 bar i Note By adjusting the vacuum it is possible to prevent the label from being applied to the product If the vacuum is too strong the label will not be released by the pad...

Page 24: ...dispensing plate of the printer Printing direction tamp axis 3 2 1 Fig 21 Alignment of the product to the tamp The product 3 5 must be aligned 90 to the edge of the pad 1 Because the pad with the tong...

Page 25: ...Loosen the screws 8 at the stopper 4 and screws 9 at the transport lock 3 Pull the Stopper 5 and the transport lock 3 all the way down to the slide until the shock absorber is fully pushed in X X Tig...

Page 26: ...configuration to find the best peel off offset for the initiation 4 2 Test Mode with a Print Job This method allows testing of the labeling process with actual printing data by using the button X X S...

Page 27: ...cessed labels have to be removed manually After a few seconds the printer carries out a short backfeed to position the front edge of the next label at the printing line i Note This synchronization als...

Page 28: ...as been no change of the switch state at the upper sensor at the cylinder between the start of the labelling process and the signal from the labelling position sensor Vac plate empty Label has not bee...

Page 29: ...lag Applicator Type 4712 Applied EU Regulations Applied Standards Directive 2006 42 EC on machinery EN ISO 12100 2010 EN ISO 13849 1 2015 EN 60950 1 2006 A11 2009 A12 2011 A1 2010 A2 2013 Person autho...

Page 30: ...gnated below this statement shall thereby be made invalid Device Flag Applicator Type 4712 Applied EU Regulations Applied Standards Directive 2014 30 EU relating to electromagnetic compatibility EN 55...

Reviews: