32
A 8
5.5
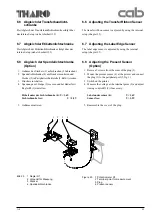
Wechsel der Leiterplatte A8
WARNUNG!
Lebensgefahr durch Strom-
schlag! Netzstecker ziehen!
Wechsel der Leiterplatte A8:
HINWEIS!
Vor Austausch der Leiterplatte A8 sollte
ein Selbsttestausdruck erstellt oder die
Einstellungen der Setup-Betriebs-
parameter notiert werden.
1. Infacekabel abziehen.
2. Gehäuse abschrauben.
3. Alle Stecker auf der Leiterplatte vorsichtig abziehen.
4. 2 Schrauben der Centronicsbefestigung abschrauben.
5. Schirmung des Einschubes der Speicherkarte
abschrauben.
6. 6 Schrauben aus der Leiterplatte A8 herausdrehen.
7. Neue Leiterplatte in umgekehrter Reihenfolge
festschrauben und Kabelstecker aufstecken.
8. Festen Sitz aller Stecker auf der Leiterplatte A8 und
die Befestigung von Leiterplatte und Centronics-
Stecker prüfen.
9. Schirmung des Einschubes der Speicherkarte
anschrauben.
10.Setup und Betriebsparameter einrichten
(Daten aus alten Selbsttestausdrucken einrichten)
11.Folgende Abgleiche durchführen:
- Abgleich Etikettenlichtschranke (Internes Setup)
- Abgleich Transferbandlichtschranke (Internes Setup)
12. Gehäuse montieren.
HINWEIS!
Bei Bedarf ein Firmware-Update durch-
führen!
5.5
Replacing the PCB A8
WARNING!
Mortal danger by electric shock!
Unplug power cord!
Replacing the A8 PCB:
NOTICE!
Before replacing the PCB A8, create a
self test printout or note the setup-
parameters for further reference.
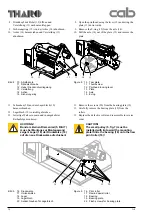
1. Remove all interface cables.
2. Remove housing.
3. Carefully remove all plugs from the PCB A8.
4. Remove 2 screws from the Centronics connector.
5. Unscrew shielding of the plug-in of the memory
card.
6. Remove 6 screws on the PCB A8.
7. Assemble new PCB A8 in reverse order, connect
cable plugs.
8. Check firm seat of all plugs on the PCB as well as
the seat of the PCB A8 and the Centronics plug.
9. Tighten screws of the shielding of the plug-in memory
card.
10. Adjust setup and operating parameters (use data from
old self-test printouts).
11. Carry out the following adjustments:
- Adjustment of label edge sensor (internal setup)
- Adjustment of transfer ribbon sensor (internal setup)
12. Reassemble the housing.
NOTICE!
Carry out a firmware-update, if
necessary!

