background image

A-7

cab - Produkttechnik GmbH / Tharo Systems, Inc.

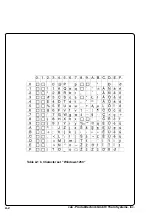
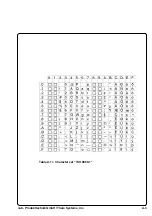
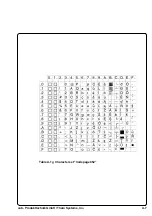
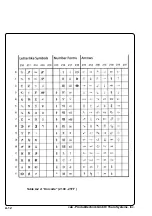
Table A-1 g  Character set "Codepage 852"

Summary of Contents for Tharo Apollo 4

Page 1: ...Edition 11 98 Transfer Printer Apollo 4 Operator s Manual ...

Page 2: ...odifiables sans prévais Gesellschaft für Tharo Systems Inc Computer und Automations 2866 Nationwide Parkway Bausteine mbH P O Box 798 cab Produkttechnik GmbH Brunswick OH 44212 0798 Postfach 19 04 D 76007 Karlsruhe Web http www tharo com tharo Haid und Neu Straße 7 D 76131 Karlsruhe E mail tharo tharo com Telefon 49 0 721 66 26 00 Tel 1 330 273 4408 Telefax 49 0 721 66 26 249 Fax 1 330 225 0099 We...

Page 3: ...pollo 4 All rights reserved including those of the translations No part of this manual nor any translation may be reproduced or transmitted in any form or by any means for any purpose other than the purchaser s personal use without the express written permission of cab Produkttechnik GmbH Karlsruhe Edition 11 98 Printed in Germany ...

Page 4: ...rint Media 16 Print Media for Direct Thermal Printing 17 Print Media for Thermal Transfer Printing 17 Label Tag Media Specifications 18 Transfer Ribbon 19 2 General Safety Instructions 20 3 Unpacking and Delivery Contents 20 4 Printer Component Location 21 5 Connecting the Printer 25 Connection to Power Supply 25 Connection to a Computer 26 6 Media Loading 27 Installing the Collection Box 27 Loadi...

Page 5: ...Label Sensor 51 Interface 52 Cut Position 53 Peel Position 54 Printhead Position 55 Heat Level 56 Printer Info 57 Set Date 58 Set Time 59 Character Set 60 Format Card 61 Copy Memory Card 62 Backfeed 63 Debug Mode 64 Tear off Position 65 Pause Reprint 66 10 Self Test Test Print 67 Start of the Test Print 67 Explanation of the Self Test Printout 68 11 Printer Info Display 72 Viewing the Printer Info...

Page 6: ...3 Appendix B Pin Assignment of the Interface Connectors B 1 Pin Assignment of the Serial Interface Connectors B 1 Interface Cable for RS 232 B 2 Interface Cable for RS 422 RS 485 B 3 Pin Assignment of the Parallel Interface Connector B 4 Centronics Interface Cable B 4 Appendix C Error Messages Problem Resolution C 1 Correctable Errors C 1 Irrecoverable Errors C 2 Error Messages C 3 Appendix D Main...

Page 7: ...7 cab Produkttechnik GmbH Tharo Systems Inc This page is intentionally left blank ...

Page 8: ... and cabling specifications Furthermore comments on possible error messages and printer maintenance are included Note the directions for use on recommended material and comments on maintenance in order to avoid damage and premature failure of your Apollo 4 Every effort has been made in the creation of this manual to provide as much information as possible in an understandable manner We welcome you...

Page 9: ... Macintosh Computer is a product of Apple Computer Inc Microsoft is a registered trademark of Microsoft Corporation Bitstream is a registered trademark of Bitstream Inc Speedo is a registered trademark of Bitstream Inc TrueType is a registered trademark of Apple Computer Inc Easylabel is a registered trademark of Tharo Systems Inc ...

Page 10: ... printhead might be damaged 3 Use proper label material with a smooth surface only A rough surface will affect the printhead and may cause damage and reduce its operating life 4 Clean the printhead regularly with a special printhead cleaning pen or an isopropyl alcohol soaked cotton swab 5 Print with the lowest possible printhead temperature Careful use will allow you to print approximately betwee...

Page 11: ...r line With the Speedo and TrueType fonts Apollo provides a wide range of different typefaces The use of scaleable fonts and their flexibility in width and height allows exceptional flexibility in label design to suit any requirements Additional printing features include reverse italic bold underlined and rotated characters The operation and usage of the Apollo is simple and comfortable All printe...

Page 12: ...tage Directive 73 23 EEC EC Machinery Directive 89 392 EEC EC Electromagnetic Compatibility Directive 89 336 EEC foll 93 31 EEC FCC Apollo 4 complies with the requirements of the FCC regulations part 15 for class A computers Under disadvantageous circumstances the operation of these devices may cause interference with radio or TV reception which has to be eliminated by the operator ...

Page 13: ...8 EBCDIC Macintosh Supports all Western and Eastern European Latin characters Font size 035 to 5 in 9 128 mm For scaleable fonts width and height are individually changeable For Bitmap fonts the size is selectable up to a factor of 10 Font style Reverse bold italic underlined mirror inverted outlined grey Font rotation Bitmap fonts Bar codes 0 90 180 or 270 Scaleable fonts optional texts in circul...

Page 14: ...r 3 in 74 mm Core diameter 1 in 25 mm Inkside in or inkside out Backfeed In order to always start a print job from the front edge of the first label the label strip may be fed back after the completion of the previous print job Control features Paper ribbon out Control panel 4 Function keys with LED display LCD can be set to display in 6 different languages Backlit LCD with 2 lines of text 16 char...

Page 15: ...d via interface Alternatively the printer is able to read cards which was written on using PC card drives of computers lap tops etc PCMCIA 2 1 conforming sRAM cards or Flash EPROM cards are accepted The maximum capacity for Apollo 4 is 16 MegaByte Using a memory card the printer can be operated without being connected to a computer which represents a great advantage regarding the flexibility Keybo...

Page 16: ...wide range of opportunities for usage The Apollo 4 is able to print on labels and continuous paper with a maximum supply roll diameter of 8 in 200 mm The minimum core diameter is 1 5 in 40 mm The printer can also process fanfold label material The ability of label edge recognition which guarantees the precise position of the printer output is accomplished by a moveable photocell This sensor is con...

Page 17: ... of the labels should be very smooth to avoid a sandpaper effect on the printhead 3 Always choose material which can be printed on with the lowest possible heat level The greater the heat level the shorter the life of the printhead Moreover with highest heat levels the phases of heating up and cooling down extend This may have a negative effect on the print quality especially if a high print speed...

Page 18: ... A Label width 1 25 4 6 116 B Width of silicon liner 1 25 4 6 116 C Label length Apollo 4 200 C 2 5 37 2 945 Apollo 4 300 C 2 5 16 8 427 D Gap between labels Apollo 4 200 C 08 2 37 2 945 Apollo 4 300 C 08 2 16 8 427 E Label thickness 0024 06 01 25 F Thickness of silicon liner 0024 06 01 25 G Distance of the first printing position from the edge of the silicon liner 08 2 H Distance of the label sen...

Page 19: ...r transfer ribbons also tend to lose parts of the coating which leads to accumu lating dirt on the printhead and the sensors With some ribbons the color rubs off and soils the printhead All of these effects contribute to poor print quality We have carried out numerous tests with many different ribbons and we recommend you use transfer ribbons made by well known brand manufacturers only Depending o...

Page 20: ...essory or connecting the printer to a computer etc Also switch power off on all appliances before disconnecting Do not expose the printer to any moisture or use in damp or wet areas The printer will operate with the cover open if necessary This is not recommended as moving or rotating parts become accessible Keep long hair jewelry loose clothes away from the moving parts During the print process t...

Page 21: ...k GmbH Tharo Systems Inc 1 2 3 1 2 3 4 Apollo 4 200 Apollo 4 300 Apollo 4 200C Apollo 4 300C 5 4 Printer Component Location 1 Display 2 Function keys with indicator LEDs 3 Cover 4 Cutter 5 Collection box Fig 4 a Front view ...

Page 22: ...4 Knurled knob 5 Media hub 6 Media retainer 7 Media retainer knurled head screw 8 Media guide 9 Media assist bar 10 Cutter locking lever Apollo 4 200C and Apollo 4 300C only 11 Cutter Apollo 4 200C and Apollo 4 300C only 12 Collection box Apollo 4 200C and Apollo 4 300C only 10 12 Fig 4 b Side view Apollo 1 with cover open ...

Page 23: ... 2 1 3 4 5 7 Apollo 4 200 Apollo 4 300 Apollo 4 200C Apollo 4 300C Fig 4c Detailed view of the print mechanism 1 Thermal printhead 2 Prinhead lever 3 Label edge sensor 4 Printhead levelling adjustment screw 5 Media feed roller 6 Tear off plate 7 Ribbon shield ...

Page 24: ...c 1 2 3 5 4 8 7 6 Fig 4 d Back view 1 Memory card module slot 2 Input voltage selector Fuse holder 3 Input voltage selector cover 4 Power switch 5 Power supply connector 6 Serial interface port 7 Parallel interface port 8 Slot for fanfold paper ...

Page 25: ...u have changed the operating voltage of your printer the fuses need replacing as stated below 230V 2 x T 1 6A 115V 2 x T 3 15A When delivered the correct fuses for the pre selected operative voltage are installed You will find the necessary fuses for the other voltage in the accessories package Slide the voltage selector back into the power supply module so that the correct voltage is visible in t...

Page 26: ...tronics interface which offers a faster transfer of data than the serial interfaces Therefore we recommend you use the parallel interface for those applications where a large number of loadable fonts or complex graphics have to be printed For the Centronics interface use the 36 pin interface connector 1 Select the required interface settings using the Setup procedure see Chapter 9 and connect the ...

Page 27: ...ferent positions dependent on the label length and the required stack hight For that there are two pairs of holes 5 6 in the bracket 3 They may be used for mounting alternatively 1 Draw the sliding bracket 2 to extend the box to the maximum size After that the elongated holes 8 are accessible 2 Push the hex wrench 1 thru the elongated holes 8 and fix the collection box with the screws 4 included i...

Page 28: ...bels The broken dotted line shows the media path of fanfold paper 6 4 Swing the media retainer 4 clockwise to the media hub 3 and push it inwards until it rests against the side of the label roll Tighten the knurled screw 5 5 Slide the media guide 7 into its outermost position 6 Unroll a length of label stock from the media roll and feed it through as shown in Figure 6 b c It is particularly impor...

Page 29: ...fter label loading relock the cutter 9 Slide the media guide 7 back towards the edge of the media strip 10 Turn the lever 1 counterclockwise until it stops and thereby lock the printhead 10 11 At devices with integrated cutter it is recommended to press the key after switching on the printer This way the label feed will by synchronised for the first print job If you do not use the printer for an e...

Page 30: ...ide of the printhead In Figure 6 d the solid line shows the path of inside wound ribbon and the broken line represents the path of outside wound ribbon 3 Turn the knurled knob 7 until offering resistance and so jam fast the transfer ribbon 5 at the ribbon supply hub 6 4 Slide an empty cardboard core 2 onto the ribbon take up hub 3 and jam fast it by turning the knurled knob 4 5 From the side feed ...

Page 31: ...port 4 may be adjusted Adjust printhead support as follows 1 Loosen the locking screw 2 2 Move the locking screw 2 as required within the adjustment slot 3 This will cause the cam shaped printhead support 4 to rotate in effect providing a higher or lower base on which the printhead mounting 1 rests 3 It is convenient to use the position 2a to printout large labels The printhead support 4 is total ...

Page 32: ... should be made even from the left to the right by moving the ribbon shield 4 up or down 1 Loosen the adjustment screw 3 2 Shift the transfer ribbon shield 4 sideways into the direction of the wrinkle Moving it to the left will increase the tension on the left Use the scale 2 provided to monitor the adjustments made If the screw is in position 1 the tension is highest on the outside and if it is i...

Page 33: ...rovides the operator with the actual information concerning the current printer mode and label processing The indicator LEDs support the information shown in the display by indicating which keys have to be pressed e g in the event of a fault On the following pages you will find descriptions of the system modes of the Apollo 4 the related indications by the LCD display and the LEDs as well as a des...

Page 34: ...the bottom line of the display LED Display LED ONL on Function Keys ONL key Switch into OFFLINE mode LED ONL off FF key Provides label feed The leading edge of the next label to be printed is in print position CAN key Deletes data of the previous print job in internal memory Following that Pause reprint is not available see PSE key PSE key Repeats the print of the last label after the previous pri...

Page 35: ...s of the printer will be shown see also Chapter 11 LED Display The display is blank Function Keys ONL key Switch into ONLINE mode LED ONL on FF key Provides label feed The leading edge of the next label to be printed is in print position CAN key Switch into LABEL FROM CARD mode only if memory card is installed and formats are stored on it PSE key Display shows current printer mode Printer info see...

Page 36: ... current number of printed labels During the transfer of data a rotating pointer appears in the right hand corner of the lower display line LED Display LED ONL on Function Keys CAN key short pressing Cancels the current print job Switch to the next job which is available in the input buffer longer pressing 1s Cancels the current print job Clears the input buffer LED CAN blinks Switch into ONLINE m...

Page 37: ...unction keys in PAUSE mode FF key Provides label feed The leading edge of the next label to be printed is in print position CAN key short pressing Cancels the current print job Switch to the next job which is available in the input buffer longer pressing 1s Cancels the current print job Clears the input buffer LED CAN blinks Switch into ONLINE mode LED ONL on PSE key Continues the current print jo...

Page 38: ...g labels of the current print job LED Display LED CAN on LED PSE is flashing If an applicator is connected LED FF is flashing Function Keys CAN key short pressing Cancels the current print job Switch to the next job which is available in the input buffer longer pressing 1s Cancels the current print job Clears the input buffer LED CAN blinks Switch into ONLINE mode LED ONL on PSE key Continues curr...

Page 39: ...ff again If the fault remains contact Technical Service System Mode FAULT IRRECOVERABLE While switching on the printer or during printing a fault has occured which cannot be cleared by the operator without cancelling the current print run e g hardware fault Display The display shows the type of fault LED Display LED CAN is flashing Function Keys Table 8 f Function keys in mode FAULT IRRECOVERABLE ...

Page 40: ...roceeds to the ONLINE mode or otherwise the printer switches to system mode FAULT IRRECOVERABLE Display The top line of the display shows the version of the printer APOLLO 4 300 The bottom line of the display shows the numbers 123456 one after the other depending on the progress of the several test steps LED Display All LEDs flash up once briefly Function keys The function keys have no effect ...

Page 41: ...d below either press both keys the key and the key simultaneously when switching on the printer and keep them pressed down until the system test is completed or in ONLINE mode press both keys the key and the key simultaneously for at least 5 seconds In SETUP mode various printer parameters can be specified to suit the current print requirements for details see Chapter 9 Display Following the compl...

Page 42: ...e TEST PRINT mode is entered by pressing the key when switching on the printer and keeping it pressed down until the system test is completed Following an internal test sample will be printed for details see Chapter 10 Then the system test will be repeated Display Following the completion of the system test the display shows Test print LED Display LED ONL on Function Keys ...

Page 43: ...mode ASCII Dump mode is entered by pressing the key when switching on the printer and keeping it pressed down until the system test is completed In this mode the control codes received by the printer are directly printed as text corresponding to the set font rather than being interpreted as defined by the programming Display After the completion of the system test the display shows ASCII Dump Mode...

Page 44: ...m Mode LABEL FROM CARD Provided that a memory card is installed and a label format is present in OFFLINE mode press the key to enter the LABEL FROM CARD mode In this mode the labels stored on the card can be selected to print for files with a variable number of labels the quantity of labels to be printed can be set Display The top line of the display shows Label from card The bottom line of the di...

Page 45: ...45 cab Produkttechnik GmbH Tharo Systems Inc This page is intentionally left blank ...

Page 46: ... the first of the parameters to select from Depending on the selection the setup parameters and their settings will be shown The list of parameters is brought up in a row and may be run through repeatedly Each time a parameter setting has been changed there will be a request for confirmation There will not be a general request before leaving the setup mode The setup mode can be left at any point b...

Page 47: ... time 12 Character set 13 Format card 14 Copy memory card 15 Backfeed 16 Debug mode 17 Tear off position 18 Pause reprint 1 Country Starting Setup Overview of the Setup Parameters Fig 9 a Setup parameters Scrolling up down the parameters Definition of the list items No Para No Item number Para Name of the parameter Parameter may be altered via software Parameter is limited changeable via software ...

Page 48: ... used for the printout can be altered via software The language that the prompts on the LCD are displayed in cannot be altered through software only with the front panel Default Setting USA 2 Transfer print Fig 9 b Set Country parameter 18 Pause reprint 1 Country Selection xxxx xxxxxxxxx Yes xxxx xxxxxxxxx No Confirmation Land Deutschland Pays France Country United Kingdom Country USA Pays Suisse ...

Page 49: ...chland 08 06 1998 13 51 23 Pays France 08 06 1998 13 51 23 Country United Kingdom 08 06 1998 13 51 23 Country USA 06 08 1998 01 51 23 pm Land Schweiz 08 06 1998 13 51 23 Pays Suisse 08 06 1998 13 51 23 Pays Belgie 08 06 1998 13 51 23 Maa Suomi 08 06 1998 13 51 23 Nazione Italia 08 06 1998 13 51 23 Pais España 08 06 1998 13 51 23 Table 9 Specific format settings for date and time ...

Page 50: ...lower heat level compared to the direct thermal printing mode On the other hand the ribbon sensor is only active in thermal transfer printing mode This parameters can also be changed via software For different print jobs it is recommended that you carry out all changes in the software Default Setting Transfer print ON Transfer print On Transfer print Off Transfer print xxx Yes Transfer print xxx N...

Page 51: ...uiped with a gap sensor recognizing the front edge of the label This sensor evaluates the different transparency of the material in the area of the labels and the label gaps For the Apollo 4 printers with integrated cutter Apollo 4 200C Apollo 4 300C which will be prepared it is also possible to recognize the labels through reflective marks at the bottom side of the material This parameter can als...

Page 52: ...ace RS 232 baud rate 9600 protocol RTS CTS network address A Baud rate 57600 Interface xxxxxxx Yes Interface xxxxxxx No Confirmation Baud rate Protocol Baud rate Interface RS 422 Interface RS 232C Interface RS 485 Interface Centronics Type of Interface Fig 9 e Set Interface parameter 3 Label sensor 4 Interface 5 Cut position Baud rate 1200 Baud rate 57600 Baud rate 1200 Baud rate Baud rate 57600 B...

Page 53: ... media will be advanced before it is cut that means there is a greater distance between the cutting edge and the rear edge of the label It is recommended that you carry out changes for single print jobs in the software e g if the cut is not wanted in the middle of the gap The software provides a second value for individual adjustments Any front panel value and software command value are totaled to...

Page 54: ...erances may be equalized by adjusting the peel position adjustment range 8 4mm until 8 4mm If the offset values are positive the paper will be forwarded after completion of the print job It means that the distance between the tear off edge and the rear label edge will be greater The current field to be changed is flashing in the display 5 Cut position 7 Printhead pos 6 Peel position Peel position ...

Page 55: ...osition value influences the tear off and the cut position For that reason alter the values of the parameters Peel position and Cut position by the same amount like the Printhead position but in the opposite direction Adjustments for various print jobs may also be carried out via software which provides an additional offset value Any front panel value and software command value are totaled togethe...

Page 56: ... the setting possibly has to be adjusted To adjust the printer to current print jobs it is recommended that you alter the heat level parameter via software e g for different material and speed Any front panel value and software command value are totaled together for printing The current field to be changed is flashing in the display Fig 9 i Set Heat level parameter Heat level x Heat level x Heat l...

Page 57: ...es information about the firmware Furthermore information about the cumulative length of printed media as well as the number of operating hours are shown 8 Heat level 9 Printer info 10 Set date Printer info Printer info Version xxxxxxx Printer info xxxxxx m xxxx h Fig 9 k Printer info display ...

Page 58: ...cember 31 2069 If an invalid date entry is made the display shows Invalid input After pressing the key the parameter may be set again Date changes in the software will only influence the date on the printout but not affect the system date as stored in the setup The current field to be changed is flashing in the display 10 Set date 11 Set time Day Month Year Confirmation Set date xx 12 xxxx Set dat...

Page 59: ...ce the printout but not affect the system time of the printer The changed time will neither be shown in the display nor be stored in the printer setup The current field to be changed is flashing in the display Hour Minute Second Confirmation Set time xx 59 xx Set time xx 00 xx Set time xx xx 59 Set time xx xx 00 Set time 23 xx xx Set time 00 xx xx Set time xx xx xx Yes Set time xx xx xx No Fig 9 m...

Page 60: ...ted fonts the Unicode character table can be used The character set tables are included in Appendix A Default Setting Windows 1252 11 Set time Selection Character set ISO 8859 1 Character set Codepage 850 Character set Macintosh Character set ISO 8859 8 Character set Codepage 852 Character set EBCDIC Fig 9 n Set Character set parameter 12 Character set 13 Format card Character set xxxxxxx Yes Char...

Page 61: ...rd etc optional The delete process will format the card Therefore this option may also be used to prepare new memory cards for operation Fig 9 o Delete Format a memory card If the procedure has been started without having a card installed the display will show No card Pressing the key will skip to the following parameter 12 Character set 13 Format card 14 Copy memory card Format card No Format car...

Page 62: ...mory cards with different capacities When the duplicate card cannot store any more information the display shows Card full If data with a capacity of more than 1Megabyte has to be copied the duplication process will be divided into several cycles Alternately the printer display will ask to insert either the source card or the duplicate card 15 Backfeed Selection Insert card to be copied no yes 14 ...

Page 63: ...d independent of the label design if the parameter is set on always If the setting is on smart the backfeed will only be performed if the front label is in its cut position and the Apollo 4 has not yet received all of the data for printing the following label Otherwise the print of the second label will be started but only completed after the first one has been picked up Smart backfeed can cause f...

Page 64: ... mode 15 Backfeed 16 Debug mode 17 Tear off position Debug Mode The Debug mode represents a tool for the firmware programmer It will help to recognize faults and their possible sources beyond standard error messages For standard use of the printer the parameter should always be switched OFF Default Setting Debug mode OFF Debug mode Off ...

Page 65: ...he Tear off position is active an additional feed forward will take place after completion of the print job This makes it possible to tear off the last label at the tear off plate After starting a new print job first the label material will be fed back until the front edge of the first label is located at the print line If the parameter is OFF the label dispense stops immediately after the last la...

Page 66: ...ig 9 t Set Pause Reprint parameter 17 Tear off position 18 Pause reprint 1 Country Pause reprint On Pause Reprint After completion of a print job the print of the last label may be repeated by pressing the key This function may be switched ON or OFF in the Pause reprint parameter of the setup mode Default Setting Pause Reprint ON ...

Page 67: ...p it pressed down until the system test is completed The display shows Test print and the Apollo 4 will print an internal test sample which contains a variety of information about the configuration of the printer as well as the results of the internal test The test printout can also include a range of hardware errors which have occurred previously even if they have disappeared again This informati...

Page 68: ...elf Test Printout Fig 10 Self test printout On the following pages you will find detailed information about the contents of the test printout 1 2 4 5 3 Firmware version Setup and status information Available character sets Test pattern Bar code with test information ...

Page 69: ...s see Table 10 for fault correction see Appendix C The letter behind the sign indicates the state of modification of the hardware board Operative time Cumulative operating time of the printer Number of labels Cumulative amount of printed labels Thermal transfer Cumulative length of printed material in thermal transfer mode Thermal direct Cumulative length of printed material in direct thermal mode...

Page 70: ...2 4000 16384 Wrong board revision 8000 32768 Setup invalid For the test result the codes of occurred errors are added up to a four digit hexadecimal number to determine the final test result For example A D converter fault LCD damaged Test result 0024 Table 10 Self test Test result error codes 3 Bar Code with Test Information This special bar code is designed for use by Technical Service It contai...

Page 71: ...rrors such as varying print intensity which indicates the printhead being misadjusted or dirty or missing ink dots causing vertical white lines 4 Existing Character Sets No Identification No of the font for programming command T Name Name of font used for internal storing Name of command query sequence q CR Type Method of generating the characters see programming of command T Description Font desc...

Page 72: ...essing the key back into ONLINE mode Definition of the Printer Info Display Printer info 1 RS 232 RTS CTS Fig 11 a Printer info display 1 On the first page the selected interface RS 232 RS 422 RS 485 Centronics and in case of a serial interface the handshake or protocol RTS CTS or will be shown Printer info 2 9 600 Fig 11 b Printer info display 2 The second page contains information about the fixe...

Page 73: ... in Figure 11d displays 0000 indicating that there have been no hardware faults y Type of peripheral device 0 Cutter 3 None fitted 4 External print start For example Figure 11 d 3 No peripheral device connected z Configuration setting Transfer print Label sensor The value of z results from adding the code numbers for selected settings Transfer print 1 ON 0 OFF Label sensor 8 Bottom Reflect 4 Gap s...

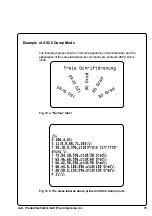
Page 74: ...SCII Dump Mode To start the monitor mode press the key while switching on the printer and keep it pressed down until the system test is completed The display shows ASCII Dump Mode To cancel ASCII Dump mode press the key In monitor mode the print of data will be started after every four lines of data received Therefore in some cases the last lines of the label have to be retrieved by pressing the k...

Page 75: ...of ASCII Dump Mode The following figures show the normal appearance of a printed label and the appearance of the same label when its commands are printed in ASCII Dump mode Fig 12 a Normal label Fig 12 b The same label as above printed in ASCII Dump mode ...

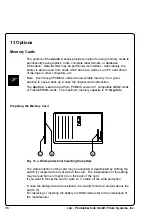
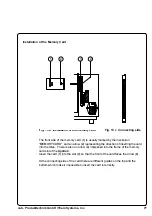
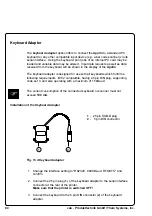
Page 76: ... card malfunction The Apollo 4 is able to read from PCMCIA version 2 1 compatible sRAM cards or Flash EPROM cards The maximum memory capacity is 16 MegaByte Preparing the Memory Card 1 2 3 Fig 13 a Write protection Inserting the battery The write protection of the card may be activated or deactivated by shifting the switch 1 located at the front side of the card The interpretation of the setting m...

Page 77: ...scription MEMORY CARD and an arrow 2 representing the direction of inserting the card into the drive There is also an arrow 4 impressed into the frame of the memory card slot of the Apollo 4 Insert the card 1 into the slot 3 so that the front of the card faces the arrow 4 At the connecting side of the card there are different guides on the top and the bottom which make it impossible to insert the ...

Page 78: ...he easiest way is to copy label formats graphics or font files directly onto the card using a PC card drive of a lap top or another computer and the DOS command COPY Another way is to write on the card using the card drive of the Apollo 4 and transfer the data via interface For saving a label you need to put the label design commands into brackets consisting of Ms commands Ms LBL ABC Command to sa...

Page 79: ...card Confirm the selection by pressing the key 4 If you have chosen a label with a set number of labels to print the Apollo 4 will instantly start printing 5 For labels with a variable number of labels the top line of the display shows Number of labels the bottom line shows 00001 with the first figure flashing cursor Using the key and the key the figure at the position of the cursor may be altered...

Page 80: ...gned for use with all keyboards which fulfill the following requirements MF 2 compatible having a 5pin DIN plug supporting code set 3 and also operating with a maximum of 15 kBaud The current consumption of the connected keyboard or scanner must not exceed 100 mA Installation of the Keyboard Adapter Fig 13 d Keyboard adapter 1 25 pin SUB D plug 2 5 pin DIN connector 1 Change the interface setting ...

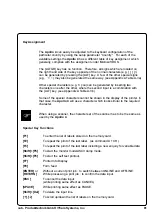
Page 81: ... Appendix A Table A 3b Some of the special characters cannot be shown in the display of the printer In that case the Apollo 4 will use a character which looks similar to the required character When using a scanner the character set of the scanner has to be the same as used by the Apollo 4 Special Key Functions F1 To enter the list of labels stored on the memory card F2 To repeat the print of the l...

Page 82: ...82 cab Produkttechnik GmbH Tharo Systems Inc This page is intentionally left blank ...

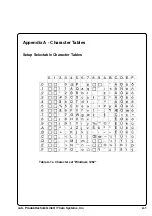
Page 83: ...A 1 cab Produkttechnik GmbH Tharo Systems Inc Table A 1 a Character set Windows 1252 Appendix A Character Tables Setup Selectable Character Tables ...

Page 84: ...A 2 cab Produkttechnik GmbH Tharo Systems Inc Table A 1 b Character set Windows 1250 ...

Page 85: ...A 3 cab Produkttechnik GmbH Tharo Systems Inc Table A 1 c Character set ISO 8859 1 ...

Page 86: ...A 4 cab Produkttechnik GmbH Tharo Systems Inc Table A 1 d Character set Codepage 850 ...

Page 87: ...A 5 cab Produkttechnik GmbH Tharo Systems Inc Table A 1 e Character set EBCDIC ...

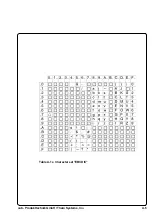
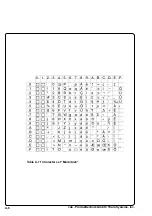
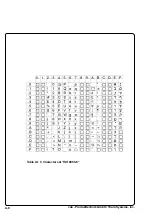
Page 88: ...A 6 cab Produkttechnik GmbH Tharo Systems Inc Table A 1 f Character set Macintosh ...

Page 89: ...A 7 cab Produkttechnik GmbH Tharo Systems Inc Table A 1 g Character set Codepage 852 ...

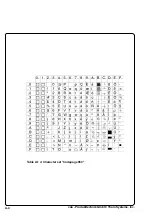
Page 90: ...A 8 cab Produkttechnik GmbH Tharo Systems Inc Table A 1 h Character set ISO 8859 8 ...

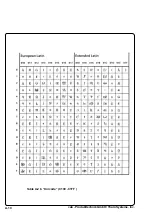
Page 91: ...A 9 cab Produkttechnik GmbH Tharo Systems Inc Unicode Tables Table A 2 a Unicode 0000 00FF ...

Page 92: ...A 10 cab Produkttechnik GmbH Tharo Systems Inc Table A 2 b Unicode 0100 01FF ...

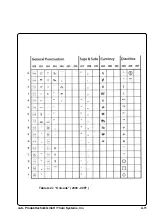
Page 93: ...A 11 cab Produkttechnik GmbH Tharo Systems Inc Table A 2 c Unicode 2000 20FF ...

Page 94: ...A 12 cab Produkttechnik GmbH Tharo Systems Inc Table A 2 d Unicode 2100 21FF ...

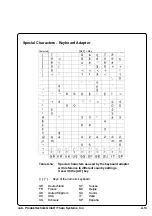
Page 95: ...Characters ALT Key Table A 3a Special characters as used by the keyboard adapter with reference to different country settings Use with the ALT key Keys of the numeric keyboard GR Deutschland SF Suisse FR France BE Belgie UK United Kingdom SU Suomi US USA IT Italia SG Schweiz SP España ...

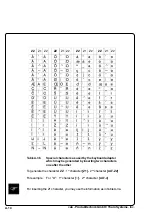
Page 96: ...acter ZZ 1st character Z1 2nd character ALT Z2 For example For ñ 1st character 2nd character ALT n For inserting the Z1 character you may use the information as in TableA 3a Table A 3b Special characters as used by the keyboard adapter which may be generated by inserting two characters one after the other ...

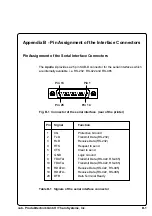
Page 97: ...Transmit Data RS 422 RS 485 18 RDATA Receive Data RS 422 RS 485 19 RDATA Receive Data RS 422 RS 485 20 DTR Data Terminal Ready Appendix B Pin Assignment of the Interface Connectors Pin Assignment of the Serial Interface Connectors The Apollo 4 provides a 25 pin SUB D connector for the serial interfaces which are internally available i e RS 232 RS 422 and RS 485 Fig B 1 Connector of the serial inte...

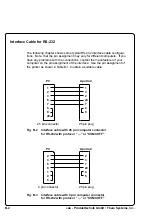
Page 98: ...5 pin computer connector for RS 232 with protocol or XON XOFF 1 1 2 3 3 2 5 20 7 7 6 4 8 5 20 Interface Cable for RS 232 The following chapter shows some typical RS 232 interface cable configura tions Note that the pin assignment may vary for different computers If you have any problems with the connections contact the manufacturer of your computer on the pin assignment of the interface Use the pi...

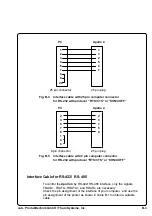
Page 99: ...erface cable with 25 pin computer connector for RS 232 with protocol RTS CTS or XON XOFF 2 2 3 3 5 7 7 5 8 4 1 4 6 1 1 2 3 3 2 4 5 5 4 7 7 6 8 20 Interface Cable for RS 422 RS 485 To control the Apollo 4 by RS 422 RS 485 interface only the signals TDATA TDATA RDATA and RDATA are necessary Check the pin assignment of the interface of your computer and use the pin assignment of the printer as shown ...

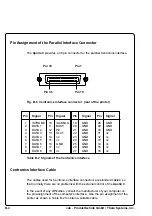
Page 100: ... 21 GND 30 GND 4 DATA 3 13 SLCT 22 GND 31 nc 5 DATA 4 14 nc 23 GND 32 nc 6 DATA 5 15 nc 24 GND 33 nc 7 DATA 6 16 GND 25 GND 34 nc 8 DATA 7 17 nc 26 GND 35 nc 9 DATA 8 18 nc 27 GND 36 nc Pin 18 Pin 1 Pin 19 Pin 36 Centronics Interface Cable The cables used for Centronics interface connectors are standard cables so that normally there are no problems with the external control of the Apollo 4 In the ...

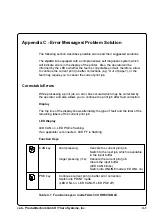
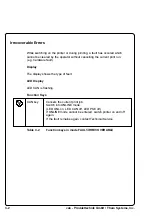
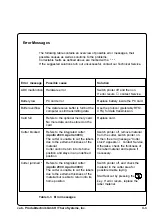
Page 101: ...iagnostic system which will indicate errors in the display of the printer Also the operator will be informed by the LEDs whether the fault is correctable and will therefore allow to continue the current print job after corrections e g Out of paper or the fault may require you to cancel the current print job Correctable Errors While processing a print job an error has occured which may be corrected...

Page 102: ...the current print run e g hardware fault Display The display shows the type of fault LED Display LED CAN is flashing Function Keys CAN key Cancels the current print job Switch into ONLINE mode LED ONL on LED CAN off LED PSE off If ONLINE mode cannot be entered switch printer on and off again If the fault remains again contact Technical Service Table C 2 Function keys in mode FAULT IRRECOVERABLE ...

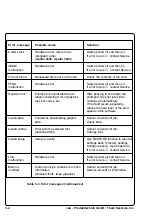
Page 103: ...hickness of the material but is able to return into its home position Solution Switch printer off and then on If error recurs contact Service Replace battery inside the PC card Use the protocol preferably RTS CTS for data transmission Replace card Switch printer off remove material from the cutter switch printer on If then the error message Cutter stuck appears contact Service Otherwise check the ...

Page 104: ...rrent print job contains too much information selected fonts large graphics Solution Switch printer off and then on If error recurs contact Service Switch printer off and then on If error recurs contact Service Check the contents of the card Switch printer off and then on If error recurs contact Service After pausing to cool down the printhead the print job will be continued automatically If the f...

Page 105: ... Set software to direct thermal mode Restart print job Jam tight the supply roll of transfer ribbon by turning the knurled knob at the supply hub Possible cause There are labels missing on the label material The label format as set in the software does not correspond with the real label format Printer is loaded with continuous paper but the software is set on labels Definition of the label size is...

Page 106: ...Hardware error Refers to the optional memory card Write protection is activated Error during firmware update Firmware version is not valid for the present hardware version Solution Depending on the type of fault the command can be skipped by pressing the key or the print job has to be cancelled by pressing the key Switch printer off Correct the interface setting in the printer setup see chapter 9 ...

Page 107: ...maintenance switch the printer OFF and disconnect it from the power supply General Cleaning While operating dust accumulates especially within the printer mechanism Remove dirt and dust regularly using a soft brush or a vacuum The cover of the Apollo 4 may be cleaned using standard cleanser Do not use abrasive cleaning powders or solvents Cleaning the Media Feed Rollers Accumulations of dirt on th...

Page 108: ...ds cleaning Recommended cleaning intervalls Direct Thermal Printing at every 1 300 yd or 1 200 m Thermal Transfer Printing each time you change the ribbon Do not use any sharp objects for cleaning the printhead Do not touch the protective glass layer of the printhead Clean the printhead as follows 1 Lift the printhead 2 Remove label material and transfer ribbon from the printer 3 Clean the printhe...

Page 109: ... as follows 1 You may leave the transfer ribbon 1 inside the printer and simply poke through it with your hex wrench 2 Loosen the locking screw 2 on the printhead by half a turn This will allow for the required horizontal adjustment of the printhead 3 By turning the two screws underneath 3 you may shift the printhead as follows The overall distance for adjusting is 1 in or 2 5 mm By turning the sc...

Page 110: ... be closed after every single adjustment step to make the change effective 5 Tighten the locking screw 2 6 Perform a test print for instance a wide black line over the whole width of the label and review the results 7 Repeat steps 2 to 6 as necessary to complete the adjustment ...

Page 111: ...cutter unit will be unlocked 3 Swing away the cutter unit 4 Loosen the screws 1 and remove the cutter cover 2 5 Swing back the cutter unit to the front of the Apollo 4 6 Turn the lever 3 clockwise until it stops and so re lock the cutter 7 Swing the upper blade carrier upward by pressing the lever 4 2 1 3 1 4 Fig D 2a Cleaning and replacing the cutter blades 1 Fig D 2b Cleaning and replacing the c...

Page 112: ...counter sunk screws 6 8 which hold each of the blades After that the blades can be removed Mount the new blades It is not necessary to re adjust the new blades once they are mounted 10 Following the blades having been cleaned or replaced using the screws 1 re mount the cutter cover 2 Important Under no circumstances may the cutter assembly be used without cover G Fig D 2c Cleaning and replacing th...

Page 113: ... 2 When switching the Apollo 4 ON press all of the four function keys at once The display will show SYSTEM UPDATE 3 Transmit the data to the printer Under DOS use the following copy command COPY AP4_XXX FMW COM2 b 4 During processing the printer display indicates the progress with a after each block completed total number of blocks is 11 After completing the copy process the display shows OK and a...

Page 114: ...E 2 cab Produkttechnik GmbH Tharo Systems Inc This page is intentionally left blank ...

Page 115: ...s C 1 Country 48f Cover 20 21 Cut position 49 51 Cutter 11 21f 27 29 51 53 C 3f Cutter blocked C 3 Cutter jammed C 3 Cutter stuck C 3 D Date 49 58 Debug mode 64 Dimensions 14 Direct thermal printing 17 Display 21 33f Documentation 8 dRAM malfunction C 4 E EASYLABEL 15 EBCDIC character set A 5 Error messages C 1ff F Fanfold paper 24 28 FAULT CORRECTABLE system mode 38 FAULT IRRECOVERABLE system mod...

Page 116: ...ing 78 Memory card module slot 24f 77 Memory card writing on 78 Memory card printing from 79 Memory overflow C 4 Monitor mode 74f MONITOR MODE system mode 50 N No label found C 4 No label size C 5 No record found C 5 O OFFLINE system mode 35 ONL key 33f ONLINE system mode 34 Operating manual 8 Options 15 76f Out of paper C 5 Out of ribbon C 5 P Parallel interface port 24 26 Pause reprint 66 PAUSE ...

Page 117: ...47 SETUP system mode 41 Slot for fanfold paper 24 Slot for memory card 24 Structural error C 6 System modes 34f SYSTEM TEST system mode 40 T Tear off plate 23 65 Tear off position 65 Technical Specifications 13ff TEST PRINTOUT system mode 42 Test printout 67ff Thermal printhead 10 23 D 1f Thermal transfer printing 17 Time 49 59 Trademarks 9 Transfer print 50 Transfer ribbon 14 19 30 U Unicode Tabl...

Page 118: ...ransfer Printer Apollo 4 Applied EU Regulations and Norms EC Machinery Regulations 89 392 EEC Appendix IIA Machine Safety EN 292 T1 T2 1991 11 EC Low Voltage Regulations 73 23 EEC Data and Office Machine Safety EN60950 1992 A1 1993 EN 60950 A2 1993 EC Electromagnetic Compatibility Regulations 89 336 EEC Threshold values for the Interference EN 55022 1995 05 of Data Machines Interference Resistance...

Reviews: