background image

www.cablematters.com 

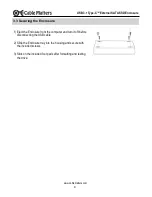
USB 3.1 Type-C™ External SATA SSD Enclosure 

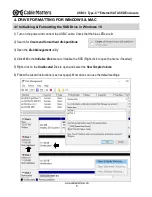
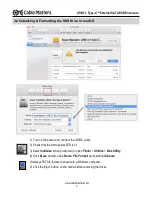
5. Troubleshooting Notes 

· 

Connect directly to a USB port (not through a hub or dock) as a test. 

· 

Hot-swapping the SSD is not supported and may corrupt the data. 

· 

Check with the SSD manufacturer for management and diagnostic software. 

· 

Disconnect the Enclosure, reboot the computer and reconnect the Enclosure. 

· 

A USB-C Gen 2 port should provide sufficient power for the Enclosure. Connect the DC to USB power 
cable and a wall charger if the LED will not light.


· 

Do not connect the DC to USB power cable before connecting the USB cable to the computer.


· 

Verify that your computer supports data transfer over USB-A or USB-C.


· 

Try a different USB-A or USB-C port on the computer.


Windows OS: 

· 

Check to see if your computer recognizes the Enclosure: Device Manager > Storage controllers > USB 
Attached SCSI (UAS) Mass Storage Device 
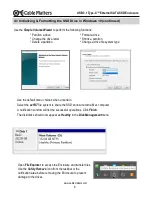
macOS: 

· 

Check to see if your computer recognizes the Enclosure: About this Mac > System Report > USB 
Device Tree 

> USB 3.1 Bus > USB 3.1 Storage Device


Contact support@cablematters.com if you believe that the Enclosure is defective. 

Summary of Contents for 201079

Page 1: ...support cablematters com USB 3 1 Type C Gen 2 External SATA SSD Enclosure Model 201079 User Manual Available in a PDF file ...

Page 2: ...ecklist 3 DRIVE INSTALLATION AND STORAGE CONFIGURATION 3 3 1 SATA Drive Installation 3 2 Connecting the Enclosure to the Computer 3 3 Securing the Enclosure 4 4 DRIVE FORMATTING FOR WINDOWS MAC 5 4 1 Initializing Formatting the SSD Drive in Windows 10 4 2 Initializing Formatting the SSD Drive in macOS 7 5 TROUBLESHOOTING STEPS 8 6 TECHNICAL SPECIFICATIONS 9 7 WARRANTY AND SUPPORT 7 1 Customer Supp...

Page 3: ...1 Type C to Type A 10Gbps cable 1x DC to USB power cable 1x Screwdriver 1x User Manual available in a PDF format 1 1 Introduction Specifications are subject to change without notice Cable Matters is a registered trademark or trademark of Cable Matters Inc All rights reserved All other trademarks are the property of their respective owners Thunderbolt and the Thunderbolt Logo are trademarks of Inte...

Page 4: ... power cord if needed 2 5 SATA SSD or HDD up to 9 5mm in height Included screwdriver and mounting screws Included USB and DC to USB cables Anti static wrist strap or other grounding method not included 2 2 Product Description 2 4 Installation Checklist Add portable external storage to a computer with USB A USB C or Thunderbolt 3 Migrate files from a computer with USB A to a new computer with USB C...

Page 5: ... to the computer 2 Carefully insert the SATA SSD drive The connector is keyed to fit in one direction only 3 Gently press down on the drive until it is flush with the side and bottom mounting holes 4 Hold down the drive and secure the mounting screws with the screwdriver 3 2 Connecting the Enclosure to the Computer 1 Connect the provided USB cable to your computer and the USB C 3 1 port on the Enc...

Page 6: ... 3 Securing the Enclosure 1 Eject the Enclosure from the computer and turn it off before disconnecting the USB cable 2 Slide the Enclosure tray into the housing and secure with the included screws 3 Stick on the included foot pads after formatting and testing the drive ...

Page 7: ...are lit 2 Search for Create and format hard disk partitions 3 Open the Disk Management utility 4 Click OK in the Initialize Disk menu to initialize the SSD Right click to open the menu if needed 5 Right click on the Unallocated Disk to open and select the New Simple Volume 6 Follow the wizard instructions see next page Most drives can use the default settings 4 DRIVE FORMATTING FOR WINDOWS MAC ...

Page 8: ...on Change a drive file system type Use the default menu choices when uncertain Select the exFAT file system to share the SSD enclosure with a Mac computer A notification window will list the successful operations Click Finish The disk disks should now appear as Healthy in the Disk Management menu Open File Explorer to access the Enclosure and transfer files Use the Safely Remove icon from the task...

Page 9: ...power and connect the USB C cable 2 Check that the white power LED is lit 3 Select Initialize when prompted or open Finder Utilities Disk Utility 4 Click Erase and provide a Name File Format and partition Scheme Select exFAT file format to share with a Windows computer 5 Click the Eject button on the menu before removing the drives ...

Page 10: ...he DC to USB power cable and a wall charger if the LED will not light Do not connect the DC to USB power cable before connecting the USB cable to the computer Verify that your computer supports data transfer over USB A or USB C Try a different USB A or USB C port on the computer Windows OS Check to see if your computer recognizes the Enclosure Device Manager Storage controllers USB Attached SCSI U...

Page 11: ...NTY SUPPORT INFORMATION Cable Matters offers lifetime technical support as an integral part of our commitment to provide industry leading solutions Email us with any questions at support cablematters com 7 1 Customer Support and Contact Information In no event shall Cable Matters Inc including their officers directors employees or agents be liable for any damages whether direct or indirect special...

Page 12: ... SATA SSD products at www cablematters com USB C 3 1 Gen 2 Dual Bay External M 2 SATA SSD Enclosure Model 201078 Model 201080 USB C 3 1 Gen 2 External Dual Bay SATA SSD Enclosure USB C 3 1 to 2 5 SATA HDD Adapter Model 202042 USB C 3 1 Dual Bay SSD Dock with Cloning Model 202014 ...

Reviews: