background image

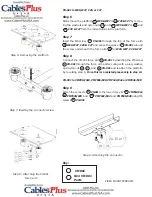
Step 11 : Removing the nylon nut

Step 12: Attaching the long nut

VIDEO MOUNT PRODUCTS

Step 10

Attach the VH-001 force arm        VH-001 to the connector       ) 
VH-001 using the 3/8” screw         VH-001 and washer        VH-001 in 
between the connector and the force arm.  Insert a brake screw 
       VH-001 into the connector using the M3 Allen key        VH-001 to 
tighten it down onto the 3/8” screw.  Once this is completed please 
skip to step 14.

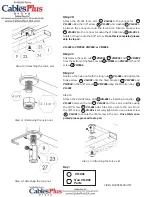
VH-001 to VMP001, VMP003, or VMP006

Step 11

First remove the nylon nut        VMP001,        VMP003, and        VMP006 
from the bottom of the fi xed bracket        VMP001 and VMP003 or the 3/8” 
screw        VMP006

Step 12

Replace the nylon nut with the long nut         VH-001 and tighten the 
brake screw         VH-001 onto the fi xed bracket         VMP001 and 
VMP003 or the 3/8” screw         VMP006 using the M3 Allen Key        ) 
VH-001

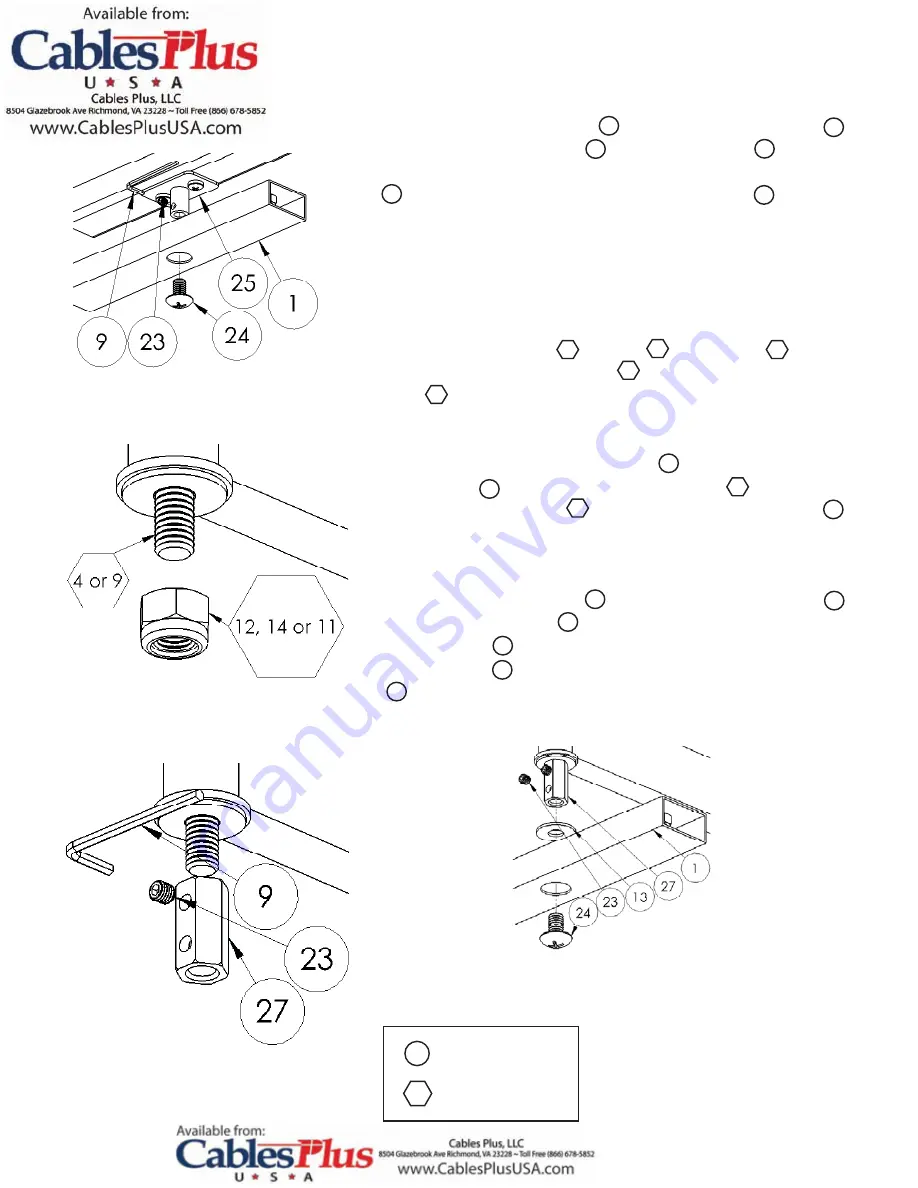
Step 13
Attach the VH-001 force arm       VH-001 by inserting a washer         ) 
VH-001 between the nut         VH-001 and force arm and then using 
the 3/8” screw         VH-001 attach the force arm to the nut.  Once 
the 3/8” screw         VH-001 is securely tightened, use a brake screw 
        VH-001 to secure the 3/8” screw in the nut.  Once this is com-
pleted please proceed to step 14.

Step 10 : Attaching the force arm

1

Key:

 VH-001

Non VH-001 

Parts

Step 13 : Attaching the force arm

25

24

13

23

9

12

14

11

4

9

13

1

27

24

24

23

27

23

4

9

9

Summary of Contents for VH-001

Page 1: ...VIDEO MOUNT PRODUCTS Instruction Sheet For VH 001 VH 001S ...

Page 2: ...at you have al ready assembled the primary mount VH 001 to W13 or C13 Step 3 First remove the TV from the mount Next remove the platform W 13 or C 13 by removing the nylon nut and washer and W 13 or and C 13 Step 4 Remove the plastic swivel W 13 and C 13 Snap off the plastic circle on the bottom of the plastic swivel W 13 and C 13 and remove the 2 5 long screw W 13 or C 13 Step 5 Attach the VH 001...

Page 3: ...the M6 screw VH 001 through the force arm and securing with a plug washer and nylon nut and VH 001 and reattach the platform by reversing step 6 Once this is completed please skip to step 14 VH 001 to VMP014 024 VMP036 038 VMP042 044 or VMP046 048 Step 9 Attach the connector VH 001 to the lower force arm VMP014 024 VMP036 038 and VMP042 044 and VMP046 048 using M6 screws VH 001 VIDEO MOUNT PRODUCT...

Page 4: ...d bracket VMP001 and VMP003 or the 3 8 screw VMP006 Step 12 Replace the nylon nut with the long nut VH 001 and tighten the brake screw VH 001 onto the fixed bracket VMP001 and VMP003 or the 3 8 screw VMP006 using the M3 Allen Key VH 001 Step 13 Attach the VH 001 force arm VH 001 by inserting a washer VH 001 between the nut VH 001 and force arm and then using the 3 8 screw VH 001 attach the force a...

Page 5: ... along the edges Step16 Insert the extension holders VH 001 into the force arm VH 001 Slide the desired equipment in between the adjustable stoppers and both extension holders and VH 001 Secure the position of the extension holders by tightening down brake screws VH 001 into the force arm while making sure the equipment is centered in the bracket Lastly slide the adjustable stoppers down onto the ...

Reviews: