Chapter 2: Connecting to the Network
Page 2-2
Ethernet Switch Module User Guide
The power-up LED sequence for an Ethernet Switch Module not attached
to a network is as follows:
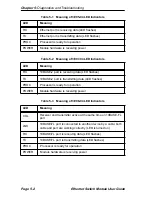
1. All LEDs flash.
2. The PWR LED remains on, and the TX and RX LEDs flash.
3. 3E02-04:
The PROC LED comes on for 5 seconds, then blinks, then remains lit.
The RX, COL, and TX LEDs flash for 100 milliseconds.
3E07-04:
The PROC, RX, and TX LEDs come on for 5 seconds, then the RX and
TX LEDs go off. The PROC LED remains lit.
3E08-04:
The PROC LED comes on for 5 seconds, then blinks, then remains lit.
The RX, COL, and TX LEDs flash for 100 milliseconds.
3E05-04:
The PROC, RX, and TX LEDs come on for 5 seconds, then the RX and
TX LEDs go off. The PROC LED remains lit.
4. After a few seconds the module reboots and the PROC LED comes on.
5. All other LED activity beyond this point is a function of the
configuration and connection of the ATX.
2.3 CONNECTING TO A NETWORK
To connect an Ethernet Switch Module to an Ethernet network, use the
following types of Ethernet cable:
•
Unshielded twisted pair (10BASE-T)
•
Thin coaxial cabling (10BASE2)
•
Multimode fiber optics (10BASE-FL)
•
Attachment Unit Interface cabling (10BASE5)
To connect the 3E02-08-ATX to an Ethernet network, use UTP cable
(10BASE-T).
Summary of Contents for 3E02-04
Page 2: ......
Page 30: ...Chapter 4 Monitoring Page 4 4 Ethernet Switch Module User Guide ...
Page 36: ...Chapter 5 Diagnostics and Troubleshooting Page 5 6 Ethernet Switch Module User Guide ...
Page 40: ...Chapter 6 Adding Swapping Modules Page 6 4 Ethernet Switch Module User Guide ...
Page 44: ...Appendix A Technical Specifications Page A 4 Ethernet Switch Module User Guide ...
Page 52: ...Appendix B Cables Page B 8 Ethernet Switch Module User Guide ...
Page 54: ...Index Index 2 Ethernet Switch Module User Guide ...


