background image

QUICK START

22      CyberSWITCH

A

PPLE

T

ALK

 R

OUTER


TO

 A

PPLE

T

ALK

 R

OUTER

 C

ONFIGURATION

C

ONFIGURATION


FOR

 S

ITE

 "C

ENTRAL

"

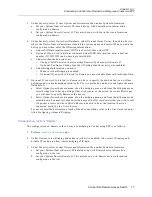
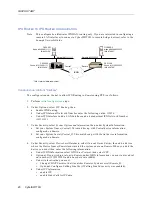
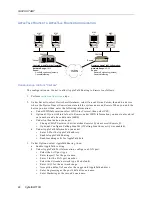
The configuration on Central to allow AppleTalk Routing to Remote is as follows:

1.

Perform 

initial configuration

 steps.

2.

Under Security, select Device Level Databases, select On-node Device Entries, then add a device 
where the Device Name (Remote) must match the system name on Remote. When you add the 
device you must then enter the following information:
a.

Under ISDN Information select ISDN Line Protocol, then select PPP.

b.

Optional: If you wish to dial out to Remote, under ISDN Information you must enter a dial 
out number and a base data rate (64Kb).

c.

Under Authentication you must:

Change CHAP Secret so that it matches Remote’s System secret (Remote_S). 

Optional: Configure Calling Line Ids (if Calling Line Id security was enabled). 

d. Under AppleTalk Information you must:

Enter 0.0 for the AppleTalk address.

Enable AppleTalk Routing.

Enable making calls for AppleTalk data.

3.

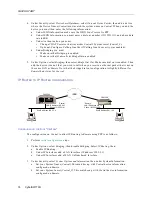
Under Options, select AppleTalk Routing, then:
a.

Enable AppleTalk routing.

b.

Under AppleTalk Port Information, configure a LAN port:

Select the LAN port type.

Enter lanport1 for the port name.

Enter 1 for the LAN port number.

Select the Extended network type (the default).

Enter 10-13 for the network range.

Accept the default of none for the suggested AppleTalk address.

Enter Engineering as the port’s default zone name.

Enter Marketing as the second zone name.

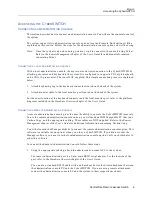
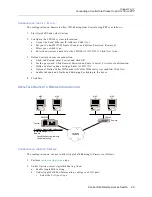
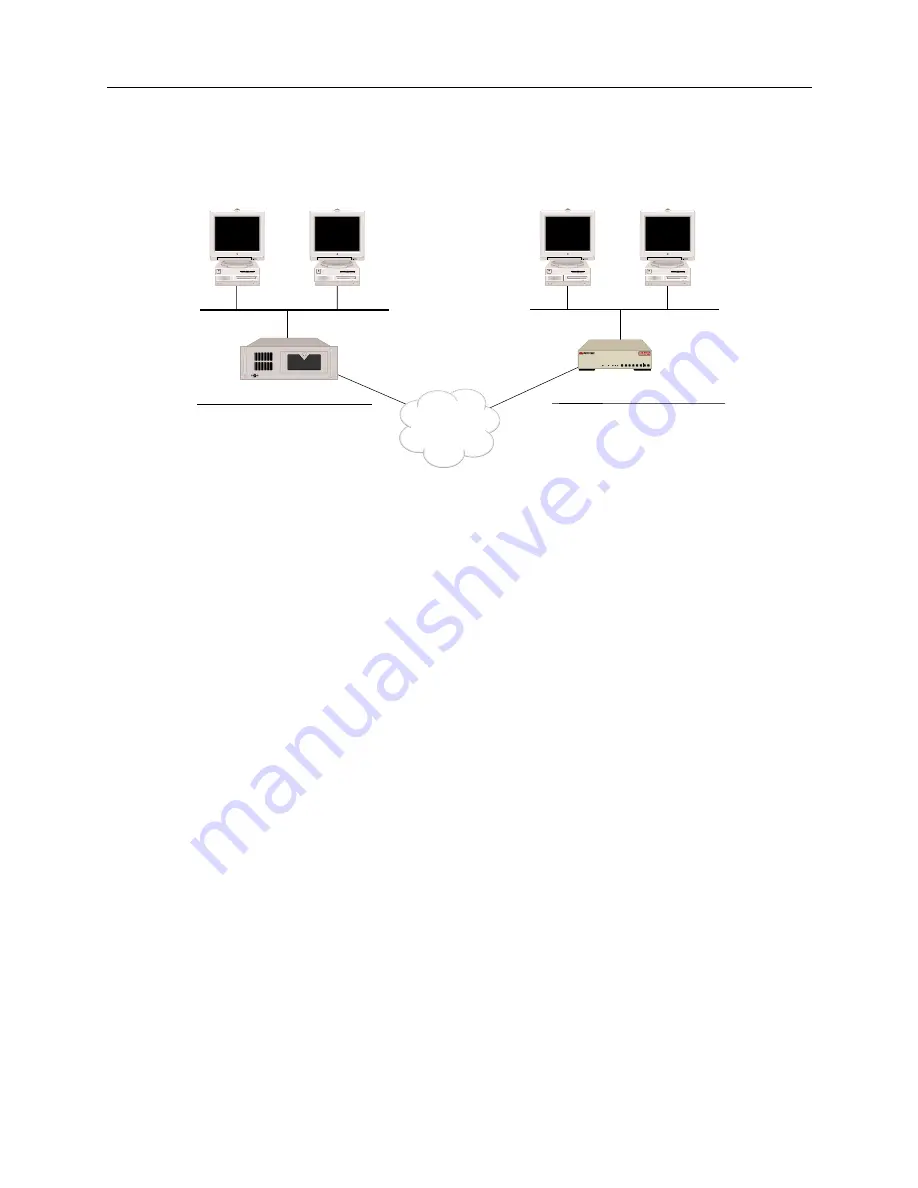
Central's  AppleTalk Configuration
Network Range:
 10-13
Zones:
     Central.Engineering (default)
     Central.Marketing

Remote's AppleTalk Configuration
Network Range:
 45-50
Zones:
     Remote.Engineering (default)
     Remote.Marketing

CSX5500

CSX1200

MAC

MAC

MAC

MAC

ISDN

"Remote"

"Central"

B25 B27

B26 B28

WORKGROUP REMOTE ACCESS SWITCH

B29

E1   ONLY

B-CHANNELS

LAN

10BASE-T

RX

TX

SERVICE

B31

B30 L1

B21 B23

B22 B24

B17 B19

B18 B20

B13 B15

B14 B16

E1

D

T1

D

B9

B11

B10 B12

B5

B7

B6

B8

B1

B3

B2

B4

POWER

Summary of Contents for Cabletron CyberSWITCH CSX5500

Page 1: ...CENTRAL SITE REMOTE ACCESS SWITCH QUICK START Release 7 4 Cabletron Systems 603 332 9400 phone 603 337 3075 fax support ctron com ...

Page 2: ...ED TO THIS MANUAL OR THE INFORMATION CONTAINED IN IT EVEN IF CABLETRON SYSTEMS HAS BEEN ADVISED OF KNOWN OR SHOULD HAVE KNOWN THE POSSIBILITY OF SUCH DAMAGES Copyright 1999 by Cabletron Systems Inc All rights reserved Cabletron Systems Inc P O Box 5005 Rochester NH 03866 5005 Order Number 9032109 04 VIRUS DISCLAIMER Cabletron Systems has tested its software with current virus checking technologies...

Page 3: ...nics 1993 including one or more U S Patents No 4701745 5016009 5126739 and 5146221 and other pending patents Telenetworks Copyright 1991 92 93 by Telenetworks All rights reserved FCC NOTICE This device complies with Part 15 of the FCC rules Operation is subject to the following two conditions 1 this device may not cause harmful interference and 2 this device must accept any interference received i...

Page 4: ... Control Council for Interference by Information Technology Equipment VCCI If this equipment is used in a domestic environment radio disturbance may arise When such trouble occurs the user may be required to take corrective actions CABLETRON SYSTEMS INC PROGRAM LICENSE AGREEMENT IMPORTANT Before utilizing this product carefully read this License Agreement This document is an agreement between you ...

Page 5: ... Bridge to Bridge Configuration 16 Configuration for Site Remote 17 IP Router to IP Router Configuration 18 Configuration for Site Central 18 Configuration for Site Remote 19 IPX Router to IPX Router Configuration 20 Configuration for Site Central 20 Configuration for Site Remote 21 AppleTalk Router to AppleTalk Router Configuration 22 Configuration for Site Central 22 Configuration for Site Remot...

Page 6: ...r Modem 31 Configuration for Site Central 31 Configuration for Site Remote on Windows NT 4 0 31 Configuration of Site Remote on Windows 95 34 IPX Router with Digital Modem to a Terminal Adapter Modem 36 Configuration for Site Central 36 Configuration for Site Remote on Windows NT 4 0 36 Configuration of Site Remote on Windows 95 39 Index 41 ...

Page 7: ...tart is divided into two parts Basics This chapter gives detailed instructions on the initial installation steps that are required for all CyberSWITCH configurations Connectivity This chapter gives instructions for connecting two of our products together via PPP Separate instructions are provided for bridging IP IPX and AppleTalk configurations ...

Page 8: ... Type the following command at the DOS prompt install return 3 If you wish to review the Release Notes answer y to the prompt Use page down and page up to view sections of the Release Notes At anytime you may press the Esc key to continue with the installation 4 Follow the on screen instructions to complete the software installation ACCESSING THE RELEASE NOTES The Release Notes provide release hig...

Page 9: ...he local monitor port refer to the platform diagrams included in the Hardware Overview chapter of the User s Guide CONNECTING A REMOTE ADMINISTRATION CONSOLE A remote administration console gives the user the ability to operate the CyberSWITCH remotely To use the remote administration console option you will need an IBM Compatible PC that runs Carbon Copy and the appropriate cabling These cables a...

Page 10: ... CCINSTAL program Refer to the Remote Management chapter of the User s Guide for details on running this program LOGIN ON THE CYBERSWITCH Once you have a connection to the CyberSWITCH you will be presented with a prompt to enter your log in id Use admin as the login id You will then be prompted for a new password so choose a password that you will remember If your software was previously accessed ...

Page 11: ...system is upgraded you may then upgrade any Manager diskettes purchased for the upgraded system Notes If you have an older platform there is a possibility that the new features we have added may use up the available memory Therefore this release may effect the number of compression sessions available You may want to purchase more memory for your CyberSWITCH Contact your distributor You may not per...

Page 12: ...nd 4 6 If you wish to upgrade the Manager at this time a issue the quit command to terminate the system software b insert the Manager diskette c at the DOS prompt type C ADMIN UG_ADMIN return d follow the on screen prompts to complete the Manager Upgrade 8 Reboot to complete the Upgrade process Note Before you configure your CyberSWITCH issue the ver command and check to make sure that you have se...

Page 13: ...mplete file and try again 5 Telnet to the CyberSWITCH and issue the restart command HANDLING UPGRADE WARNINGS AND ERRORS During Step 5 of the Upgrade process checks are made to ensure that the system is in a normal condition before an upgrade If something abnormal is found you will be warned of the abnormality and the upgrade process is halted In the event that you receive any of the following err...

Page 14: ...follow the on screen instructions to disable the TFTP feature 3 Change the admin and guest system passwords If your system was previously accessed by your distributor the preconfigured password will be admin in lower case Change this password to secure your system To make this change enter the following command at the system prompt pswd Then follow the prompts to enter a new password Your password...

Page 15: ...irst line name Next select the line s slot number and port number from the displayed list The information requested to complete the line configuration will depend on the line type The following summarizes the information requested for each line type and the most common responses For Basic Rate If you have a 4 port basic rate adapter configure all basic rate lines at this time up to four lines sele...

Page 16: ...ired for connecting a central site system to a workgroup system via PPP Separate instructions are included for bridging IP routing with an UnNumbered Interface IPX routing and AppleTalk routing configurations BRIDGE TO BRIDGE CONFIGURATION Configuration for Site Central The configuration on Central to allow Bridging to Remote using PPP is as follows 1 Perform initial configuration steps 2 Select O...

Page 17: ... Remote you have to specify the method that you will use determine how to make bridge dial out calls The two methods and how to configure them are listed below a Select Options from the main menu then the bridging menu and from the bridging menu select bridge filters Set up a Bridge filter with connect as the action For some filter types you will need to specify Remote as the device b Select Optio...

Page 18: ...al out configuration is slightly different for Remote than it was for Central IP ROUTER TO IP ROUTER CONFIGURATION CONFIGURATION FOR SITE CENTRAL The configuration on Central to allow IP Routing to Remote using PPP is as follows 1 Perform initial configuration steps 2 Under Options select Bridging then disable Bridging Select IP Routing then a Enable IP Routing b Under IP Interfaces add a LAN Inte...

Page 19: ...ect Bridging then disable bridging Select IP Routing then a Enable IP Routing b Under IP Interfaces change the LAN Interface IP address 201 1 2 1 c Under IP Interfaces make sure you have a WAN UnNumbered Interface 3 Under Security select System Options and Information then under System Information a Set your System Name Remote This matches up with Remote device information configured on Central b ...

Page 20: ...emote 4 Under Security select Device Level Databases select On node Device Entries then add a device where the Device Name Remote must match the system name on Remote When you add the device you must then enter the following information a Under ISDN Information select ISDN Line Protocol then select PPP b Optional If you wish to dial out to Remote under ISDN Information you must enter a dial out nu...

Page 21: ...ith Remote device information configured on Central b Set your System Secret Remote_S This matches up with Remote device information configured on Central 4 Under Security select Device Level Databases select On node Device Entries then add a device where the Device Name Central must match the system name on Central When you add the device you must then enter the following information a Under ISDN...

Page 22: ...lk Information you must Enter 0 0 for the AppleTalk address Enable AppleTalk Routing Enable making calls for AppleTalk data 3 Under Options select AppleTalk Routing then a Enable AppleTalk routing b Under AppleTalk Port Information configure a LAN port Select the LAN port type Enter lanport1 for the port name Enter 1 for the LAN port number Select the Extended network type the default Enter 10 13 ...

Page 23: ...ows 1 Perform initial configuration steps 2 Under Security select Device Level Databases select On node Device Entries then add a device where the Device Name Central must match the system name on Central When you add the device you must then enter the following information a Under ISDN Information select ISDN Line Protocol then select PPP b Optional If you wish to dial out to Central under ISDN I...

Page 24: ... included for two router to router applications IP and IPX and two router to bridge applications IPX and AppleTalk The documentation assumes that you are able to run QuickSET and have it find your CSX100 If you are unable to run QuickSET please refer to the Read Me First document on the CyberSWITCH 100 Family with QuickSET CD ROM IP ROUTER TO IP ROUTER WITH NETWORK ADDRESS TRANSLATION CONFIGURATIO...

Page 25: ...ollowing information a Under ISDN Information select ISDN Line Protocol then select PPP b Under Authentication you must Change CHAP Secret so that it matches Remote s System secret Remote_S Optional Configure Calling Line Ids if Calling Line Id security was enabled c Under IP Information you must configure an IP Address of 199 2 2 3 for Remote Note If the IP address pool has been enabled you do no...

Page 26: ...ITE CENTRAL The configuration on Central to allow IPX Routing to Remote using PPP is as follows 1 Perform initial configuration steps 2 Under Options select IPX Routing then a Enable IPX Routing b Under IPX Internal Network Number enter the following value 123456 c Under IPX Interfaces add a LAN Interface and a hexadecimal IPX Network Number 0000BABE 3 Under Security select System Options and Info...

Page 27: ...er the name of the device or node address of the next hop device Remote in this case CONFIGURATION FOR SITE REMOTE The configuration on Remote to allow IPX Routing to Central using PPP is as follows 1 Start QuickSET and select Custom 2 Configure the CSX100 system information a Accept the Local Ethernet IP Address Click Next b Set your CyberSWITCH Name Remote and System Password Remote_S c Select y...

Page 28: ...tion a Set your System Name Central This matches up with Central device information configured on Remote b Set your System Secret Central_S This matches up with Central device information configured on Remote 6 Under Security select Device Level Databases select On node Device Entries then add a device where the Device Name Remote must match the system name on Remote When you add the device you mu...

Page 29: ...ord Click Remote s Password and enter Central_S twice for confirmation c Define Central s phone settings Enter 13135551111 d Optional Define Caller ID Numbers if Caller ID Security was enabled Click Next e Enable Inbound and Outbound Bridging by clicking in the boxes 4 Click Save APPLETALK ROUTER TO BRIDGE CONFIGURATION CONFIGURATION FOR SITE CENTRAL The configuration on Central to allow AppleTalk...

Page 30: ... a device where the Device Name Remote must match the system name on Remote When you add the device you must then enter the following information a Under ISDN Information select ISDN Line Protocol then select PPP b Under Authentication you must Change CHAP Secret so that it matches Remote s System secret Remote_S Optional Configure Calling Line Ids if Calling Line Id security was enabled c Under B...

Page 31: ...ommodate the Digital Modem 4 Under Security select System Options and Information then under System Information a Set your System Name Central This matches up with Central device information configured on Remote b Set your System Secret Central_S This matches up with Central device information configured on Remote 5 Under Security select Device Level Databases select On node Device Entries then ad...

Page 32: ... install files are located If the network currently does not support DHCP or if you are unsure click No on the TCP IP Setup window Click OK on any subsequent Setup Message windows you may encounter 8 A set of remote access configuration windows are displayed a On the Add RAS Device menu set RAS Capable Devices box to the modem you will use for dial up and click OK b On the Remote Access Setup wind...

Page 33: ...structions to install and configure Dial up Networking You then should receive a message that the phone book is empty Click OK to continue 2 The New Phonebook Entry Wizard should be displayed Check the box to edit properties I know all about and click Finish The Phonebook Entry window containing five tabs will then be displayed 3 Basic tab a Type in a Central for the Entry Name b Check Use Telepho...

Page 34: ...ows 95 the process of dialing a newly set up number Installing Network Protocols 1 From the Control panel open Network 2 On the Configuration tab of the Network dialog box ensure that Client for Microsoft Networks TCP IP and Dial Up Adapter are installed If they are go to step 9 If they are not installed click Add 3 Select Client as the network component type to install Click Add 4 Select Microsof...

Page 35: ...r Connection Preferences set the following Data Bits 8 Parity none Stop Bits 1 Port Settings and Advanced may remain at default values Call Preferences may remain at default values c Options tab may remain at default values 4 Click OK to accept these values and return you to the modem name type screen Click Next 5 Enter 313 as the Area Code 5551111 as the Phone Number and select United States of A...

Page 36: ...urity select System Options and Information then under System Information a Set your System Name Central This matches up with Central device information configured on Remote b Set your System Secret Central_S This matches up with Central device information configured on Remote 5 Under Security select Device Level Databases select On node Device Entries then add a device where the Device Name Remot...

Page 37: ...essary give the path to your install diskettes or CD or where install files are located Click No on the TCP IP Setup window Click OK on any subsequent Setup Message windows you may encounter 8 A set of remote access configuration windows are displayed a On the Add RAS Device menu set RAS Capable Devices box to the modem you will use for dial up and click OK b On the Remote Access Setup window clic...

Page 38: ...t the modem you want to use in the Dial using box Disable the option Use another port if busy by assuring no check is in this box 4 Server tab a Set Dial up server type to PPP Windows NT Windows 95 Plus Internet b Ensure Network protocols match what you entered earlier page 37 c Boxes for software compression and PPP LCP extensions should not be checked i e these should be disabled d Select TCP IP...

Page 39: ... access to the network just as if you were on site CONFIGURATION OF SITE REMOTE ON WINDOWS 95 This section describes the setup of a new number for dial up networking under Windows 95 the process of dialing a newly set up number Installing Network Protocols 1 From the Control Panel open Network 2 On the Configuration tab ensure that Client for NetWare Networks IPX SPX compatible Protocol and Dial u...

Page 40: ... the Area Code 55511111 as the Phone Number and select United States Of America as the Country Code Click Next 6 Confirm your choices Click Finish to proceed or Cancel to abort the new number shortcut Setting Up Server Type 1 After setting up a new number a new dialing icon will be displayed under Dial Up Networking It will have the name you ve assigned the new connection Select this item click Fi...

Page 41: ...resources adding 15 exit 11 expansion resources adding 15 F FCC notice 3 framing type ESF 15 H hardware installation 8 I install 10 L LAN adapters 8 LCD Cable 8 line build out 15 line coding type B8ZS 15 lines configuring 15 logging in 10 log in id 14 M maintenance upgrading software 13 manage 11 P point to point 15 Q quit 12 R release notes 8 remote devices via PPP 16 resources 15 rupgrade bat 13...

Page 42: ...QUICK START 42 CyberSWITCH U upgrade osw 13 upgrading software warnings and errors 13 V VCCI notice 4 W WAN adapters 8 WAN resources adding 15 ...

Reviews: