Page 3-6
INSTALLATION
5.
Set the HUB aside and carefully drill four 1/4" pilot holes, one for
each of the Molly screw anchors and insert the four Molly screw
anchors into the holes just drilled.
6.
Tighten each of the anchor screws until the anchor expands
holding the anchor firmly in the wall, then remove the screws
completely.
7.
Position the HUB on the wall over the anchors and reinstall the
four anchor screws to attach the HUB to the wall. Tighten the
four anchor screws.
Perpendicular Wall Mounting
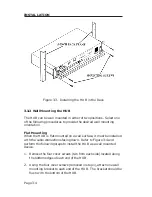
Refer to Figure 3-5 and perform the following steps to install the
HUB perpendicular to the wall surface.
WARNING: This mounting method is not intended for installation
on drywall or other composition wall materials. The weight of cabling
connected at the HUB could cause the HUB to break away from the
wall causing damage to the wall and HUB.
1.
Remove the four cover screws (two from each side) located along
the front edges of each end of the HUB.
2.
Using the four cover screws (removed in step 1), attach one rack/
wall mounting bracket to each end of the HUB. You must use the
mounting holes indicated in Figure 3-5 (farthest away from the
bend in the bracket). This provides the necessary space for
ventilation of the HUB.
3.
Select the wall location for the HUB within 7 feet of a power
outlet.
WARNING: There is a potential SHOCK HAZARD if there is
electrical wiring within the wall that interferes with drilling for
pilot holes. Select a wall location where drilling pilot holes for the
Molly screws will not come in contact with electrical wiring in the
wall.
Summary of Contents for MRX
Page 11: ...INTRODUCTION Page 1 6...

