Page 5-4
ADDING/REPLACING SPIMs
3.
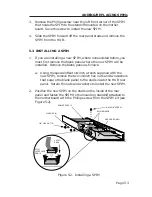
Fasten the SPIM to the rear panel studs with the previously
removed washers and 1/4-inch hex nuts. Tighten the nuts with
the special offset wrench.
4.
Connect the SPIM interface cable to the 16-pin receptacle on the
mother board. Push the cable connector all the way into the
receptacle and secure it with the latch ears on the receptacle.
5.
Reinstall the cover using the previously removed cover screws.
6.
If cables were previously removed, reconnect them according to
their labels.
7.
Power on the HUB by plugging the power cable into the wall
outlet.
8.
Refer to Chapter 3, Installation, for specific cabling and
configuration procedures for the type of SPIM that you have just
installed.
9.
Refer to Chapter 4, Testing and Troubleshooting, to test the
SPIM and resolve any difficulties encountered following
installation.
Summary of Contents for MRX
Page 11: ...INTRODUCTION Page 1 6...

