QUICK START
28 SmartSwitch Remote Access Module
C
ONFIGURING
S
ITE
C
ENTRAL
’
S
LAN IP S
UBNET
1.
From the menu bar click on Functions then click on IP Network, then on Subnets, or click
on the toolbar.
2.
Click on Add.
3.
Complete the Properties information.
a.
Enter CentLAN for the Subnet Name.
b.
Enter 231.231.231.0 for the Subnet Address (the subnet’s IP address). All devices on this
subnet must share a portion of the address (this is known as the network number, e.g., the
first 24 bits out of 32), and will also have a portion of the address act as a unique identifier
(this is known as the host address, e.g, the last 8 bits).
c.
Enter a Subnet Mask of 255.255.255.0. The subnet mask is a bit pattern that cancels out
unwanted bits so that only the bits of interest are left. For our example, the subnet address
is 231.231.231.0, and the mask is 255.255.255.0, the three sets of 255s will cancel out
231.231.231, leaving the last 8 bits as the bits of interest. All devices on the subnet will have
an address of 231.231.231.x, where x can be any number from 1 to 254.
d. Click on Add.
4.
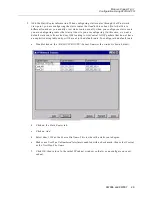
Add the Network Interfaces information.
a.
Click on the Network Interfaces tab.
b.
Click on Add.
c.
Select Central for the Site Name.
d. Select LAN for the Interface Type.
e.
Edit the Address field so that it reflects this interface’s IP address (231.231.231.1). Initially,
the address field will contain the subnet address; we just need to change the ending 0 to a 1.
f.
The IP address pool feature provides a pool of IP addresses that can be dynamically
assigned to remote IP devices as they connect to the system. This would occur when a
remote IP device calls into the system and has no IP address, and requests to have one
assigned. We will use this feature for our remote IP devices Rem_Modem and Rem_100.
Enter 231.231.231.240 for the Start IP Pool Address, and 231.231.231.254 for the End IP Pool
Address. This IP addressing pool scheme will reserve 15 IP addresses for dial in users.
Note:
For the IP address pool feature to work, the remote devices must configure a
gateway with an IP address of 231.231.231.1.
g.
Select 1 for the LAN Port Number. This is the module’s LAN port that will be associated with
this interface.
h. Click OK, then close the window.


