background image

32

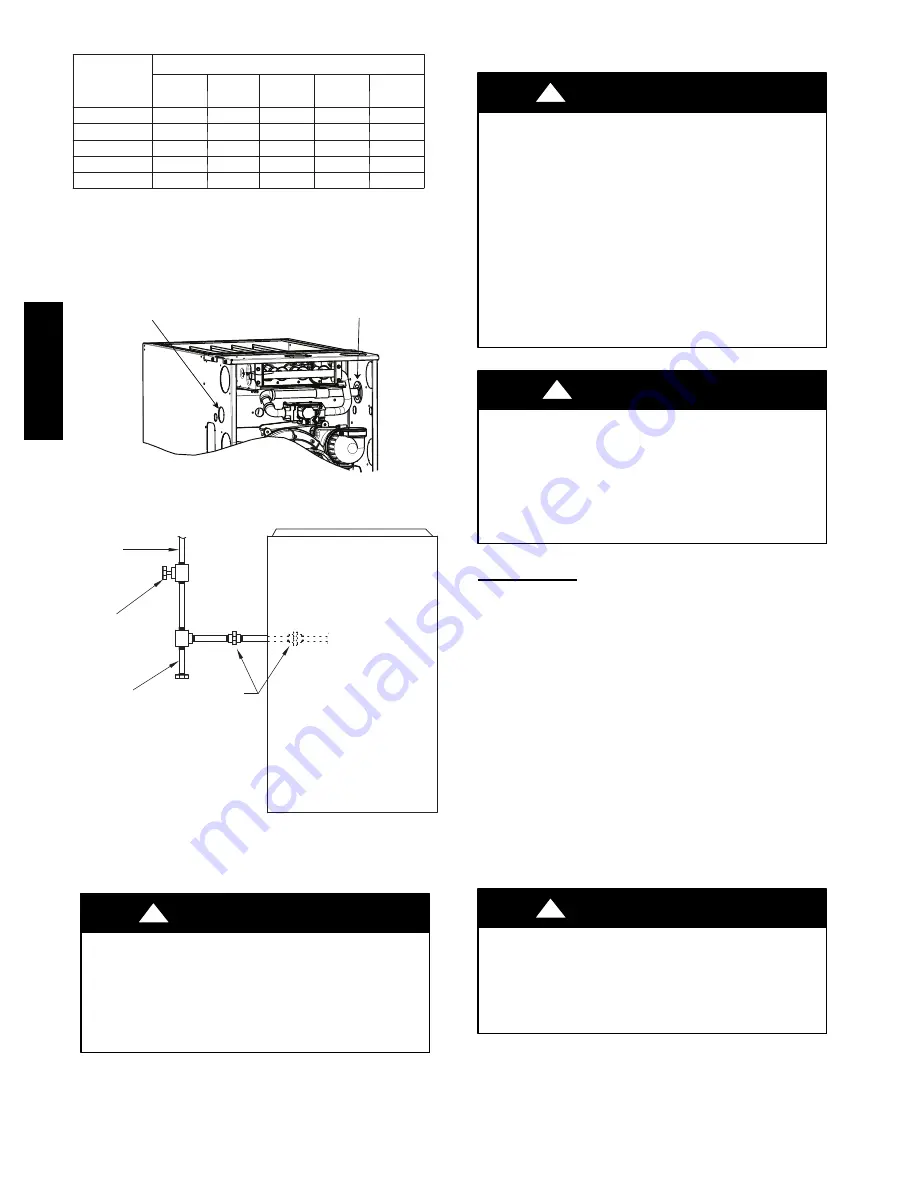
Table 10 – Maximum Capacity of Pipe

NOMINAL

IRON PIPE

SIZE

IN. (MM)

LENGTH OF PIPE --- FT (M)

10

(3.0)

20

(6.0)

30

(9.1)

40

(12.1)

50

(15.2)

1/2 (13)

175

120

97

82

73

3/4 (19)

360

250

200

170

151

1 ( 25)

680

465

375

320

285

1-1/4 (32)

1400

950

770

660

580

1-1/2 (39)

2100

1460

1180

990

900

* Cubic ft of gas per hr for gas pressures of 0.5 psig (14---in. w.c.) or less

and a pressure drop of 0.5---in. w.c. (based on a 0.60 specific gravity gas).

Ref: Table 10 above and 6.2 of NFPA54/ANSI Z223.1---2009.

Gas Pipe Grommet Required
For Direct Vent Applications

Left Side Gas Entry. Gas Pipe
Grommet Required For Direct
Vent Applications.

A11338

Fig. 30 -- Gas Entry

GAS

SUPPLY

MANUAL
SHUT OFF
VALVE
(REQUIRED)

SEDIMENT
TRAP

UNION

NOTE:  Union may be inside the
vestibule where permitted by
local codes.

FRONT

A11035

Fig. 31 -- Typical Gas Pipe Arrangement

ELECTRICAL CONNECTIONS

ELECTRICAL SHOCK HAZARD

Failure to follow this warning could result in personal

injury or death.
Blower door switch opens 115--v power to control. No

component operation can occur. Do not bypass or close

switch with blower door removed.

!

WARNING

See Fig. 35 for field wiring diagram showing typical field 115--v

wiring. Check all factory and field electrical connections for
tightness.

Field--supplied wiring shall conform with the limitations of 63

_

F

(33

_

C) rise.

ELECTRICAL SHOCK AND FIRE HAZARD

Failure to follow this warning could result in personal

injury, death, or property damage.
The cabinet MUST have an uninterrupted or unbroken

ground according to NEC ANSI/NFPA 70--2011 or local

codes to minimize personal injury if an electrical fault

should occur. In Canada, refer to Canadian Electrical Code

CSA C22.1. This may consist of electrical wire, conduit

approved for electrical ground or a listed, grounded power

cord (where permitted by local code) when installed in

accordance with existing electrical codes. Refer to the

power cord manufacturer’s ratings for proper wire gauge.

Do not use gas piping as an electrical ground.

!

WARNING

FURNACE MAY NOT OPERATE HAZARD

Failure to follow this caution may result in intermittent

furnace operation.
Furnace control must be grounded for proper operation or

else control will lock out. Control must remain grounded

through green/yellow wire routed to gas valve and manifold

bracket screw.

CAUTION

!

115--V Wiring

Furnace must have a 115-v power supply properly connected and

grounded.

NOTE

: Proper polarity must be maintained for 115-v wiring. If

polarity is incorrect, control LED status indicator light will flash
rapidly and furnace will

NOT

operate.

Verify that the voltage, frequency, and phase correspond to that
specified on unit rating plate. Also, check to be sure that service

provided by utility is sufficient to handle load imposed by this
equipment. Refer to rating plate or Table 11 for equipment

electrical specifications.

U.S.A. Installations

: Make all electrical connections in accordance

with the current edition of the National Electrical Code (NEC)

ANSI/NFPA 70 and any local codes or ordinances that might
apply.

Canada Installations

: Make all electrical connections in

accordance with the current edition of the Canadian Electrical

Code CSA C22.1 and any local codes or ordinances that might

apply.

FIRE HAZARD

Failure to follow this warning could result in personal

injury, death, or property damage.
Do not connect aluminum wire between disconnect

switch and furnace. Use only copper wire. See Fig. 33.

!

WARNING

Use a separate, fused branch electrical circuit with a properly sized
fuse or circuit breaker for this furnace. See Table 11 for wire size

and fuse specifications. A readily accessible means of electrical

disconnect must be located within sight of the furnace.

PG92SAS

Summary of Contents for PG92SAS
Page 1: ...ERVICE AND MAINTENANCE PROCEDURES 70 Cleaning Heat Exchangers 75 SEQUENCE OF OPERATION 79 PARTS REPLACEMENT GUIDE 83 TABLES Loose Parts Bag 5 Minimum Clearances to Combustible Materials 5 Minimum Free Area Required 11 Minimum Space Volumes 11 Filter Size Information 24 Opening Dimensions 25 Air Delivery CFM 30 Maximum Capacity of Pipe 32 Electrical Data 34 Vent Termination Kit for Direct Vent 2 Pi...

Page 2: ...aust vent terminal for the horizontally vented gas fueled heating appliance or equipment The sign shall read in print size no less than one half 1 2 inch in size GAS VENT DIRECTLY BELOW KEEP CLEAR OF ALL OBSTRUCTIONS 4 INSPECTION The state or local gas inspector of the side wall horizontally vented gas fueled equipment shall not approve the installation unless upon inspection the inspector observe...

Page 3: ...nal injury Sheet metal parts may have sharp edges or burrs Use care and wear appropriate protective clothing safety glasses and gloves when handling parts and servicing furnaces CAUTION This is the safety alert symbol When you see this symbol on the furnace and in instructions or manuals be alert to the potential for personal injury Understand the signal words DANGER WARNING and CAUTION These word...

Page 4: ...n the United States and Canada follow all codes and standards for the following Safety S US National Fuel Gas Code NFGC NFPA 54 2009 ANSI Z223 1 2009 and the Installation Standards Warm Air Heating and Air Conditioning Systems ANSI NFPA 90B S A manufactured Mobile home installation must conform with the Manufactured Home Construction and Safety Standard Title 24 CFR Part 3280 or when this standard...

Page 5: ... yourself in contact with the furnace Put all used and new controls into containers before touching ungrounded objects 7 An ESD service kit available from commercial sources may also be used to prevent ESD damage ACCESSORIES See Product Data Sheet for a list of accessories for this product Table 1 Factory Supplied Installation Parts DESCRIPTION QUANTITY Outlet Choke Plate provided with 40K BTUH fu...

Page 6: ...H MM 22 2 7 8 7 8 22 2 POWER CONN AIR FLOW SEE NOTE 3 NOTES 1 Doors may vary by model 2 Minimum return air openings at furnace based on metal duct If flex duct is used see flex duct manufacturer s recommendations for equivalent diameters a For 800 CFM 16 in 406 mm round or 14 1 2 x 12 in 368 x 305 mm rectangle b For 1200 CFM 20 in 508 mm round or 14 1 2 x 19 1 2 in 368 x 495 mm rectangle c For 160...

Page 7: ...DITIONED AIR IS DISCHARGED DOWNWARD THE BLOWER IS LOCATED TO THE LEFT OF THE BURNER SECTION AND CONDITIONED AIR IS DISCHARGED TO THE RIGHT A12181 Fig 2 Multipoise Orientations 60 80 27 C 16 C SUPPLY AIR A10490 Fig 3 Freeze Protection and Return Air Temperature BACK POSITIONED DOWNWARD AIR RETURN CUT IN BACK BACK POSITIONED UPWARD A12182 Fig 4 Prohibited Installations 18 IN 457 2 mm MINIMUM TO BURN...

Page 8: ...ystem Refer to Air Ducts section S be provided ample space for servicing and cleaning Always comply with minimum fire protection clearances shown in Table 2 or on the furnace clearance to combustible construction label CARBON MONOXIDE POISONING COMPONENT DAMAGE HAZARD Failure to follow this warning could result in personal injury or death and unit component damage Corrosive or contaminated air may...

Page 9: ...ns for adequate combustion ventilation and dilution air must be provided in accordance with S U S A Installations Section 9 3 of the NFPA 54 ANSI Z223 1 2009 Air for Combustion and Ventilation and applicable provisions of the local building codes S Canada Part 8 of the CAN CSA B149 1 2010 Venting Systems and Air Supply for Appliances FURNACE CORROSION HAZARD Failure to follow this caution may resu...

Page 10: ...ms can be considered part of a space if a There are no closeable doors between rooms b Combining spaces on same floor level Each opening shall havefreeareaofat least1 in 2 1 000Btuh 2 000mm2 kW of the total input rating of all gas appliances in the space but not less than 100 in 2 0 06 m2 One opening shall commence within 12 in 300 mm of the ceiling and the second opening shall commence within 12 ...

Page 11: ...tical Ducts or Openings 60 000 40 000 100 000 divided by 3 000 33 3 Sq In for each Single Duct or Opening 80 000 30 000 110 000 divided by 2 000 55 0 Sq In for each two Horizontal Ducts Table 4 Minimum Space Volumes for 100 Combustion Ventilation and Dilution Air from Outdoors OTHER THAN FAN ASSISTED TOTAL 1 000 S BTUH GAS INPUT RATE FAN ASSISTED TOTAL 1 000 S BTUH GAS INPUT RATE ACH 30 40 50 40 6...

Page 12: ...B C D D E F G L12F012 Fig 6 Air for Combustion Ventilation and Dilution for Outdoors Minimum opening size is 100 sq in 64516 sq mm with minimum dimensions of 3 in 76mm Minimum of 3 in 76mm when type B1 vent is used L12F013 Fig 7 Air for Combustion Ventilation and Dilution from Indoors PG92SAS ...

Page 13: ... 10 and 11 A field supplied accessory Horizontal Installation Kit trap grommet is required for all direct vent horizontal installations only The kit contains a rubber casing grommet designed to seal between the furnace casing and the condensate trap See Fig 16 The field supplied accessory horizontal drain trap grommet is ONLY REQUIRED FOR DIRECT VENT APPLICATIONS It it NOT required for application...

Page 14: ... ports of the collector box Connect relief tube to port on collector box Rotate elbow to desired position and tighten clamp to 15 lb ïin Slide tube in standïoffs to adjust length Connect the new pressure switch tube from Loose Parts bag to port on front pressure switch Route tube through inducer standïoffs to adjust position of the tube Trim excess tube Connect pressure switch tube to port on coll...

Page 15: ...n Attach condensate trap with screw to collector box Slide relief tube in standïoffs to adjust length Vent elbow shown in alternate orientation Tighten clamp on inlet to vent elbow 15 lb ïin Align trap over middle and rightïhand port on collector box NOTE Remove knockout in casing before reïinstalling the condensate trap Install plug on open port of collector box Horizontal Right Trap Configuratio...

Page 16: ...osition and torque clamp on inlet 15 lb in Slide relief tube in stand offs to adjust length Attach condensate trap with screw to collector box Align trap over middle and right hand port on collector box Install two plugs previously removed in open ports on collector box Connect relief tube to port on collector box Connect the new pressure switch tube from Loose Parts bag to port on front pressure ...

Page 17: ...n knockout in the casing 5 Pull the grommet through the casing from the outside until it is seated in the knockout 6 Attach the plain end of the drain elbow to the outlet stub on the drain trap Secure the drain elbow to the trap with the spring clamp The remaining drain line can be constructed from field supplied 1 2 in CPVC or 3 4 in PVC pipe in compliance with local building codes A factory supp...

Page 18: ...ay cause kinks in the elbow Horizontal Orientation 1 The condensate trap outlet extends 2 in 51 mm below the furnace casing Leave enough clearance between the furnace and the furnace platform for the trap 2 To allow for servicing the trap the condensate drain elbow in the loose parts bag can be used to make a coupler to allow for future service of the condensate trap and drain line 3 Remove the kn...

Page 19: ...rect vent applications A11582 Fig 16 Horizontal Drain Trap Grommet s TRAP DRAIN ELBOW WITH DISCHARGE PIPE Attach elbow to condensate trap Cut formed end off condensate drain elbow Connect short end of Z pipe to modified drain elbow Factory supplied 1 2ïin CPVC to 3 4ïin PVC adapter LEFT SIDE DRAIN ROUTED BEHIND INDUCER Formed end of grommet Open spring clamp Insert 1 2ïin to 3 4ïin CPVC to PVC ada...

Page 20: ...esired In upflow position with side return inlet s leveling legs may be used See Fig 22 Install field supplied 5 16 x 1 1 2 in 8 x 38 mm max corrosion resistant machine bolts washers and nuts NOTE Bottom closure must be used when leveling legs are used It may be necessary to remove and reinstall bottom closure panel to install leveling legs To remove bottom closure panel see Item 1 in Bottom Retur...

Page 21: ... piece of sheet metal for flame roll out protection in front of burner area for furnaces closer than 12 in 305 mm above the combustible deck or suspended furnaces closer than 12 in 305 mm to joists The sheet metal MUST extend underneath the furnace casing by 1 in 25 mm with the door removed The bottom closure panel on furnaces of widths 17 1 2 in 445 mm and larger may be used for flame roll out pr...

Page 22: ...airflow versus Airflow for a variety of filter media types and sizes These are representative numbers Consult the filter or IAQ device manufacturers specification sheet for performance data for a particular filter media or IAQ device Design the filter and associated ductwork for the best match of pressure drop versus filter size Best practice usually chooses filter systems with pressure drops unde...

Page 23: ...51 0 31 79 1600 755 0 08 19 0 15 38 0 16 40 0 24 61 1800 850 0 08 21 0 18 47 0 18 47 0 29 73 2000 944 0 09 23 0 22 56 0 21 54 2200 1038 0 09 24 0 26 66 0 25 62 25 x 25 Filter 635 x 635 mm Factory Accessory Washable Factory Accessory Media Representative After Market Filter Media Fiberglass Pleated CFM L s 1 in 2 5 cm 4 in 10 cm 1 in 2 5 cm 2 in 5 cm 1 in 2 5 cm 2 in 5 cm 800 378 0 03 9 0 03 8 0 05...

Page 24: ...25 x 3 4 508 x 635 x 19 Washable 24 1 2 622 16 x 25 x 3 4 406 x 635 x 19 24 x 25 x 3 4 610 x 635 x 19 Washable Recommended to maintain air filter face velocity See Product Data for part number Not all families have these models TABS FILTER FRAME FILTER FIELD SUPPLIED DOOR FURNACE OPENING TABS TYP 3 4 OPENING 14 1 2 16 1 8 23 8 1 2 3 8 11 4 11 4 25 1 8 17 1 8 23 1 8 32 mm 10 mm 13 mm 60 mm 19 mm 41...

Page 25: ...2 419 19 5 8 498 Downflow applications on combustible flooring KGASB sub base required 15 1 8 384 19 483 16 3 4 425 20 5 8 600 Downflow Applications on Combustible Flooring with CNPV CNRV CAR or CAP Coil Assembly or KCAKC coil box KGASB subbase not required 15 1 2 394 19 483 16 1 2 419 20 508 21 533 Upflow Applications on Combustible or Noncombustible Floor ing KGASB subbase not required 19 1 2 49...

Page 26: ...t Flanges 1 3 4 1 3 4 1 3 4 1 3 4 5 16 5 16 5 16 5 16 44mm 8mm 44mm 8mm 8mm 8mm 44mm 44mm A89014 Fig 22 Leveling Legs BOTTOMPLATE BOTTOM CLOSURE PANEL A11092 Fig 23 Removing Bottom Closure Panel LEVEL 0 IN 0 MM TO 1 2 IN 13 MM MAX UPFLOW OR DOWNFLOW HORIZONTAL MIN 1 4 IN 6 MM TO 1 2 IN 13 MM MAX A11237 Fig 24 Furnace Pitch Requirements PG92SAS ...
Page 27: ... Fig 25 Upflow Return Air Configurations and Restrictions A11037 Fig 26 Downflow Return Air Configurations and Restrictions HORIZONTAL TOP RETURN NOT PERMITTED FOR ANY MODEL A11038 Fig 27 Horizontal Return Air Configurations and Restrictions PG92SAS ...

Page 28: ...g 28 Working Platform for Attic Installation NOTE Local codes may require a drain pan and condensate trap when a condensing furnace is installed over a finished ceiling 2 IN 51 mm COMBUSTION AIR PIPE SEE VENTING SECTION A11155 Fig 29 Suspended Furnace Installation NOTE Local codes may require a drain pan and condensate trap when a condensing furnace is installed over a finished ceiling PG92SAS ...

Page 29: ...ctions to furnace with code approved tape or duct sealer NOTE Flexible connections should be used between ductwork and furnace to prevent transmission of vibration Ductwork passing through unconditioned space should be insulated to enhance system performance When air conditioning is used a vapor barrier is recommended Maintain a 1 in 25 mm clearance from combustible materials to supply air ductwor...

Page 30: ... 3 4 Black 2415 2330 2245 2155 2065 1965 1865 1760 1645 1530 Yellow 2130 2075 2010 1945 1865 1785 1695 1600 1490 1375 Orange 1830 1815 1785 1740 1685 1625 1550 1470 1370 1255 Blue 1690 1680 1655 1620 1580 1530 1465 1385 1295 1185 Red 1415 1405 1390 1370 1345 1305 1260 1200 1125 1050 060120 BOTTOM or TWO SIDES 3 4 Black 2440 2360 2295 2215 2105 1975 1815 1710 1575 1405 Blue 2300 2245 2185 2090 2005...

Page 31: ...ew listed connector Do not use a connector which has previously served another gas appliance Black iron pipe shall be installed at the furnace gas control valve and extend a minimum of 2 in 51 mm outside the furnace WARNING FURNACE DAMAGE HAZARD Failure to follow this caution may result in furnace damage Connect gas pipe to furnace using a backup wrench to avoid damaging gas controls and burner mi...

Page 32: ...unded power cord where permitted by local code when installed in accordance with existing electrical codes Refer to the power cord manufacturer s ratings for proper wire gauge Do not use gas piping as an electrical ground WARNING FURNACE MAY NOT OPERATE HAZARD Failure to follow this caution may result in intermittent furnace operation Furnace control must be grounded for proper operation or else c...

Page 33: ... J Box bracket 3 Secure power cord to J Box bracket with a strain relief bushing or a connector approved for the type of cord used 4 Pull furnace power wires through 1 2 in 12 mm diameter hole in J Box If necessary loosen power wires from strain relief wire tie on furnace wiring harness 5 Connect field ground wire and factory ground wire to green ground screw on J Box mounting bracket as shown in ...

Page 34: ...80 115 60 1 127 104 9 6 13 0 14 28 8 5 15 60080 115 60 1 127 104 14 5 19 1 12 30 9 1 20 42100 115 60 1 127 104 7 6 10 4 14 35 10 7 15 60100 115 60 1 127 104 14 6 19 2 12 29 8 8 20 60120 115 60 1 127 104 14 9 19 6 12 29 8 8 20 Permissible limits of the voltage range at which the unit operates satisfactorily Unit ampacity 125 percent of largest operating component s full load amps plus 100 percent o...

Page 35: ...ECT CONDENSING UNIT TWO WIRE FURNACE C O N T R O L R G COM W C R G Y GND GND FIELD 24 V WIRING FIELD 115 208 230 460 V WIRING FACTORY 24 V WIRING FACTORY 115 V WIRING 208 230 OR 460 V THREE PHASE 208 230 V SINGLE PHASE BLOWER DOOR SWITCH WHT BLK WHT BLK NOTES Connect Y terminal in furnace as shown for proper blower operation Some thermostats require a C terminal connection as shown If any of the o...

Page 36: ...UTRAL CONNECTIONS COOL HEAT SPARE 1 SPARE 2 BLOWER SPEED SELECTION TERMINALS EAC 1 TERMINAL 115 VAC 1 0 AMP MAX 115 VAC L1 LINE VOLTAGE CONNECTION PL2 HOT SURFACE IGNITER INDUCER MOTOR CONNECTOR PL1 LOW VOLTAGE MAIN HARNESS CONNECTOR TRANSFORMER 24 VAC CONNECTIONS HUMIDIFIER TERMINAL 24 VAC 0 5 AMP MAX TWINNING AND OR COMPONENT TEST TERMINAL BLOWER OFF DELAY J2 J2 JUMPER PLT PL1 SPARE 3 SPARE 3 1 ...

Page 37: ... system must be UL listed material Acceptability under Canadian standard CAN CSA B149 is dependent upon full compliance with all installation instructions Under this standard it is recommended that the vent system be checked once a year by qualified service personnel The authority having jurisdiction gas inspection authority municipal building department fire department etc should be consulted bef...

Page 38: ...e system or Fig 48 for single pipe or ventilated combustion air option A furnace shall not be connected to a chimney flue serving a separate appliance designed to burn solid fuel Other gas appliances with their own venting system may also use the abandoned chimney as a raceway providing it is permitted by local code the current edition of the National Fuel Gas Code and the vent or liner manufactur...

Page 39: ... See Fig 49 This short inlet air pipe helps to ensure stable combustion as well as allow for sound attenuation To aid sound attenuation point the inlet air pipe away from occupants An extra elbow and or five feet of pipe may be used to accomplish the sound attenuation function OPTIONAL VENTING BELOW THE FURNACE The venting system may be positioned below the furnace ONLY IF the factory accessory Ex...

Page 40: ...ystem A 12 in long section of pipe with a tight radius 2 in 51 mm 90 degree elbow is required to be attached to the furnace See Fig 49 This short inlet air pipe helps to ensure stable combustion as well as allow for sound attenuation To aid sound attenuation point the inlet air pipe away from occupants An extra elbow and or five feet of pipe may be used to accomplish the sound attenuation function...

Page 41: ...and for calculating total vent lengths To calculate the Total Equivalent Vent Length TEVL of the venting system 1 Measure the individual distance from the furnace to the ter mination for each pipe 2 Count the number of elbows for each pipe 3 For each pipe multiply the number of elbows by the equi valent length for the type of elbow used Record the equi valent length of all the elbows for each pipe...

Page 42: ... per the instructions provided Follow all procedures outlined in these instructions WARNING CARBON MONOXIDE POISONING HAZARD Failure to follow this warning could result in personal injury or death DO NOT use cement to join polypropylene venting systems Follow the polypropylene venting system manufacturer s instructions for installing polypropylene venting systems WARNING NOTE The rubber coupling t...

Page 43: ...ith a primer that is appropriate for the type of pipe being used 5 Re insert the pipe through the casing into the vent elbow 6 Tighten the clamp around the outlet of the vent elbow Torque the clamp to 15 lb in 7 Apply cement to the end of the pipe and to the inside of the plastic vent adapter 8 Slide the adapter over the vent pipe and align the screw holes in the adapter with the dimples in the fu...

Page 44: ...provided as a reference only RECOMMENDED SUPPORT FOR VENT TERMINATIONS It is recommended that sidewall vent terminations in excess of 24 inches 0 6 M in vertical length be supported by EITHER the Direct Vent Termination Kit shown in Table 12 or by field supplied brackets or supports fastened to the structure NOTICE Determine an appropriate location for termination kit using the guidelines provided...

Page 45: ... Cement For ABS D2241 PVC Pipe SDR 21 SDR 26 D2466 PVC Fittings Schedule 40 D2468 ABS Fittings Schedule 40 D2564 For PVC Solvent Cement For PVC D2661 ABS Pipe Fittings DWV at Schedule 40 IPS sizes D2665 PVC Pipe Fittings DWV F438 CPVC Fittings Schedule 40 F441 CPVC Pipe Schedule 40 F442 CPVC Pipe SDR F493 For CPVC Solvent Cement For CPVC F628 ABS Pipe Cellular Core DWV at Schedule 40 IPS sizes F65...

Page 46: ... 3 40 2 33 8 27 1 6 1 21 3 47 9 40 5 32 6 20 30 Ft 20 25 23 14 1 20 70 94 77 57 20 70 113 94 71 M 6 1 7 6 7 0 4 3 0 3 6 1 21 3 28 7 23 5 17 4 6 1 21 3 34 4 28 7 21 6 40 40 Ft 20 14 12 3 0 20 70 71 56 38 20 70 86 70 50 M 6 1 4 3 3 7 0 9 0 0 6 1 21 3 21 6 17 1 11 6 6 1 21 3 26 2 21 3 15 2 100000 20 10 Ft N A 25 99 89 78 N A 25 110 233 265 N A 25 110 235 229 M N A 7 6 30 2 27 1 23 8 N A 7 6 33 5 71 0...

Page 47: ... NA NA 60 000 23 7 0 119 36 3 210 64 0 235 71 6 NA 80 000 15 4 6 59 18 0 155 47 2 210 64 0 232 70 7 100 000 NA 19 5 8 98 29 9 211 64 3 236 71 9 120 000 NA NA 8 2 4 86 26 2 224 68 3 140 000 4 NA NA NA 79 24 1 158 48 2 4001 to 4500 1219 to 1370 40 000 36 11 0 177 53 9 205 62 5 NA NA 60 000 21 6 4 115 35 1 204 62 2 228 69 5 NA 80 000 14 4 3 56 17 1 150 45 7 202 61 6 224 68 3 100 000 NA 17 5 2 94 28 7...

Page 48: ...valent Vent Length TEVL 112 ft Add all of the above lines Maximum Equivalent Vent Length MEVL 127 ft For 2 pipe from Table 15 Is TEVL less than MEVL YES Therefore 2 pipe may be used Example 2 A direct vent 60 000 Btuh furnace installed at 2100 ft 640 M Venting system includes FOR EACH PIPE 100 feet 30 M of vent pipe 95 feet 28 M of combustion air inlet pipe 3 90_ long radius elbows and a polypropy...

Page 49: ...0 2438 to 2743 40 000 10 3 0 121 36 9 130 39 6 NA NA 60 000 7 2 1 82 25 0 152 46 3 168 51 2 NA 80 000 NA 35 10 7 111 33 8 148 45 1 156 47 5 100 000 NA NA 67 20 4 157 47 9 170 51 8 120 000 NA NA NA 56 17 1 164 50 0 140 000 4 NA NA NA 23 7 0 42 12 8 9001 to 10 000 2743 to 3048 40 000 5 1 5 110 33 5 115 35 1 NA NA 60 000 NA 76 23 2 142 43 3 156 47 5 NA 80 000 NA 31 9 4 103 31 4 137 41 8 142 43 3 100 ...

Page 50: ...pling and Adapter A11314 Fig 37 Vent Coupling and Adapter with Gaskets PSC INDUCER ASSEMBLY INDUCER OUTLET VENT ELBOW CLAMP TORQUE 15 LB IN VENT PIPE CLAMP TORQUE 15 LB IN VENT ELBOW INDUCER OUTLET CHOKE 40 000 BTUH MODELS ONLY A11285 Fig 38 Inducer Vent Elbow PG92SAS ...

Page 51: ...pling over standoffs on adapter Slide clamps over the coupling Slide vent pipe through adapter and coupling into vent elbow Insert vent pipe into vent elbow Torque all clamps 15 lb in Attach combustion air pipe adapter with gasket to furnace Attach combustion air pipe to adapter with silicone Pilot drill a 1 8 in hole in adapter and secure with a 7 x 1 2 in sheet metal screw 1 2 3 4 5 6 7 1 2 3 4 ...

Page 52: ...o furnace Attach combustion air pipe to adapter with silicone Pilot drill a 1 8 in hole in adapter and secure with a 7 x 1 2 in sheet metal screw 1 2 3 4 5 6 7 1 2 3 4 5 6 7 5 Rotate vent elbow to required position A11311 1 2 3 4 5 6 7 5 Rotate vent elbow to required position Any other unused knockout may be used for combustion air connection A11312 Requires Accessory Internal Vent Kit See Product...

Page 53: ...tches in rubber coupling over standoffs on adapter Slide clamps over the coupling Slide vent pipe through adapter and coupling into vent elbow Insert vent pipe into vent elbow Torque all clamps 15 lb in Attach combustion air pipe to adapter with silicone Pilot drill a 1 8 in hole in adapter and secure with a 7 x 1 2 in sheet metal screw 1 2 3 4 5 6 7 Attach combustion air pipe adapter with gasket ...

Page 54: ...es in rubber coupling over standoffs on adapter Slide clamps over the coupling Slide vent pipe through adapter and coupling into vent elbow Insert vent pipe into vent elbow Torque all clamps 15 lb in Attach combustion air pipe to adapter with silicone Pilot drill a 1 8 in hole in adapter and secure with a 7 x 1 2 in sheet metal screw 1 2 3 4 5 6 7 Attach combustion air pipe adapter with gasket to ...

Page 55: ...OUPLING OVER STAND OFF ON ADAPTER TORQUE LOWER CLAMP 15 LB IN WHEN REMAINING VENT PIPE IS INSTALLED TORQUE UPPER CLAMP TO 15 LB IN A11339 Fig 43 Vent Pipe Flush with Adaptor 12 256mm minimum to 60 1524 mm or 1 additional elbow maximum CASING SIDE ATTACHMENT COMBUSTION AIR PIPE NON DIRECT VENT Point elbow down towards back of furnace L12F042 Fig 44 Combustion Air Pipe Attachment PG92SAS ...

Page 56: ...y open on a minimum of two sides beneath the floor See Note 4 Manufacturer s Recommendation See Notes 3 8 M Clearance to each side of the centerline extended above or below vent terminal of the furnace to a dryer or water heater vent or other appliance s direct vent intake or exhaust 12 in 305 mm 12 in 305 mm N Inlet air clearance to a moisture exhaust duct dryer vent spa exhaust etc 3 ft 9 M 3 ft...

Page 57: ...ly open on a minimum of two sides beneath the floor See Note 4 Manufacturer s Recommendation See Notes 3 8 M Clearance to each side of the centerline extended above or below vent terminal of the furnace to a dryer or water heater vent or other appliance s direct vent intake or exhaust 12 in 305 mm 12 in 305 mm N Inlet air clearance to a moisture exhaust duct dryer vent spa exhaust etc 3 ft 9 M 3 f...

Page 58: ...l Maintain 12 in 305mm min Clear ance above highest anticipated snow level or grade whichever is greater Typ Concentric Vent and Combustion Air Side Termination Roof Termination Preferred Note A denotes 0 To 2 in 51mm Between the first 2 vents Third vent and fourth vent if used must be 36 in Away 914mm Note 36 in separation between pairs of inlets only required for direct vent systems L12F044 Fig ...

Page 59: ... COMBUSTION AIR AND BOTTOM OF VENT MAINTAIN 12 IN 305 MM CLEARANCE ABOVE HIGHEST ANTICIPATED SNOW LEVEL OR GRADE WHICHEVER IS GREATER COMBUSTION AIR ELBOW PARALLEL TO WALL OVERHANG 12 IN 305 MM MIN GROUND LEVEL OR SNOW LEVEL EXHAUST CLEARANCE TO OVERHANG PER CODE OPTIONAL BRACKET COUPLING A12221 Fig 49 Alberta and Saskatchewan Vent Termination PG92SAS ...

Page 60: ...ipe hangar Ventilated Combustion Air intake termination in crawl space Ventilated Combustion Air intake pipe CRAWL SPACE ATTIC highest level of insulation A10497 Fig 50 Vent Terminations for Ventilated Combustion Air PG92SAS ...

Page 61: ...IGURATIONS A12220 Fig 51 Sample Inlet Air Pipe Connection for Polypropylene Venting Systems Representative drawing only some models may vary in appearance TO CODEïAPPROVED DRAIN OR CONDENSATE PUMP L1 L12F028 Fig 52 Optional Combustion Air Inlet Moisture Trap PG92SAS ...

Page 62: ... The condensate trap has two internal chambers which can ONLY be primed by pouring water into the inducer drain side of condensate trap CAUTION 1 Remove upper and middle collector box drain plugs oppos ite of the condensate trap See Fig 59 2 Connect field supplied 5 8 in 16 mm ID tube with at tached funnel to upper collector box drain connection See Fig 59 3 Pour one quart liter of water into funn...

Page 63: ...d orifice hole is essential for proper flame characteristics NOTICE 6 Replace orifice with correct size if required as shown in Table 21 Use only factory supplied orifices See EX AMPLE 1 EXAMPLE 1 0 2000 ft 0 609 6M altitude Heating value 1050 Btu cu ft Specific gravity 0 62 Therefore Orifice No 44 Furnace is shipped with No 44 orifices In this example all main burner orifices are the correct size...

Page 64: ...are allowed for proper heating airflow DO NOT use the highlighted settings for Heating airflow The highlighted settings are to be used for Cooling and Continuous Fan ONLY CAUTION Change these settings as required to maintain proper temperature rise for Heating and Cooling as described above To change blower motor speed selections for heating mode remove blower motor lead from control HEAT terminal...

Page 65: ...erify that the jumper is removed from the TEST TWIN terminal Verify that there is nothing plugged into the PLT connector Note If there is a jumper connector plugged into PLT remove it and discard See Fig 36 3 Verify that the Blower Heat Off Delay jumpers are set as desired See Fig 36 and 65 4 Verify that the blower lower door in upflow position and control Main or upper door in upflow position doo...

Page 66: ...66 338309 201 Rev E A11602 Fig 56 Service Label Information PG92SAS ...

Page 67: ... 23 157 313 783 66 54 109 273 24 150 300 750 68 53 106 265 25 144 288 720 70 51 103 257 26 138 277 692 72 50 100 250 27 133 267 667 74 48 97 243 28 129 257 643 76 47 95 237 29 124 248 621 78 46 92 231 30 120 240 600 80 45 90 225 31 116 232 581 82 44 88 220 32 113 225 563 84 43 86 214 33 109 218 545 86 42 84 209 34 106 212 529 88 41 82 205 35 103 206 514 90 40 80 200 36 100 200 500 92 39 78 196 37 ...

Page 68: ... 3 7 43 3 8 42 3 2 850 44 3 8 43 3 5 43 3 6 43 3 7 875 44 3 6 44 3 7 43 3 4 43 3 5 4000 900 44 3 4 44 3 5 44 3 7 44 3 8 1219 925 44 3 2 44 3 4 44 3 5 44 3 6 950 44 3 1 44 3 2 44 3 3 44 3 4 750 42 3 3 42 3 4 42 3 5 42 3 6 4001 775 43 3 7 43 3 8 42 3 3 42 3 4 1220 800 43 3 5 43 3 6 43 3 7 43 3 8 825 44 3 8 43 3 4 43 3 5 43 3 6 850 44 3 5 44 3 7 44 3 8 43 3 4 5000 875 44 3 3 44 3 5 44 3 6 44 3 7 1524...

Page 69: ...2 3 2 725 44 3 8 43 3 4 43 3 5 43 3 6 750 44 3 5 44 3 7 44 3 8 43 3 4 8000 775 44 3 3 44 3 4 44 3 5 44 3 7 2438 800 44 3 1 44 3 2 44 3 3 44 3 4 825 44 2 9 44 3 0 44 3 1 44 3 2 625 42 3 4 42 3 5 42 3 6 42 3 7 8001 650 43 3 8 42 3 2 42 3 3 42 3 4 2439 675 43 3 5 43 3 6 43 3 7 42 3 2 700 44 3 7 43 3 4 43 3 5 43 3 6 725 44 3 5 44 3 6 44 3 7 44 3 8 9000 750 44 3 3 44 3 4 44 3 5 44 3 6 2743 775 44 3 0 4...

Page 70: ...ation NOTE If the polarity is not correct the STATUS LED on the control will flash rapidly and prevent the furnace from heating The control system also requires an earth ground for proper operation of the control and flame sensing electrode The 24 v circuit contains an automotive type 3 amp fuse located on the control See Fig 36 Any shorts of the 24 v wiring during installation service or maintena...

Page 71: ...he Blower Heat Off Delay jumpers are set as desired See Fig 36 4 Verify that the blower and control Main doors are properly installed 5 Verify that the Status LED glows If not check that the power supply is energized and that the blower door is secure See Fig 56 6 Cycle test furnace with room thermostat to be sure that it operates properly with the room thermostat Check all modes including Heat Co...

Page 72: ...icated and require no additional lubrication These motors can be identified by the absence of oil ports on each end of the motor The following items should be performed by a qualified service technician Clean blower motor and wheel as follows 1 Turn off electrical supply to furnace 2 Remove blower door 3 All factory wires can be left connected but field thermostat and accessory wiring may need to ...

Page 73: ...power at external disconnect fuse or circuit breaker 2 Turn off gas at external shut off or gas meter 3 Remove control door and set aside 4 Turn electric switch on gas valve to OFF 5 Disconnect the gas pipe from gas valve and remove pipe from the furnace casing 6 Remove individual wires from terminals on gas valve 7 Disconnect Hot Surface Igniter HSI wires from HSI 8 Disconnect Flame Sensor wire f...

Page 74: ...switch tube disconnected from the pressure switch is higher than the collector box opening or water will flow out of tube 4 Remove the collector box plug from the top port on the up per corner of the collector box See Fig 59 5 Attach a funnel with a flexible tube to port on the collector box 6 Flush inside of collector box with water until discharge water from condensate trap is clean and runs fre...

Page 75: ...ould result in personal injury death and or property damage Turn off the gas and electrical supplies to the furnace and install lockout tag before performing any maintenance or service Follow the operating instructions on the label attached to the furnace WARNING 2 Remove control door 3 Disconnect wires or connectors to flame rollout switch gas valve igniter and flame sensor 4 Using backup wrench ...

Page 76: ...reeze should run through the inducer housing overfill condensate trap and flow to an open drain 8 Replace the rubber plug in the port on the collector box 9 Remove the middle unused rubber plug from the port on the collector box opposite the condensate trap See Fig 59 10 Repeat Steps 5 through 8 11 If a condensate pump is used check with pump manufacturer to verify pump is safe for use with antifr...

Page 77: ...CREW MOTOR ARM GROMMET SCREW LOCATION BLOWER HSG ASSY BRACKET BRACKET ENGAGEMENT SEE DETAIL A CAPACITOR OR POWER CHOKE WHEN USED BRACKET SCREW GND BLOWER HSG ASSY MOTOR BLOWER WHEEL BLOWER CUTOFF BLOWER DETAIL A A11584 Fig 62 Blower Assembly PG92SAS ...

Page 78: ...78 FLAME SENSOR BELOW BURNER FLAME ROLLOUT SWITCH BRACKET IGNITER IGNITER BURNER SUPT ASSY BURNER ASSY A11403 Fig 63 Burner Assembly PG92SAS ...

Page 79: ...en the blower motor is energized on HEAT speed 25 sec after the gas valve GV is energized Simultaneously the electronic air cleaner terminal EAC 1 is energized and remains energized as long as the blower motor BLWM is energized f Blower Off Delay When the thermostat is satisfied the R to W circuit is opened de energizing thegas valveGV stopping gas flowto theburners andde energizing thehu midifier...

Page 80: ...ious fault or status code 11 1 short and 1 long flash if there was no previous fault After the control repeats the code 4 times the control will go through a brief component test sequence The inducer will start and run for the entire component test The HSI blower motor FAN speed when equipped HEAT speed and COOL speed will run for 10 15 seconds each Gas valve and humidifier will not be turned on W...

Page 81: ...sequence 3 more times before lockout 14 occurs If flame signal is lost during the blower on delay period blower will come on for the selected blower off delay Check the following items first before proceeding to the next step Gas valve turned off Manual shut off valve Green Yellow wire MUST be connected to furnace sheet metal Flame sensor must not be grounded To determine whether the problem is in...

Page 82: ...82 A12420 Fig 65 Wiring Diagram PG92SAS ...

Page 83: ...ied section of your local telephone directory under Heating Equipment or Air Conditioning Contractors and Systems headings for dealer listing by brand name or contact Consumer Relations Department P O Box 4952 Syracuse New York 13221 4952 1 800 428 4326 Have available the model number series number and serial number located on the unit rating plate to ensure correct replacement part Model Nomencla...

Page 84: ...0 W Morris St D Indianapolis IN 46231 Edition Date 08 12 Manufacturer reserves the right to change at any time specifications and designs without notice and without obligations Catalog No IM PG92SAS 03 Replaces IM PG92SAS 02 PG92SAS ...

Reviews: