background image

7

7

8. Maintenance & troubleshooting


Maintenance

•   If you clean and maintain your appliance on a regular basis, the life of your appliance will extend and the possibility of problems will 

decrease.

•   We recommend the service of your appliance to be every twelve (12) months by a service agent to ensure continued efficient operation.
•   This appliance must only be serviced by an authorized person.
•   Check your gas hose and connections regularly for any signs of leaks and every time the gas cylinder is re-filled or fitted to the appliance 

with every use.


Troubleshooting


 In the case of a spattering flame or jet blockage:

•   Clean your burner ports in case of an over spill. 

•   We recommend to clean or replace the jets every six (6) months to ensure continued efficient operation of your appliance. 
•   Should the appliance operate abnormally after storage and all checks have not isolated the problem, the jet may be blocked. A blocked 

jet would be indicated by a weaker yellowish flame or no flame at all in extreme cases. Under these circumstances it will be necessary to 
remove and check and thoroughly clean out any foreign matter which may have gathered in the appliance.

•   This may be done by removing the jet using standard tools and blow any dirt from the jet, alternatively, you may purchase new jets from 

your local store. Do not attempt to clean the jet mechanically.


Replacing a blocked jet

•   Your appliance is fitted with a specific size jet to regulate the correct amount of gas.
•  Should the hole in the jet become blocked, this may result in a small flame or no flame at all. Do not attempt to clean the jet with a pin or 

other such device as this may damage the orifice, which could make the appliance unsafe.

• 

To replace the jet:

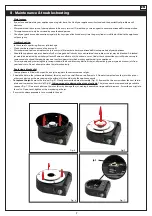
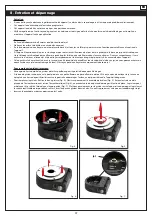
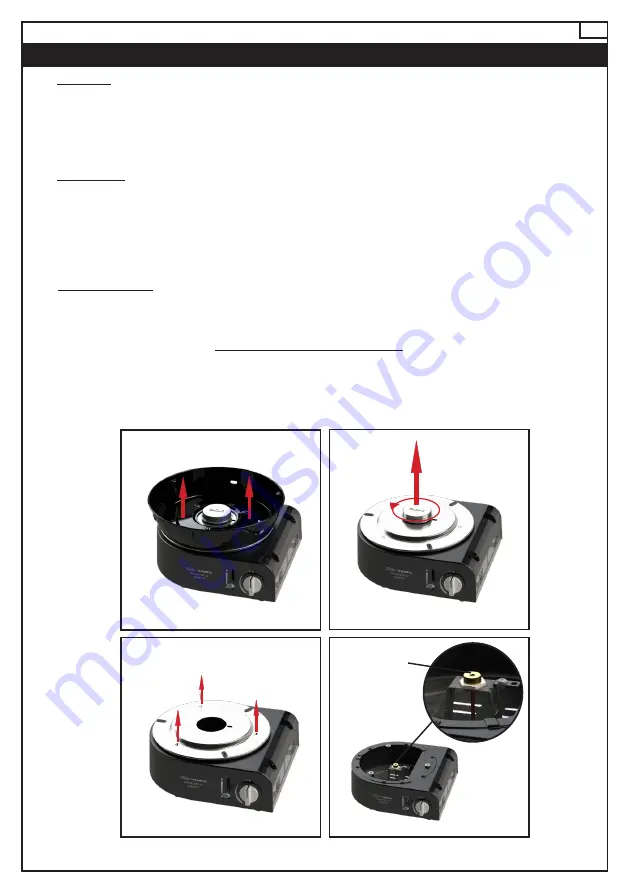
 Remove the fat pan (Fig. 4). Gently unscrew the burner assembly (Fig. 5). Remove the three screws from the heat shield 

plate and remove the heat shield (Fig. 6), 

taking care not to damage the piezo electrode.

 The jet can now be removed using a suitable 

spanner (Fig. 7). Do not use pliers on the jet as this may damage the jet, making it unusable or impossible to remove. Screw the new jet into 
the valve. Do not over-tighten as this may damage the jet.

•  Reverse the above procedure to re-assemble the unit.
  

EN

Fig. 4

Fig. 5

Fig. 7

Fig. 6

Jet

Summary of Contents for DOMETIC SAFARI CHEF 30 COMPACT

Page 1: ...503 0874 LEV1 USER INSTRUCTIONS EN ES FR NOTE PRODUCT MAY VARY FROM ILLUSTRATIONS MODEL No 6525L1 Direct Pressure SAFARI CHEF 30 COMPACT...

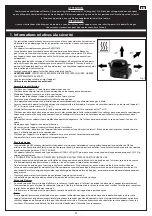
Page 2: ...SAFETY If you smell gas 1 Do not attempt to light the appliance 2 Extinguish any open flame 3 Disconnect from fuel supply CARBON MONOXIDE HAZARD This appliance can produce carbon monoxide which has n...

Page 3: ...fy this appliance any modification may be dangerous Do not use it for anything for which it has not been designed Do not move the appliance during use Never leave the appliance unattended when lit Dur...

Page 4: ...the remaining wall side back and front wall areas is open and unrestricted In the case of balconies 20 or more of the total wall area shall remain open and unrestricted EN Country of Use USA Canada Al...

Page 5: ...kwise until you hear a click If the gas has not ignited in the first two to three seconds you should close the control valve by turing the control knob back to its OFF position Wait approximately thir...

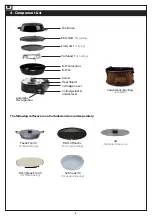
Page 6: ...for frying grilling Pizza Stone Pro 30 for Pizza baking EN Soft Soak 30 for easier cleaning Pot Dome Pot Stand For boiling Fat Pan Automatic Piezo Ignition Fat Pan locators Cartridge lock unlock lever...

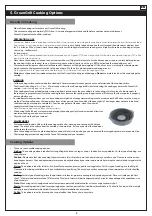
Page 7: ...ernight in hot soapy water making use of our convenient Soft Soak or use the vinegar method for the paella pan or chef pan pour a layer of vinegar into the pan and heat the pan slightly The vinegar do...

Page 8: ...with great success on some of the best cookware in the world Never the less taking care of it can help you to enjoy extra years of healthy easy non stick cooking Whilst the ceramic non stick coating...

Page 9: ...cumstances it will be necessary to remove and check and thoroughly clean out any foreign matter which may have gathered in the appliance This may be done by removing the jet using standard tools and b...

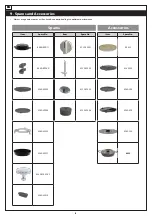
Page 10: ...ned to give optimum performance EN Item Spare No 6540 SP011 6540 SP020 6540 SP002 6540 SP004 6540 SP003 6540 SP017 6540 SP005 V2 6540 SP019 Item Spare No 6525 SP001 6525 SP002 6525 SP003 6525 SP004 It...

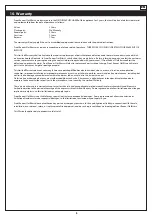
Page 11: ...ulties due to accident abuse misuse alteration misapplication vandalism improper installation or improper maintenance or service or failure to perform normal and routine maintenance including but not...

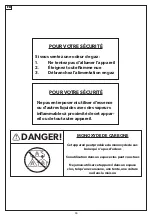
Page 12: ...ous sentez une odeur de gaz 1 Ne tentez pas d allumer l appareil 2 teignez toute flamme nue 3 D branchez l alimentation en gaz MONOXYDE DE CARBONE Cet appareil peut produire du monoxyde de car bone qu...

Page 13: ...e modification peut tre dangereuse Ne l utilisez pas pour quoi que ce soit pour lequel il n a pas t con u Ne d placez pas l appareil en cours d utilisation Ne laissez jamais l appareil sans surveillan...

Page 14: ...lus de la surface totale des murs doivent rester ouverts et sans restriction 2 Installation et changement de l alimentation en gaz Connexion de la cartouche Ouvrez le couvercle de la cartouche voir se...

Page 15: ...condes vous devez fermer la soupape de commande en ramenant le bouton de commande sur sa position OFF Attendez environ trente secondes pour laisser s chapper tout gaz accumul dans le br leur R p tez l...

Page 16: ...se Levier de verrouillage et de d verrouillage de la cartouche Bouclier thermique Br leuse Couvercle de la cartouche Paella Pan 30 pour Paella friture BBQ 2 Plancha pour frire griller Pizza Stone Pro...

Page 17: ...s pouvez essayer de faire tremper toute la nuit dans de l eau chaude savonneuse l aide de notre Soft Soak pratique ou utiliser la m thode au vinaigre verser une couche de vinaigre dans la po le et cha...

Page 18: ...ommand de n utiliser que des ustensiles en plastique ou en bois pour cuisiner Laissez toujours le gril plat plat refroidir avant de le plonger dans l eau Assurez vous qu aucune eau n entre en contact...

Page 19: ...rrait s tre accumul dans l appareil Cela peut tre fait en retirant la buse jet avec des outils standard et en soufflant tous les d bris de la buse jet ou vous pouvez acheter de nouvelles buses jet dan...

Page 20: ...ances optimales FR Pi ces de rechange Accessoires Article R f rences pi ces d tach es 6540 SP011 6540 SP020 6540 SP002 6540 SP004 6540 SP003 6540 SP017 6540 SP005 V2 6540 SP019 Article R f rences pi c...

Page 21: ...e notamment mais sans s y limiter des dommages caus s par des insectes dans les tubes de br leur comme expos dans ce manuel du propri taire Une d t rioration ou des dommages dus des conditions m t oro...

Page 22: ...gas 1 No intente encender el aparato 2 Apague cualquier llama viva 3 Desconecte del suministro de combus tible PELIGRO DEL MON XIDO DE CARBONO Este aparato puede producir mon xido de carbono que no ti...

Page 23: ...as lo est utilizando No deje nunca el aparato sin atender cuando est encendido Durante el uso las partes del aparato se calienta particularmente el quemador Evite tocar las partes calientes con las ma...

Page 24: ...stricciones En el caso de balcones el 20 o m s del rea total de la pared deber permanecer abierta y sin restricciones ES Pa s de uso USA Canada Gases permitidos Mezcla de butano propano Presi n de gas...

Page 25: ...v lvula de control girando la perilla de control nuevamente a su posici n OFF Espere aproximadamente treinta segundos para dejar escapar el gas acumulado dentro del quemador Repita el proceso anterio...

Page 26: ...lizadores de grasa Palanca de bloqueo y desbloqueo del cartucho Escudo t rmico Quemador Cubierta del cartucho Paella Pan 30 para paella fritura BBQ 2 Plancha para fre r a la parrilla Pizza Stone Pro 3...

Page 27: ...e antes de usar Para las manchas o residuos persistentes en la paellera o en la sart n del chef puede intentar remojar durante la noche en agua jabonosa caliente utilizando nuestro pr ctico Soft Soak...

Page 28: ...que solo se utilicen utensilios de pl stico o madera para cocinar Siempre permita que la parrilla placa plana se enfr e antes de sumergirla en agua Aseg rese de que no entre agua en los quemadores o e...

Page 29: ...haya podido acumular en el aparato Esto se puede hacer quitando la boquilla de chorro con herramientas est ndar y soplando cualquier residuo de la boquilla de chorro como alternativa puede comprar bo...

Page 30: ...para ofrecer un rendimiento ptimo ES Repuestos Accesorios Item Repuestos No 6540 SP011 6540 SP020 6540 SP002 6540 SP004 6540 SP003 6540 SP017 6540 SP005 V2 6540 SP019 Item Repuestos No 6525 SP001 6525...

Page 31: ...ervicio incorrecto o la falta de realizaci n del mantenimiento normal y de rutina incluyendo aunque no limit ndose solamente a da os causados por insectos dentro de los tubos de los quemadores de acue...

Page 32: ...a Namaacha Maputo Mozambique Tel 258 21 406254 www cadac co mz CADAC NEW ZEALAND Riverlea Group Pty Ltd 2A Maui Street Pukete Hamilton 3200 New Zealand Tel 64 7 847 0204 Email sales riverleagroup co n...

Reviews: