background image


© 2021 Carrier 

1 / 56 

P/N 466-

2948 • REV D • ISS 15MAR21 


NXG-433 xGen Wireless Expander Module 
Installation Sheet  

EN 

EL 

ES 

FR  FR-BE  IT 

NL  NL-BE  PT 


EN: Installation Sheet 

Product Summary 

The NXG-433 allows the addition of wireless devices to an 
xGen system. These include wireless reed switches, wireless 
motion sensors, universal inputs, and keyfobs. The xGen 
control panel model you are using will determine the number of 
wireless zones and keyfobs that can be added. 

The receiver is in a self-contained plastic housing and 
connects to an xGen control panel via the standard 4 wire 
buss. 

Additional features include: 2 zone inputs, 1 relay output, front 
and rear tamper. 

Current Limit Warning 

Check the current requirements of your load before 
connecting! 

There is no overcurrent protection on the relay when providing 
buss ground or bus voltage (jumper between - and C, or C 
and +). You must ensure your load does not exceed the 
recommended limits. Exceeding limits can damage the module 
and pose an electrical hazard. 

xGen panels do have PTC overcurrent protection on the bus 
and may disconnect the buss to provide temporary protection. 
If enabled, your panel will report "Overcurrent Fault" or 
"Expander Overcurrent". 

Installation Guidelines 

When installing the receiver: 

• 

Leave 10cm clear around all sides of the module for better 
signal reception 

• 

Avoid installing on or near metal surfaces such as filing 
cabinets and metal roller shutters 

• 

Avoid installing on or near electrical devices such as 
fridges, vacuum cleaners, air conditioners, computers, 
washing machines, and motors 

• 

Avoid areas that are damp and wet such as inside 
bathrooms and cool rooms 

Installing the Receiver 

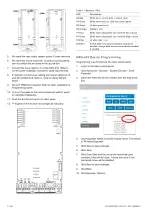
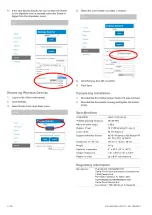
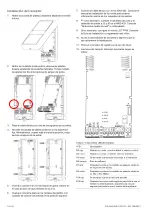
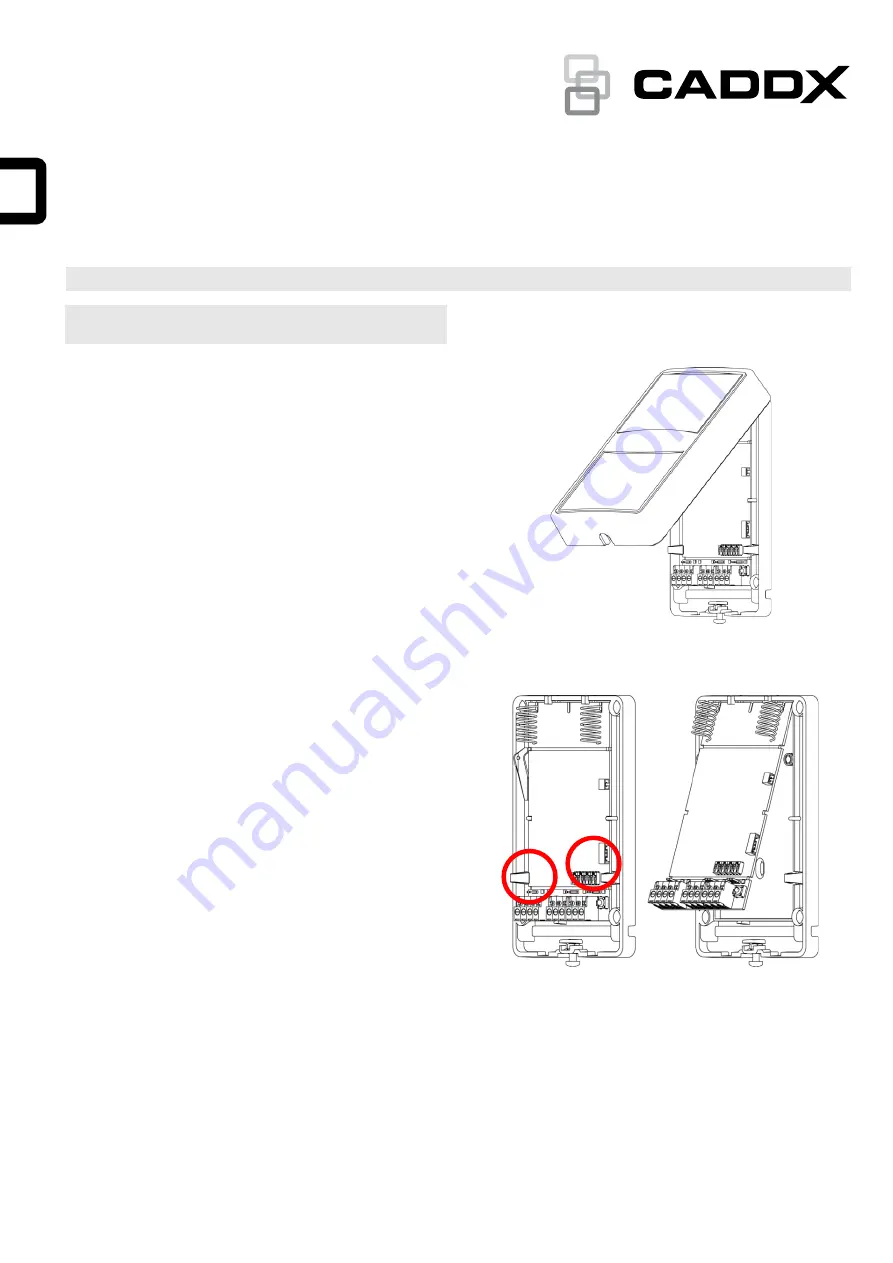
1.  Remove the front plastic housing by loosening the bottom 

screw. 


2.  Carefully remove the circuit board from the rear plastic 

housing by squeezing on the side tabs. Take care to put 
aside the two rubber tamper switches. 


3.  Feed the buss cable through one of the cable holes. 

4.  Screw the rear plastic housing to a fixed surface. Higher 

positions generally provide better signal reception. 


Summary of Contents for xGen NXG-433

Page 1: ...ended limits Exceeding limits can damage the module and pose an electrical hazard xGen panels do have PTC overcurrent protection on the bus and may disconnect the buss to provide temporary protection...

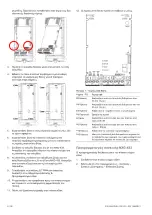
Page 2: ...data to control panel D4 Green Blinks when receiving data from control panel D9 Green Lit when power is on D8 Orange Software error D7 Blue Blinks when valid packet received from 63 bit device D6 Gre...

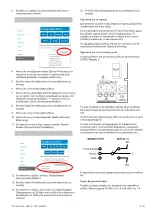
Page 3: ...erminal J6 with Normally Open and Normally Closed connections for your convenience D14 is a red LED that lights up when the relay is energized The relay can be configured in 3 different modes to suppo...

Page 4: ...ick Learn 7 Learn Mode Active will appear Trigger your wireless device Refer to the installation manual of the wireless device if you need assistance 8 New Device Found will appear and the Serial Numb...

Page 5: ...wn When the keyfob buttons are pressed the user s permissions will be checked and the user number will be reported If the keyfob is not assigned a user then it will be given Standard User permissions...

Page 6: ...the bottom screw Specifications Compatibility xGen control panels Wireless operating frequency 433 65 MHz Maximum power output 1 dBm Required Power 12 0 VDC provided by panel Current Draw 50 mA maximu...

Page 7: ...device is in compliance with the applicable requirements and provisions of all applicable rules and regulations including but not limited to the Directive 2014 53 EU For more information see firesecur...

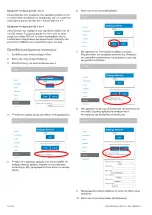
Page 8: ...8 56 P N 466 2948 REV D ISS 15MAR21 3 4 5 6 7 J1 NXG 433 8 J3 J6 NXG 433 9 J2 TERM xGen 10 11 xGen 12 1 LED LED D2 D4 D9 D8 D7 63 bit D6 80plus D14 D15 module module NXG 433 xGen 1 xGen 2...

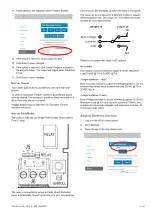
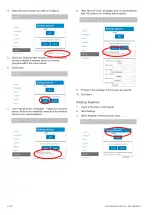
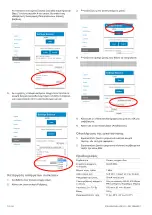
Page 9: ...xpander Name module Wireless Expander 5 Save 6 Back 7 Zone Start and End 0 8 Save 9 Back 10 Expander Options 11 Tamper Enable 12 Output Enable 13 Save 14 Output Program 15 Save SPDT C J6 D14 LED 3 J5...

Page 10: ...10 56 P N 466 2948 REV D ISS 15MAR21 C 0 V 30 VAC 1 A 30 VDC 1 A C 12 13 VDC 12 V 700 mA 1 xGen 2 3 4 5 6 7 8 9 10 Save...

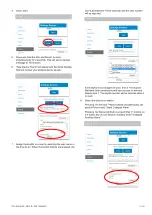
Page 11: ...P N 466 2948 REV D ISS 15MAR21 11 56 1 xGen 2 3 Keyfobs 4 5 2 6 7 1 8...

Page 12: ...12 56 P N 466 2948 REV D ISS 15MAR21 Stay 4 9 1 xGen 2 3 4 5 Remove OK 6 Save 1 2 xGen 433 65 MHz 1 dBm 12 0 VDC 50 mA 433 63 433 80plus PIR 155 mm x 95 mm x 68 mm 160 g 0 49 C 32 120 F...

Page 13: ...el bus de 4 cables est ndar Las funciones adicionales incluyen 2 entradas de zona 1 salida de rel y un tamper frontal y trasero Aviso de l mite de corriente Compruebe los requisitos de corriente de la...

Page 14: ...so necesario conecte el cableado de zona y el cableado de salida a J3 y J6 en el NXG 433 Consulte Nota sobre modos de rel a continuaci n 9 Si es necesario configure el v nculo J2 TERM Consulte la Gu a...

Page 15: ...haga clic en Programaci n de salida y seleccione la acci n precedente La salida se activar cuando se d la condici n de la acci n 15 Haga clic en Guardar para guardar los cambios Nota acerca del tampe...

Page 16: ...superar el valor nominal del rel A adir dispositivos inal mbricos 1 Entre en programaci n de la central xGen 2 Haga clic en Ajustes 3 Seleccione Zonas en el men desplegable 4 Seleccione el n mero de z...

Page 17: ...o a un usuario seleccionando el nombre de usuario en el men desplegable Cuando se pulsen los botones del mando se comprobar n los permisos del usuario y se registrar el n mero del usuario Si el mando...

Page 18: ...y a continuaci n en el bot n OK para confirmar 6 Haga clic en Guardar Finalizaci n de la instalaci n 1 Vuelva a colocar el bot n de goma de tamper frontal en el caso de que se haya retirado de su sit...

Page 19: ...duos urbanos no clasificados en la Uni n Europea Para que se pueda realizar un reciclaje adecuado devuelva este producto a su representante de ventas local al comprar un equipo nuevo similar o des che...

Page 20: ...llation de la centrale pour les exigences en mati re de c blage 8 Si besoin connectez les entr es de zone et la sortie aux J3 et J6 du NXG 433 Reportez vous la rubrique Remarques sur les modes relais...

Page 21: ...iv es 8 Cliquez sur Enregistrer pour accepter les modifications apport es 9 Cliquez sur Retour 10 Cliquez sur Options de l extension 11 Si les deux autoprotections sont requises s lectionnez Autoprote...

Page 22: ...maximale de 30 Vca 1 A ou 30 Vcc 1 A Cavalier entre C et Tension du bus fournie vers la borne de sortie typiquement 12 13 Vcc La charge maximale 12 V est un courant total de la centrale de 700 mA Cela...

Page 23: ...uez sur Param tres 3 S lectionnez T l commandes dans le menu d roulant 4 Cliquez sur D tecter 5 Maintenez les boutons Armer et D sarmer enfonc s simultan ment pendant 2 secondes Ceci enverra un messag...

Page 24: ...ent sur les boutons Armer et D sarmer un v nement Police Alarme silencieuse associ e au clavier peut tre envoy En appuyant sur les boutons Sc ne ic ne en forme d ampoule et Pr sent sur un t l commande...

Page 25: ...garanties et la s curit rendez vous l adresse https firesecurityproducts com policy product warning ou scannez le code QR Certification EN50131 5 3 2017 Grade de s curit 2 Classe d environnement II E...

Page 26: ...u un r frig rateur un aspirateur un climatiseur un ordinateur une machine laver et un moteur viter les environnements humides tels que les salles de bains et les chambres froides Installation du r cep...

Page 27: ...n 2 Cliquez sur Avanc P riph riques P riph riques syst me Extension de zone 3 S lectionnez le num ro du p riph rique NXG 433 partir de la liste d roulante 4 Cliquez sur Nom de l extension pour d finir...

Page 28: ...lectionner le mode r pondant vos besoins Configuration par d faut aucun cavalier avec le relai en position NC Aucun cavalier Fermeture de contact sec fournie vers la borne de sortie Charge maximale 3...

Page 29: ...tect appara t et le champ Num ro de s rie indique les d tails de votre p riph rique sans fil 9 Programmez d autres param tres sur cet cran au besoin 10 Cliquez sur Enregistrer Ajout de t l commandes...

Page 30: ...ations d utilisateur standard et un acc s la partition d armement et de d sarmement 1 lui seront remis Le num ro de la t l commande est indiqu lorsqu il est utilis 8 S lectionnez les boutons activer E...

Page 31: ...HARGER DE LEUR INSTALLATION CARRIER FIRE SECURITY NE PEUT GARANTIR QU UNE PERSONNE OU ENTIT FAISANT L ACQUISITION DE CEUX CI Y COMPRIS UN REVENDEUR AGR DISPOSE DE LA FORMATION OU DE L EXP RIENCE REQUI...

Page 32: ...Le centrali xGen dispongono di un dispositivo di protezione da sovracorrente PTC nel bus e possono scollegare il bus per fornire una protezione temporanea Se la funzione abilitata la centrale indicher...

Page 33: ...do il dispositivo a 63 bit riceve un pacchetto valido D6 verde Lampeggia quando il dispositivo 80plus riceve un pacchetto valido D14 rosso Si illumina quando il rel acceso LED Descrizione D15 rosso Un...

Page 34: ...ormalmente chiusi in base alle esigenze D14 un LED rosso che si accende quando il rel viene attivato possibile configurare il rel in 3 modalit per supportare diverse applicazioni Per selezionare la mo...

Page 35: ...o Modalit di apprendimento attivata Attivare il dispositivo senza fili Per assistenza consultare il manuale di installazione del dispositivo senza fili 8 Verr visualizzato il messaggio Nuovo dispositi...

Page 36: ...ti dei radiocomandi vengono verificate le autorizzazioni dell utente e viene indicato il numero utente Se non si assegna alcun utente al radiocomando a quest ultimo verranno associate autorizzazioni u...

Page 37: ...astica e serrare la vite inferiore Specifiche Compatibilit Centrali xGen Frequenza operativa via radio 433 65 MHz Massima potenza in uscita 1 dBm Alimentazione richiesta 12 0 V CC fornita dalla centra...

Page 38: ...o i centri di raccolta preposti Per maggiori informazioni vedere www recyclethis info Informazioni di contatto www firesecurityproducts com en page caddx NL Installatieblad Productbeschrijving Met beh...

Page 39: ...Raadpleeg de Installatie configuratiehandleiding van xGen 10 Schakel het bedieningspaneel in en wacht tot de initialisatie is voltooid 11 Druk op de registratieschakelaar op de xGen centrale 12 De led...

Page 40: ...over sabotage Twee rubberen drukknoppen bieden sabotagebeveiliging aan de voor en achterzijde U kunt de toestand Sabotage uitbreidingsmodule opheffen door beide sabotage ingangen te overbruggen De be...

Page 41: ...oze modules toevoegen 1 Meld u aan op het xGen bedieningspaneel 2 Klik op Instellingen 3 Selecteer de modus Zones uit het vervolgkeuzemenu 4 Selecteer het zonenummer dat u wilt configureren 5 Controle...

Page 42: ...loze module 7 Wijs de keyfob toe aan een gebruiker door de gebruikersnaam te selecteren in de vervolgkeuzelijst Wanneer de knoppen op de keyfob zijn ingedrukt worden de rechten van de gebruiker gecont...

Page 43: ...het vervolgkeuzemenu 4 Selecteer het zonenummer dat u wilt verwijderen 5 Klik op Verwijderen en vervolgens op OK om uw keuze te bevestigen 6 Klik op Opslaan De installatie voltooien 1 Plaats de voorst...

Page 44: ...t worden via de gemeentelijke huisvuilscheiding in de Europese Gemeenschap Voor correcte vorm van kringloop geef je de producten terug aan jou locale leverancier tijdens het aankopen van een gelijkaar...

Page 45: ...tiehandleiding van het bedieningspaneel voor kabelvereisten 8 Indien nodig sluit u de zonebekabeling en uitgangsbekabeling aan op J3 en J6 van de NXG 433 Verwijs naar de onderstaande Aantekening bij r...

Page 46: ...ereist zijn selecteert u Sabotage actief 12 Indien de uitgang vereist is selecteert u Uitgang actief 13 Klik op Opslaan om wijzigingen op te slaan 14 Indien de uitgang vereist is klikt u op Uitgang pr...

Page 47: ...totale paneelstroom van 700mA dit omvat alle verbonden klavieren en uitbreidingsmodules Relaisrating niet overschrijden Draadloze modules toevoegen 1 Aanmelden op het xGen bedieningspaneel 2 Klik op I...

Page 48: ...l 2 Klik op Instellingen 3 Selecteer Keyfobs in het uitvouwmenu 4 Klik op Leren 5 Houd de knoppen inschakelen en uitschakelen tegelijkertijd ingedrukt gedurende 2 seconden Hierdoor zal een sabotagesig...

Page 49: ...en Door de knoppen in en uitschakelen tegelijkertijd in te drukken kan een Politie evenement Stil Codepad Alarm worden verzonden Door op de knoppen Sc ne lamppictogram en Aanwezig te drukken op een ke...

Page 50: ...en en productveiligheid https firesecurityproducts com policy product warning of scan de QR code Certificering EN50131 5 3 2017 Beveiligingsklasse 2 Milieuklasse II EN50131 3 2009 Getest en gecertific...

Page 51: ...roupa e motores Evite reas h midas ou molhadas tais como casas de banho e compartimentos frios Instala o do recetor 1 Remova a caixa frontal de pl stico desapertando o parafuso inferior 2 Remova cuida...

Page 52: ...o no painel de controlo xGen 2 Clique em Avan adas Dispositivos Dispositivos do sistema Expansor de zona 3 Selecione o n mero do dispositivo NXG 433 na caixa pendente 4 Clique em Nome do expansor par...

Page 53: ...er com rel na posi o NC Sem jumper Fecho por contacto seco fornecido ao terminal de sa da Carga m xima 30 VCA a 1 A ou 30 VCC a 1 A Jumper entre e C Liga o terra do bus fornecida ao terminal de sa da...

Page 54: ...ontrado e o campo do n mero de s rie cont m os detalhes do dispositivo sem fios 9 Programe outras defini es neste ecr conforme necess rio 10 Clique em Guardar Adicionar comandos 1 Inicie sess o no pai...

Page 55: ...dor padr o e ter acesso para armar e desarmar a rea 1 O n mero do comando ser reportado quando for usado 8 Selecione os bot es a ativar Premir os bot es de arme e desarme simultaneamente pode enviar u...

Page 56: ...QUER DISTRIBUIDOR AUTORIZADO OU REVENDEDOR AUTORIZADO TEM FORMA O OU EXPERI NCIA ADEQUADA PARA INSTALAR CORRETAMENTE PRODUTOS RELACIONADOS COM A SEGURAN A E A PROTE O CONTRA INC NDIOS Para mais inform...

Reviews: