
80
VENUS - GIOIA
EN
10.15
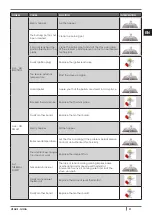
WEEKLY PROGRAMMING
It allows to enable, disable and settle the weekly hermostat functions (saturday and sunday included).
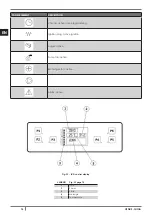
Press P3 key and then P5 key till the menu “SET CHRONO”. Press once P3 key and with P5 and P6 keys select
“PROGRAM WEEK”. Press once P3 till finding “WEEKLY CHRONO”. With P1 and P2 keys put in “OFF” or “ON”.
It is possible to set four working times delimited by the set times.
After “WEEKLY CHRONO”:
Press P5: the display shows “START PROG-1”, with P1 and P2 keys insert the ignition time value or put in “OFF”.
Press P5: the display shows “STOP PROG-1”, with P1 and P2 insert the switching off value or put in “OFF”.
• Press P5: the display shows “MONDAY PROG-1”, with P1 and P2 keys set “ON” or “OFF”.
• Press P5: the display shows “TUESDAY PROG-1”, with P1 and P2 keys set “ON” or “OFF”.
• Press P5: the display shows “WEDNESD PROG-1”, with P1 and P2 keys set “ON” or “OFF””.
• Press P5: the display shows “THURSDAY PROG-1”, with P1 and P2 keys set “ON” or “OFF”.
• Press P5: the display shows “FRIDAY PROG-1”, with P1 and P2 keys set “ON” or “OFF”.
• Press P5: the display shows “SATURDAY PROG-1”, with P1 and P2 keys set “ON” or “OFF””.
• Press P5: the display shows “SUNDAY PROG-1”, with P1 and P2 keys set “ON” or “OFF”.
Now press P5 and repeat all the previous instructions for Prog-2, Prog-3, Prog-4.
• To exit press three times P4.
10.16
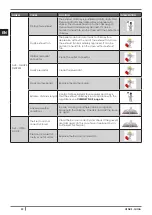
FAN ADJUSTMENT
Press P3 button in menu 1 “FAN ADJUST”: the fan menus no.2 and no.3 will open.
Press P1 to adjust fan no. 2, while P2 button adjusts fan no. 3.
Function “A” activates the default fan data. (For example: heat output 1 activates default rotations at
heat output 1, heat output 2 activates default rotations at heat output 2, etc.).
With function “1” or “2” or “3” or “4” or “5” the fan is forced to work at the selected output. (For example:
by setting “2”, even if the fan is set to heat output 5 it will work as if set to heat output “2”, etc.).
If the stove is set to maximum heat output 5 and the fans to minimum output 1, this may
cause overheating and the “THERMAL SAFETY” alarm to go off.
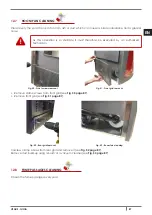
10.17
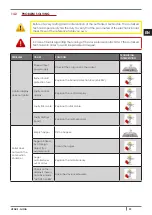
FIRE EXTINGUISHING IN CASE OF FIRE
In case it would be necessary to extinguish the fire emitted by the stove or by the chimney flue, use a fire-
extinguisher or contact the firemen. DO NOT use water to extinguish the fire inside the burning pot.
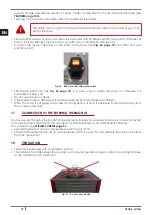
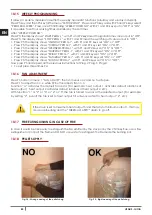
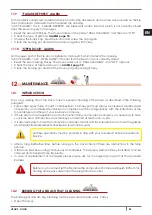
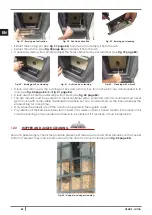
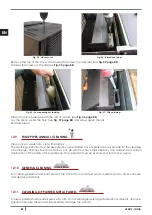
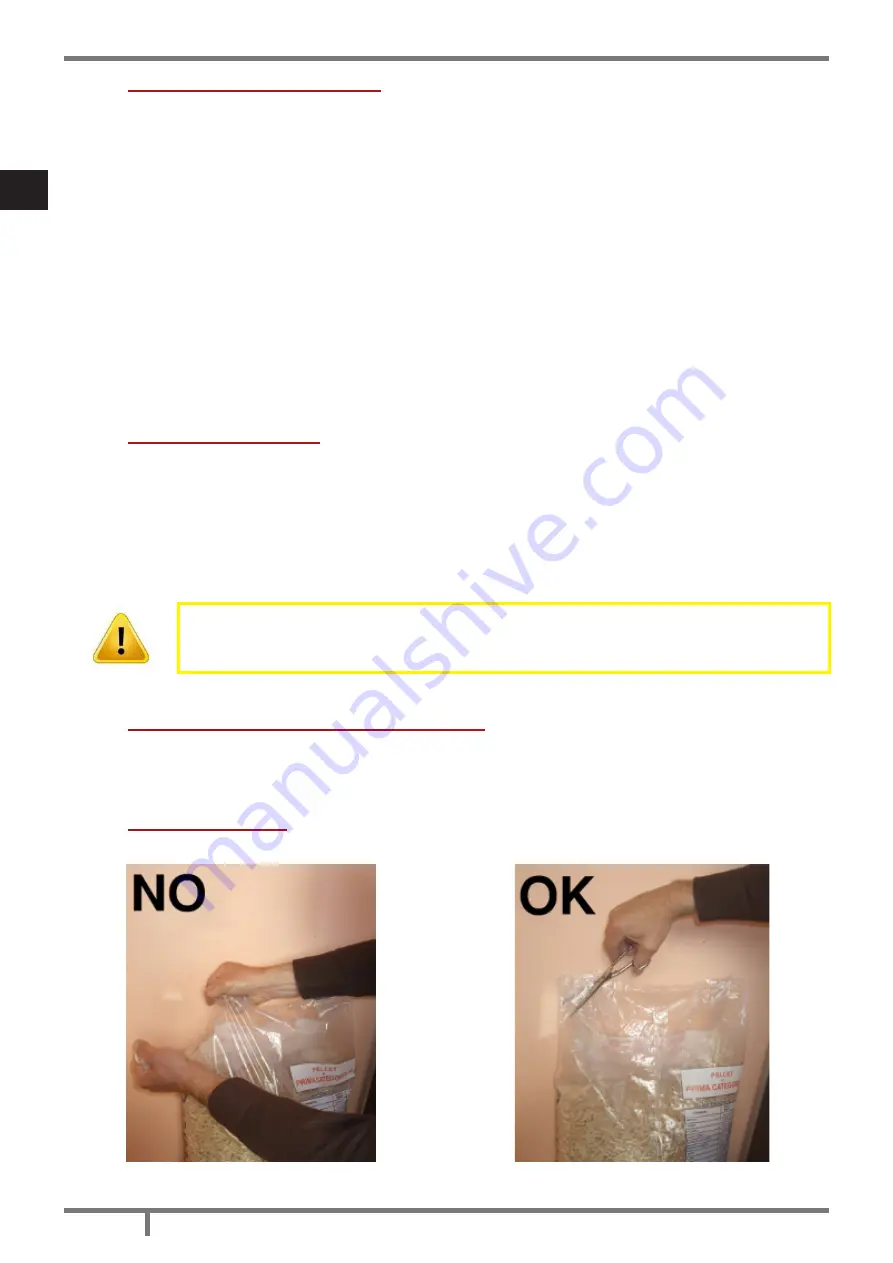
10.18
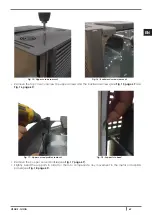
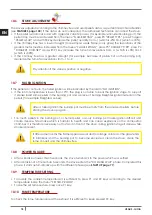
PELLET SUPPLY
Fig. 34 -
Wrong opening of the pellets bag
Fig. 35 -
Right opening of the pellets bag
Summary of Contents for VENUS
Page 2: ......
Page 49: ...49 VENUS GIOIA IT 14 3 RICAMBI Fig 60 Ricambi...
Page 52: ...52 VENUS GIOIA IT 14 4 DICHIARAZIONE DI CONFORMIT Fig 61 Dichiarazione di Conformit...
Page 98: ...98 VENUS GIOIA EN 14 3 SPARE PARTS Fig 60 Spare parts...
Page 101: ...101 VENUS GIOIA EN 14 5 DECLARATION OF CONFORMITY Fig 61 Declaration of Conformity...
Page 148: ...148 VENUS GIOIA FR 14 3 PI CES D TACH ES Fig 60 Pi ces d tach es...
Page 151: ...151 VENUS GIOIA FR 14 5 D CLARATION DE CONFORMIT Fig 61 D claration de Conformit...
Page 197: ...197 VENUS GIOIA ES 14 3 REPUESTOS Fig 60 Repuestos...
Page 200: ...200 VENUS GIOIA ES 14 5 DECLARACI N DE CONFORMEDAD Fig 61 Declaraci n de conformedad...
Page 247: ...247 VENUS GIOIA NL 14 3 RESERVEONDERDELEN Fig 60 Reserveinderdelen...
Page 250: ...250 VENUS GIOIA NL 14 5 CONFORMITEITSVERKLARING Fig 61 Conformiteitsverklaring...
Page 297: ...297 VENUS GIOIA PT 14 3 PE AS SOBRESSALENTES Fig 60 Pe as sobressalentes...
Page 300: ...300 VENUS GIOIA PT 14 5 DECLARA O DE CONFORMIDADE Fig 61 Declara o de conformidade...
Page 302: ...302 VENUS GIOIA EL 1 MANUAL...
Page 305: ...305 VENUS GIOIA EL 7 2 Fig 2 LEGEND Fig 2 305 1 2 3 4 5 3 5 mt Fig 2 305 1 2 3 u 4...
Page 307: ...307 VENUS GIOIA EL Fig 4 7 4 350 3 5 meters 7 5 7 6 Fig 5 Fig 5 307 Fig 3 306...
Page 308: ...308 VENUS GIOIA EL 7 7 Fig 6 LEGEND Fig 6 308 1 2 3 4 5 6 7 8 9 10...
Page 312: ...312 VENUS GIOIA EL 7 11 Fig 10 1 LEGEND Fig 10 312 1 2 100 80 mm 3 4 0 5 mt 120 mm Fig 11 2...
Page 319: ...319 VENUS GIOIA EL Fig 23 Fig 24 2 Fig 23 319 Fig 24 319 Fig 25 Fig 25 319 9 6 350...
Page 323: ...323 VENUS GIOIA EL 10 10 1 10 2 1 2 pellet 1 5...
Page 333: ...333 VENUS GIOIA EL 12 12 1 12 2 2 Fig 37 Fig 38 Fig 39 Fig 37 333 Fig 38 333 Fig 39 333...
Page 335: ...335 VENUS GIOIA EL 12 4 4 8 Fig 44 Fig 45 2 Fig 44 335 Fig 45 335 12 5 Fig 46...
Page 339: ...339 VENUS GIOIA EL 12 13 12 14 700 C...
Page 341: ...341 VENUS GIOIA EL AL 5 NO IGNITION Pellet pellets AL 6 NO PELLET AL 7 THERMAL SAFETY...
Page 342: ...342 VENUS GIOIA EL AL 8 FAILURE DEPRESS pellets 304 AL 9 OPEN DOOR...
Page 343: ...343 VENUS GIOIA EL 13 2 4A 250V pellet ACTIVE ALARM...
Page 345: ...345 VENUS GIOIA EL WORK MODULATI...
Page 346: ...346 VENUS GIOIA EL 14 14 1 WIRING SCHEME Fig 58 Wiring scheme 14 2 Fig 59 347...
Page 347: ...347 VENUS GIOIA EL Fig 59 Fig 60 348 3 5 8 7 10 9 6 1 4 3 3 2...
Page 348: ...348 VENUS GIOIA EL 14 3 Fig 60...
Page 351: ...351 VENUS GIOIA EL 14 5 Fig 61...


