

82
VENUS - GIOIA
EN
11.2
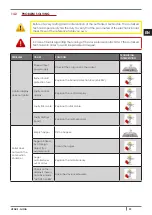
”BLACK OUT” ALARM
“ACTIVE ALARM” “AL 1 - BLACK OUT”: current breaking during ignition.
• Reset the error with P4 key. The stove carries out the phase “FINAL CLEANING” and then is in “OFF”:
• Clean the burning pot and start the stove up again with P4 key.
11.3
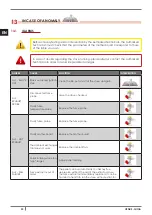
”EXHAUST PROBE” ALARM
To the exhaust is connected a probe which contantly controls the temperature during working time.
“ACTIVE ALARM” “AL 2 - EXHAUST PROBE”: the probe is damaged or disconnected.
• Reset the error with P4 key. The stove carries out the phase “FINAL CLEANING” and the is in “OFF”.
• Check the type of glitch as
ALARMS page 90
.
• Clean the burning pot and start the stove up again with P4 key.
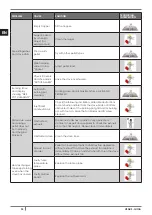
11.4
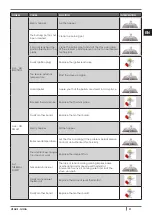
”HOT EXHAUST” ALARM
If the fume probe registers a temperature at the exhaust higher then 180°C, the display shows “HOT
EXHAUST”. Then the combustible (pellet) drop will be decreased at phase 1.
This function has the aim to bring the values within preset values. If for any reason the temperature would
not decreas but increase, at 215°C the display shows “ACTIVE ALARM” “AL 3 - HOT EXHAUST” and the stove
start the switching off phase up.
• Reset the error with P4 key. The stove carries out the phase “FINAL CLEANING” and the is in “OFF”.
• Check the type of glitch as
ALARMS page 90
.
• Clean the burning pot and start the stove up again with P4 key.
11.5
”FAN FAILURE” ALARM
“ACTIVE ALARM” “AL 4 - FAN FAILURE”: the fume fan is out of order.
• Reset the error with P4 key. The stove carries out the phase “FINAL CLEANING” and the is in “OFF”.
• Check the type of glitch as
ALARMS page 90
.
• Clean the burning pot and start the stove up again with P4 key.
11.6
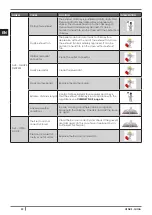
”NO IGNITION” ALARM
“ACTIVE ALARM” “AL 5 - NO IGNITION”: the temperatureis not sufficient for ignition.
• Reset the error with P4 key. The stove carries out the phase “FINAL CLEANING” and the is in “OFF”.
• Check the type of glitch as
ALARMS page 90
.
• Clean the burning pot and start the stove up again with P4 key.
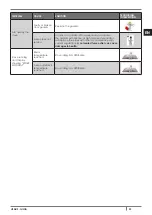
11.7
”NO PELLET” ALARM
If the fume probe registers a temperature at the exhaust lower than the minimum threshold and the display
shows “ACTIVE ALARM” “AL 6 - NO PELLET”.
• Reset the error with P4 key. The stove carries out the phase “FINAL CLEANING” and the is in “OFF”.
• Full the hopper.
• Clean the burning pot and start the stove up again with P4 key.
11.8
”THERMAL SAFETY” ALARM
In the hopper is installed a thermostat with manual reset which activates if the temperature excursion
exceeds the allowed limits, so avoiding the possibility that the pellet inside the hopper could burn because
of overheating.
“ACTIVE ALARM” “AL 7 - THERMAL SAFETY”: the thermostat stops the power supply to the auger.
• Reset the error with P4 key. The stove carries out the phase “FINAL CLEANING” and then is in “OFF”.
• Check the type of glitch as
ALARMS page 90
.
• Unscrew the black cap, press the button and screw the cap again.
• Clean the burning pot and start the stove up again with P4 key.
Summary of Contents for VENUS
Page 2: ......
Page 49: ...49 VENUS GIOIA IT 14 3 RICAMBI Fig 60 Ricambi...
Page 52: ...52 VENUS GIOIA IT 14 4 DICHIARAZIONE DI CONFORMIT Fig 61 Dichiarazione di Conformit...
Page 98: ...98 VENUS GIOIA EN 14 3 SPARE PARTS Fig 60 Spare parts...
Page 101: ...101 VENUS GIOIA EN 14 5 DECLARATION OF CONFORMITY Fig 61 Declaration of Conformity...
Page 148: ...148 VENUS GIOIA FR 14 3 PI CES D TACH ES Fig 60 Pi ces d tach es...
Page 151: ...151 VENUS GIOIA FR 14 5 D CLARATION DE CONFORMIT Fig 61 D claration de Conformit...
Page 197: ...197 VENUS GIOIA ES 14 3 REPUESTOS Fig 60 Repuestos...
Page 200: ...200 VENUS GIOIA ES 14 5 DECLARACI N DE CONFORMEDAD Fig 61 Declaraci n de conformedad...
Page 247: ...247 VENUS GIOIA NL 14 3 RESERVEONDERDELEN Fig 60 Reserveinderdelen...
Page 250: ...250 VENUS GIOIA NL 14 5 CONFORMITEITSVERKLARING Fig 61 Conformiteitsverklaring...
Page 297: ...297 VENUS GIOIA PT 14 3 PE AS SOBRESSALENTES Fig 60 Pe as sobressalentes...
Page 300: ...300 VENUS GIOIA PT 14 5 DECLARA O DE CONFORMIDADE Fig 61 Declara o de conformidade...
Page 302: ...302 VENUS GIOIA EL 1 MANUAL...
Page 305: ...305 VENUS GIOIA EL 7 2 Fig 2 LEGEND Fig 2 305 1 2 3 4 5 3 5 mt Fig 2 305 1 2 3 u 4...
Page 307: ...307 VENUS GIOIA EL Fig 4 7 4 350 3 5 meters 7 5 7 6 Fig 5 Fig 5 307 Fig 3 306...
Page 308: ...308 VENUS GIOIA EL 7 7 Fig 6 LEGEND Fig 6 308 1 2 3 4 5 6 7 8 9 10...
Page 312: ...312 VENUS GIOIA EL 7 11 Fig 10 1 LEGEND Fig 10 312 1 2 100 80 mm 3 4 0 5 mt 120 mm Fig 11 2...
Page 319: ...319 VENUS GIOIA EL Fig 23 Fig 24 2 Fig 23 319 Fig 24 319 Fig 25 Fig 25 319 9 6 350...
Page 323: ...323 VENUS GIOIA EL 10 10 1 10 2 1 2 pellet 1 5...
Page 333: ...333 VENUS GIOIA EL 12 12 1 12 2 2 Fig 37 Fig 38 Fig 39 Fig 37 333 Fig 38 333 Fig 39 333...
Page 335: ...335 VENUS GIOIA EL 12 4 4 8 Fig 44 Fig 45 2 Fig 44 335 Fig 45 335 12 5 Fig 46...
Page 339: ...339 VENUS GIOIA EL 12 13 12 14 700 C...
Page 341: ...341 VENUS GIOIA EL AL 5 NO IGNITION Pellet pellets AL 6 NO PELLET AL 7 THERMAL SAFETY...
Page 342: ...342 VENUS GIOIA EL AL 8 FAILURE DEPRESS pellets 304 AL 9 OPEN DOOR...
Page 343: ...343 VENUS GIOIA EL 13 2 4A 250V pellet ACTIVE ALARM...
Page 345: ...345 VENUS GIOIA EL WORK MODULATI...
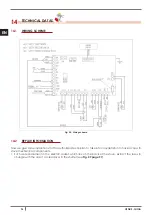
Page 346: ...346 VENUS GIOIA EL 14 14 1 WIRING SCHEME Fig 58 Wiring scheme 14 2 Fig 59 347...
Page 347: ...347 VENUS GIOIA EL Fig 59 Fig 60 348 3 5 8 7 10 9 6 1 4 3 3 2...
Page 348: ...348 VENUS GIOIA EL 14 3 Fig 60...
Page 351: ...351 VENUS GIOIA EL 14 5 Fig 61...


