background image

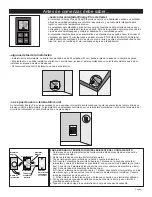
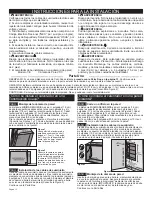
OPERATING INSTRUCTIONS


WARNING 

Risk of Electrical Shock and Fire.

The heater must be properly installed before it is used.

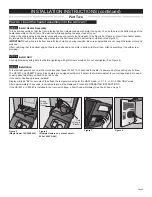
1. Do not operate without grill.

2. Keep electrical cords, drapery, furnishings and other com-

bustibles at least 3 feet (0.9 m) away from the front of the 

heater and 6 inches (15.2 cm) away from the sides.

3. Do not tamper with the over temperature limit control.

4. If the heater over temperature limit trips more than once 

per day, the heater must be replaced.

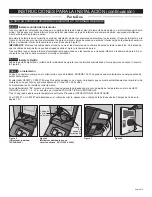
5. Clean heater at least every six


months.

6. After allowing the heater to cool, turn power off at circuit 

breaker panel before removing grill.

7. Use a hair dryer or vacuum on blow cycle to blow debris 

through the top element (do not touch element).

8. Install the grill before turning on power.

    WARNING: 

Any other service not detailed in this Own-

er’s Guide should be performed by an authorized service 

representative.

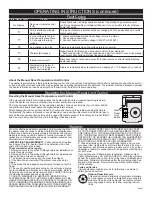
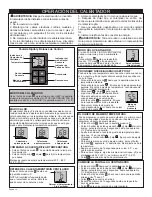
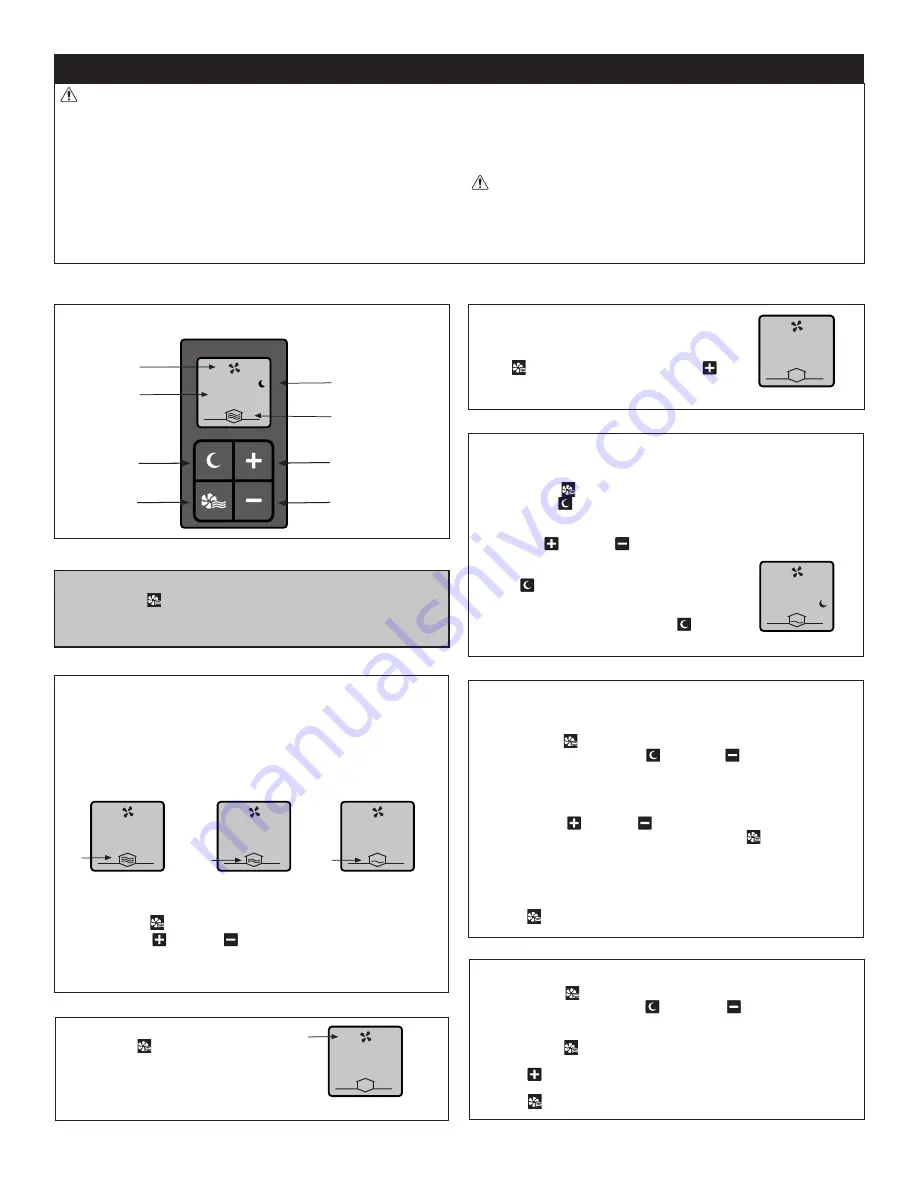
Digital Display and Control Buttons

 START HEATING/SET TEMPERATURE

 PROGRAMMING NIGHT/AWAY SET POINT

 MAX/MIN TEMPERATURE LOCK

Preset a night or away temperature set point, for quick and easy 

“one-touch” energy savings.

•  Press mode      button until display shows room temperature.

•  Press night      button. The moon icon will show in display 

screen. The “night/away” set point temperature will briefly 

flash.

•  Press up      or down      to adjust night/away set point.

•  To exit the night/away mode   

when you awake or return, press the  

night      again. The moon icon  

will no longer be in display screen.

•  To return to your previous night/away  

set point, simply press the night      button.

Preset a maximum and/or minimum set point as a child safety 

or tamperproof option. To preset a maximum setpoint:

•  Press mode      button until display shows ‘

0

’.

•  Press and hold both night      and down      buttons at the 

same time, for at least 5 seconds, until the ‘

HL

’ (high limit) 

temperature is displayed.

•  Release buttons: temperature setpoint will alternate with ‘

HL

’ 

on the display.

•  Using the up      or down      button, set maximum set point.

•  To preset a minimum setpoint, press mode      button, ‘

LL

’ will 

flash, set low temperature setting.

•  Wait a minimum of 15 seconds for display to return to ‘

0

’, and 

your settings will be saved.

•  To remove the lock, follow same instructions, and set to  

maximum of 86˚F (30˚C), or minimum of 40˚F (4.4˚C).

•  Press      to return to HEAT mode.

•  Press mode      button. Display shows room temperature.

•  Press the up      or down      button to set your desired 

temperature.

Temperature Setpoint Range: 40˚F - 86˚F (4.4˚C - 30˚C)

 HEATER MODES

Use the mode      button to alternate between HEAT (display 

shows room temperature), STOP HEATING/NO FAN (display 

shows 

0

), and FAN ONLY (display shows 

1

2

 or 

3

).

FAN ONLY MODE

The FAN ONLY mode can circulate air 

but will not supply heat. 

Press      until display shows ‘

0

’. Push      

to choose 

1

 for low speed, 

2

 for medium 

speed, or 

3

 for high speed.

 STOP HEATING/NO FAN

Press mode      button until display 

shows ‘

0

’.

NOTE: Fan will run until heater cools 

down. This phase could last for five 

minutes or more.

 CHANGE DISPLAY TO CELSIUS

•  Press mode      button until display shows ‘

0

’.

•  Press and hold both night      and down      buttons at the 

same time, for at least 5 seconds, until the ‘

HL

’ (high limit) 

temperature is displayed.

•  Press mode      twice, until display alternates between 

oF

 and 

U   

.

•  Press      to convert to Celsius. 

• 

Wait a minimum of 15 seconds until display stops flashing.

•  Press      to return to HEAT mode.

73

HEAT MODE

Your Energy Plus heater has a unique variable speed blower 

that auto adjusts heat output based on the room’s requirements. 

Once you set your desired temperature, the heater will vary the 

wattage output for maximum efficiency.

The digital display will show the level of heat being output to 

maintain the room’s temperature.

68

68

68

68

68

68

3

3

3

3

Heating Full Power Heating Mid Power Heating Low Power

Fan Only / High Speed

55

NO

55

NO

Night/Away Mode

Night/Away 

Mode Indicator
Heating Output 

Indicator

Temperature

Fan 

Operation 

Indicator

Up

Down

Night / 

Away

Heating 

Mode

0

NO

0

NO

Stop Heating / No Fan 

u     

55

NO

55

NO

Page 6

Summary of Contents for CE163T

Page 1: ...ed when you need it and adjusts automatically to save you money You define your comfort maintains your room temperature within one degree Our most thoughtful design features Large digital display shows your room temperature and heating mode Easy intuitive one touch controls Night Away and Max Min options for extra savings and safety Improve air circulation and add comfort in off sea son with three...

Page 2: ...or fire or damage the heater 8 WARNING Risk of Fire To prevent a possible fire do not block air intakes or exhaust in any manner 9 WARNING Fire or explosion may occur A heater has hot and arcing or sparking parts inside Do not use it in areas where gasoline paint or flammable vapors or liquids are used or stored 10 Use this heater only as described in this manual Any other use not recommended by t...

Page 3: ...alled in either of these locations Installation on an inside wall is recommended Your Energy Plus heater is equipped with a unique built in thermostat that both regulates the heat output and provides precise tem perature control If replacing a heater controlled by an existing wall thermostat remove wall thermostat from the heater circuit and cover the hole with a faceplate TO REMOVE AN EXISTING WA...

Page 4: ...d height is 24 inches 61 cm from the floor to the bottom of the wall can See Figure 4 CONTROLS A built in digital thermostat is included May not be used with a wall thermostat REQUIRED MINIMUM distance of inches 1 9 cm from adja cent surfaces such as walls and 4 inches 11 4 cm from the floor See Figure 4 Cadet recommends 24 inches 61 cm from floor for optimum performance Heaters must be spaced at ...

Page 5: ... in the slots in bottom lip of wall can attach assembly at top with screw provided Installation STEP 3 Turn electrical power back on at the main disconnect panel WAIT 10 15 seconds for heater to power up before pushing any buttons The CE163T and CE083T Energy Plus heaters are equipped with a smart sensor that will auto adjust to your voltage supply No need to worry about whether you have 120 or 24...

Page 6: ...ll alternate with HL on the display Using the up or down button set maximum set point To preset a minimum setpoint press mode button LL will flash set low temperature setting Wait a minimum of 15 seconds for display to return to 0 and your settings will be saved To remove the lock follow same instructions and set to maximum of 86 F 30 C or minimum of 40 F 4 4 C Press to return to HEAT mode Press m...

Page 7: ...ranty claims made after the warranty period has expired will be denied Products returned without authorization will be refused Parts and Service Visit cadetheat com parts service for information on where to obtain parts and service Reduce Reuse Recycle This product is made primarily of recyclable materials You can reduce your carbon footprint by recycling this product at the end of its useful life...

Page 8: ...ccumulated inside heater 2 Poor or loose electrical connections 1 Clean heater See MAINTAINING YOUR HEATER section for instructions 2 Turn off power at circuit breaker Inspect all supply and heater wires for loose or poor connections Secure or reconnect all loose connections Do not reset circuit breaker until all connections have been checked or repaired Element heats for a moment without the fan ...

Page 9: ... para ahor rarle dinero Usted define su comodidad mantiene la tempera tura ambiente con un margen de un grado Nuestro diseño más creativo incluye Gran pantalla digital en la que aparece la tempera tura ambiente y el modo de calentamiento Controles sencillos e intuitivos con un solo toque Las opciones de Noche Ausencia y Máx Mín aportan más ahorro y seguridad Mejora la circulación del aire brinda m...

Page 10: ...electrocución No introduzca ni permita que ingresen objetos en las aberturas de la ventilación o escape ya que ello puede causar electrocución o incendio o bien dañar el calentador 8 ADVERTENCIA Riesgo de incendio Para evitar posibles incendios no bloquee las tomas de aire ni el escape de manera alguna 9 ADVERTENCIA Podrían producirse explosiones o incendios Todo calentador contiene piezas que se ...

Page 11: ... calentador existente que estuvo instalado en alguna de estas ubicaciones Se recomienda realizar la instalación en una pared interior Su calentador Energy Plus viene equipado con un exclusivo termostato incorporado que regula la generación del calor y brinda un preciso control de temperatura Si reemplazará un calentador controlado por un termostato mural actual retire dicho termostato del circuito...

Page 12: ...para un ren dimiento óptimo Si se instalan varios calentadores deje al menos tres pies 0 9 m entre ellos Corte un orificio de 8 pulgadas 20 3 cm de ancho por 10 pul gadas 26 cm de alto al lado del puntal de la pared Inserte la cámara de pared en la abertura manteniéndola alinea da con la superficie de la pared Asegure la cámara al puntal de la pared con 2 tornillos no incluidos mediante los orific...

Page 13: ...n Cerciórese de que los cables de suministro no queden atrapados entre el motor y la cámara de pared Tras confirmar que el borde inferior del calentador está posicionado en las ranuras en el reborde inferior de la cámara de pared fije el conjunto en la parte superior mediante el tornillo suministrado La Instalación Vuelva a conectar la energía en el cortacircuito o caja de fusibles ESPERE 10 a 15 ...

Page 14: ...gramar un punto de ajuste mínimo pulse el botón de modo aparecerá LL destellando fije al ajuste de baja temperatura Espere un mínimo de 15 segundos para volver a 0 y se guardarán los ajustes Para quitar el seguro siga las mismas instrucciones y fije en el máximo de 86 F 30 C o el mínimo de 40 F 4 4 C Pulse para volver al modo de calentamiento Pulse el botón de modo La pantalla muestra la tempera t...

Page 15: ...ión sobre dónde obtener repuestos y servicio Reduzca Reutilice Recicle Este producto está hecho principalmente de materiales reciclables Puede reducir la cantidad de carbono que contribuye al medio ambi ente reciclando este producto al término de su vida útil Comuníquese con su centro local de reciclaje para obtener mayores instrucciones al respecto El calentador está protegido por un control limi...

Page 16: ... estén dañados No reestablezca el cortacircuito sino hasta que se hayan reparado todos los cortocircuitos eléctricos 3 Vuelva a colocar el cortacircuito 4 Reemplace el conjunto del calentador El ventilador del calentador funciona pero no envía aire caliente 1 El botón de modo no se ha fijado en el modo HEAT Calor 2 El elemento ha fallado 1 Pulse el botón de modo y fíjelo en el modo HEAT la pantall...

Reviews: