3
1 1
10
9
1
2
3
13
12
5
8
7
6
4
1
3
H
H
FAN
SWITCH
FRONT
AUTO
ON
TERMINAL BLOCK
MULTI-WATT SWITCH
MANUAL RESET LIMIT
LOW
HIGH
REAR
FAN DELAY RELAY
IMPORTANT!
Always connect
heater to properly
grounded outlets.
IMPORTANT!
This is a 240 volt
heater and
requires a 240 volt
wired receptacle.
Do not alter cord.
IMPORTANT!
The fan will delay
approximately 20
seconds on startup,
and will continue
for approximately
70 seconds after
elements shut off.
WARNING!
Risk of fire.
Heaters must be
kept clean of lint,
dirt and debris.
Failure to follow
warnings may
cause heater to
eject sparks, ignite
materials, or cause
electrical shock.
Operation and Maintenance
Figure 3
“ON” SETTING
The fan can be operated continuously when set
to the “ON” position. For cooling or air circulation
(when no heat is desired), turn the thermostat to
the lowest setting possible by rotating the
thermostat knob counter clockwise
.
NOTE
If the thermostat is turned to a setting above room
temperature, the elements will turn on and heat
the area until the temperature reaches that set
point. Once the elements go off, the fan will continue
to run. This cycle will continue.
IMPORTANT:
DO NOT use breaker panel or fuse box or wall
thermostat to control outlet plug.
Maintenance
As needed or every six months, minimum
1. Allow the heater to cool, then disconnect the
power cord from power supply. To disconnect
heater, turn control to “OFF”, then remove plug
from outlet. IMPORTANT: The heater must be
unplugged before performing any maintenance.
2. Remove front diffuser grill by removing
the 4 screws (1 from each corner).
3. Wash grill with hot soapy water and dry
immediately, or use air compressor to
blow debris from grill louvers.
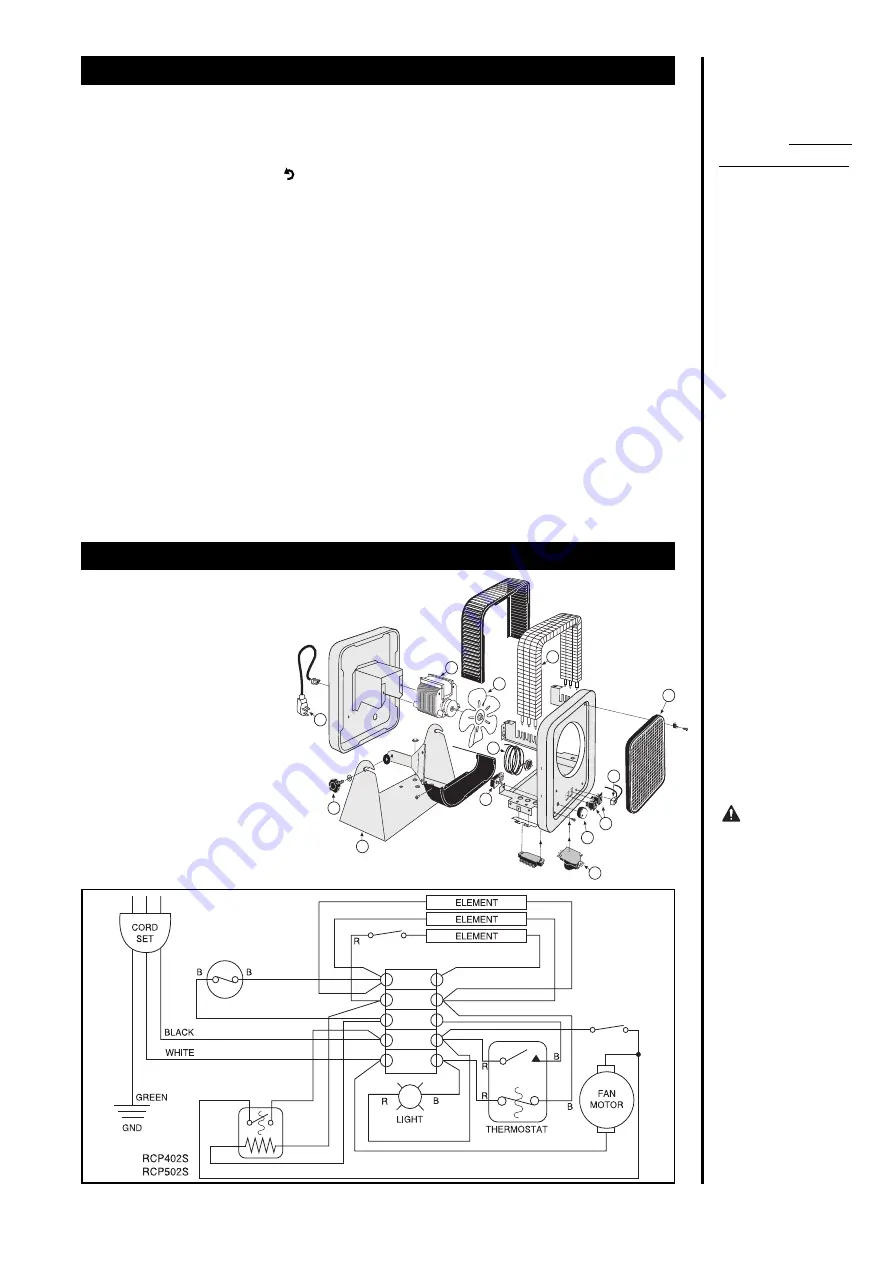
1.
410102 FRONT GRILL ASSY W/CLIPS
2.
040019 THERMOSTAT KNOB
3.
050524 PILOT LIGHT
4.
051226 THERMOSTAT
5.
050327 TEMPERATURE LIMIT SWITCH
6.
401723 ELEMENT, RCP402S 1333/1000W
(3 REQ.)
401726 ELEMENT, RCP502S 1667/1332W
(3 REQ.)
7.
001601 BLADE FAN
8.
051424 FAN MOTOR, RCP402S
051408 FAN MOTOR, RCP502S
9.
400202 MOUNTING STAND
10.
040023 MOUNTING KNOB
11.
051901 CORDSET, RCP402S
051903 CORDSET, RCP502S
12.
051707 ROCKER SWITCHES (2 REQ.)
13.
050520 FAN DELAY RELAY
Note: Only the items listed above are
available for purchase.
Parts List
4. While holding fan (to avoid damage or bending),
use an air compressor, hair dryer or vacuum on
blow cycle to blow debris through the outer
cabinet louvers and finned elements (Do not
touch elements. Elements have sharp surfaces).
5. Vacuum or blow air inside fan area without
touching the elements.
6. Carefully wipe off the fan blade without
damaging or bending it.
7. Replace diffuser grill and secure with screws.
8. Re-connect power cord to power supply.
Resetting the Manual-Reset Limit Control
The heater is protected by a high temperature
manual reset switch, designed to open the heater
circuit when excessive operating temperature
is detected. If the manual reset limit control has
opened the heater circuit due to excessive
operating temperatures, the heater will not work or
may blow cold air until the limit reset button is
pressed. After allowing the unit to cool for at least
10 minutes and resolving the problem causing the
limit to trip (typically the heater is blocked or needs
cleaning); use a narrow object such as a ball-point
pen to access the reset button through the lower-
right hole marked “RESET”. Press FIRMLY and be
sure to listen and feel for a click indicating it has
been reset. If the manual reset continues to trip,
check heater clearances to make sure they meet
the recommended distances.
All manuals and user guides at all-guides.com


