background image

19

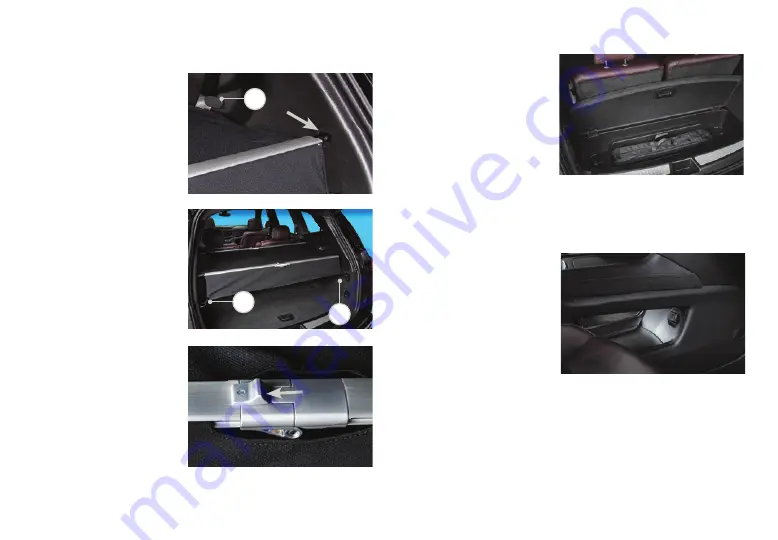
CARGO COVER INSTALLATION
1.  Fold the 3rd-row seats.
2.  Insert the 3rd-row seat 

belts into the clips (A) on 

the side panels.

3.  Unfold the cargo cover 

until the center hinge of 

each crossbar clicks.

4.  Insert the longer 

crossbar into the slots 

on each side panel near 

the 2nd-row seats.

5.  Insert the shorter 

 crossbar into the slots 

on each side panel near 

the liftgate opening.

6.  Attach the clips to the  

tie-downs (B).

CARGO COVER 

REMOVAL
1.  Unhook the clips from 

the tie-downs.

2.  Slide the release  button 

to fold the shorter 

crossbar, followed by 

the  longer crossbar.

R E A R   C A R G O   C OV E R

R E A R   C A R G O   C OV E R

C E N T E R   C O N S O L E  
S T O R A G E   A R E A

3.  Fold the crossbars and 

roll up the cover. Place 

the cover in the storage 

bag and store under the 

cargo floor.

See Storage in your Owner’s 

Manual.

A storage area is located 

under the front of the 

center console for use by 

front seat passengers. The 

storage area features an 

accessory power outlet for 

electrical   equipment.

See Instruments and Controls 

in your Owner’s Manual.

Some equipment shown may not be included in your vehicle.


Optional equipment

A

B

B
Summary of Contents for XT6 2023

Page 1: ...n your vehicle Contact your dealer for details on a specific vehicle All information contained in this guide is based on the latest information available at the time of printing and is subject to chan...

Page 2: ...ecognition Buttons Driver Information Center Controls Audio Steering Wheel Controls Climate Controls Heated Ventilated Seat Buttons Traction Control StabiliTrak Driver Mode Control Buttons Infotainmen...

Page 3: ...al The Keyless Access System enables operation of the doors and liftgate without removing the Remote Keyless Entry RKE transmitter from your pocket or purse The transmitter must be within 3 feet of th...

Page 4: ...l The fuel saving stop start system automatically turns off the engine referred to as an Auto Stop when the brake pedal is pressed and the vehicle is at a complete stop if certain operating conditions...

Page 5: ...ehicle Refer to your Owner s Manual for each procedure See Driving and Operating in your Owner s Manual E L E C T R O N I C P R E C I S I O N S H I F T E L E C T R I C PA R K I N G B R A K E D R I V E...

Page 6: ...n your Owner s Manual S T E E R I N G W H E E L CO N T R O L S B VOICE RECOGNITION Push to Talk Press to answer an incoming call or to use voice recognition with the OnStar Bluetooth or infotainment s...

Page 7: ...he Info menu See Instruments and Controls in your Owner s Manual The Head Up Display HUD projects some operating information on the windshield Temporary information such as audio changes and navigatio...

Page 8: ...udio player iPod to the infotainment system using a Bluetooth or USB connection For assistance call 1 855 428 3669 or visit cadillac com support Mute Unmute speakers Home page Additional Pages Swipe t...

Page 9: ...able through a compatible smartphone using the Apple CarPlay or Android Auto icon on the Home page 1 Download the Android Auto app to your compatible smartphone from the Google Play Store No app is re...

Page 10: ...Bluetooth system while driving To use a Bluetooth enabled device it must be paired with the in vehicle Bluetooth system Not all devices will support all functions The pairing process is disabled when...

Page 11: ...he infotainment screen If not charging remove the smartphone for 3 seconds and rotate it 180 degrees before reinserting it in the charging pocket See Instruments and Controls in your Owner s Manual Wi...

Page 12: ...l screen to synchronize all climate zone settings to the driver s settings AIR IONIZER The air ionizer which removes contaminants such as pollen and dust to help clean the air inside the vehicle turns...

Page 13: ...displays when the high beam headlamps are on Note IntelliBeam activates the high beam headlamps only when driving more than 25 mph See Lighting in your Owner s Manual Move the lever up or down to acti...

Page 14: ...when the ignition is turned on off For exit recall the driver s door must be opened To set the automatic recall options go to Settings Vehicle Seating Position Seat Entry Memory and Seat Exit Memory S...

Page 15: ...ss Entry RKE transmitter twice Press the Power Liftgate knob on the driver s door Press the touchpad above the license plate to open the liftgate Press the button next to the liftgate latch to close t...

Page 16: ...and is amber when following a vehicle ahead much too closely When approaching a vehicle directly ahead too rapidly a red alert flashes on the windshield and the Safety Alert Seat pulses or rapid beep...

Page 17: ...n HD SURROUND VISION The system uses multiple cameras to display a high resolution image of the area around your vehicle along with front and rear camera views on the D R I V E R A S S I S TA N C E S...

Page 18: ...d Operating in your Owner s Manual T R AC T I O N CO N T R O L T I R E P R E S S U R E M O N I TO R I N G S YS T E M U LT R AV I E W S U N R O O F The Low Tire Pressure warning light on the instrument...

Page 19: ...he tie downs 2 Slide the release button to fold the shorter crossbar followed by the longer crossbar R E A R C A R G O COV E R R E A R C A R G O COV E R C E N T E R CO N S O L E S T O R AG E A R E A 3...

Page 20: ...side Assistance provides every Cadillac owner with the advantage of contacting a Cadillac advisor and when appropriate a Cadillac trained dealer technician who can provide on site services including t...

Reviews: