Instructions for using HoloLens with VimedixAR™
36
©2017 CAE
905K800022 v4
Local Demo
The Local Demo option is only enabled for users whose Shared Experience Mode is
Individual
and who may or may
not be connected to Vimedix. The Local Demo gives
Individual
users the opportunity to become acquainted with
some of the features of VimedixAR even when they are not connected to Vimedix.
Note:
Before starting a Local Demo, make sure that your Shared Experience Mode is
Individual
.
To start a Local Demo, select the
Local
Demo
button on the
Interactive
Panel
under the
Settings
tab.
Once a Local Demo is started, a FitBox appears in your field of view; this is the same FitBox that appears in a Shared
Demo. It is important that the HoloLens are adjusted so that you can see the four corners of the FitBox. The FitBox
disappears from your field of view when you select any of the Local Demo options below excluding the
FitBox
demo item. The following demo items appear on your
Interactive
Panel
during a Local Demo.
Note:
The anatomy in the Local Demo is preloaded. This means that you cannot change the visibility of the different
anatomical structures using the Structures Visibility menu in Vimedix even if you are connected to Vimedix.
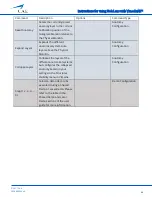
Demo Item
Voice Command
Description
FitBox
Vimedix, Step 1
Displays the FitBox in your field of view.
Anatomy
Vimedix, Step 2
Displays the preloaded anatomy at the Calibration position of the
Hologram Manikin relative to the Physical Manikin.
Show layers
Vimedix, Step 3
Expands the different anatomical systems into layers above the Physical
Manikin.
Isolate heart
Vimedix, Step 4
Raises the heart and the circulatory system above the Physical Manikin.
The
Isolate
heart
option also unlocks the zoom and rotation gestures.
Cut Plane
Ultrasound
Vimedix, Step 5
Displays the cross-sectional view of the preloaded anatomy based on the
position of the ultrasound beam cut plane along its preloaded trajectory;
note that this is an animation. Both the
Ultrasound
Panel
and the
ultrasound beam cut plane will display the ultrasound image.
Region Highlight Vimedix, Step 6
Displays a hologram of each of the following FAST protocol regions
throughout the preloaded anatomy:
• Right Upper Quadrant
• Left Upper Quadrant
• Pelvic
• Pericardial
• Right Pleural
• Left Pleural
Fluids Highlight
Vimedix, Step 7
Displays a hologram of the free fluid in each the following free fluid
locations throughout the preloaded anatomy:
• Douglas’ Pouch
• Morrison’s Pouch
• Pericardial Effusion
• Pleural Effusion
• Splenal Renal


