background image

49-2000386   Rev. 1

13

* Compatible Apple or Android devices and home WiFi network required.

Options

USING 

THE 

RANGE:

2SWLRQV

6HWWLQJV

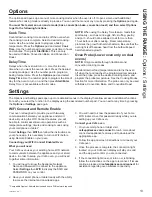
The options pad opens up a menu of more cooking modes when the oven is off. It opens a menu with additional 
features if a cooking mode is already in process. You can exit the menu at any time by pressing the 

Options

 pad again.

You must first select an oven and a mode


(bake, convection bake, convection roast) and then select Options 

to get to the following functions.

Cook Time

Counts down cooking time and turns off the oven when 
the cooking time is complete. Select a desired cooking 
mode. Use the number pads to program a baking 
temperature. Press the 

Options

 pad and select 

Cook 

Time

. Use the number pad to program cook time in hours 

and minutes. Then press 

Start/Enter

. This can only 

be used with Bake, Convection Bake, and Convection 
Roast.

Delay Time

Delays when the oven will turn on.  Use this to set a 
time when you want the oven to start. Press the desired 
cooking mode pad. Use the number pad to program a 
baking temperature. Press the 

Options

 pad and select 

Delay Time

. Use the number pads to program the time of 

day for the oven to turn on, and then press 

Start/Enter

Delay Time is not available with all modes.

NOTE:

 When using the Delay Time feature, foods that 

spoil easily – such as milk, eggs, fish, stuffing, poultry, 
and port – should not be allowed to sit for more than 
1 hour before or after cooking.  Room temperature 
promotes the growth of harmful bacteria. Be sure that the 
oven light is off because heat from the bulb will speed 
harmful bacteria growth.

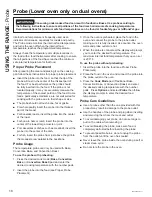
Oven Probe (Lower oven only on dual 
ovens)

NOTE: 

Only accessible through traditional and 

convection cooking modes.
Monitors internal food temperature and turns the oven 
off when the food reaches the programmed temperature. 
Insert the probe, press the desired cooking mode, and 
program the probe temperature. See the Cooking Modes 
Section for more information. The probe can only be used 
with Bake, Convection Bake, and Convection Roast. 

Settings

The Options and Settings pads open up more detailed menus in the display that allow access to additional functions. 
For each you select the function in the display using the associated number pad. You can exit at any time by pressing 
the 

Options

 or 

Settings

 pad again.

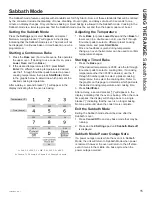
WiFi Connect and Remote Enable

Your oven is designed to provide you with two-way 
communication between your appliance and smart 
device. By using the WiFi Connect features, you will 
be able to control essential oven operations such as 
temperature settings, timers and cooking modes using 
your smartphone or tablet.*
Select 

Settings 

then

 Wifi

 then follow the instructions on 

your phone app. It is necessary to turn on WiFi before 
using Remote Enable on your oven.

Connecting your WiFi Connect Enabled Oven
What you will need

Your Café oven uses your existing home WiFi network 
to communicate between the appliance and your smart 
device. In order to setup your Café oven, you will need 
to gather some information:
1.  You will need to know the Appliance Network 

Name and Password to connect to the appliance. 
Select 

Settings 

then

 Wifi

 to display the SSID and 

PASSWORD on your control.

2.  Have your smart phone or tablet ready with the ability 

to access the internet and download apps.

3.  You will need to know the password of your home 

WiFi router. Have this password ready while you are 
setting up your Café oven.

Connect your Café oven

1.  On your smart phone or tablet visit 

cafeappliances.com/connect

 to learn more about 

connected appliance features and to download the 
appropriate app.

2.  Follow the app onscreen instructions to connect your 

Café oven.

3.  Once the process is complete, the connection light 

located on your Café oven display will stay on solid 
and the app will confirm you are connected.

4.  If the connection light does not turn on or is blinking, 

follow the instructions on the app to reconnect. If issues 
continue, please visit 

cafeappliances.com/connect

 for 

assistance regarding oven wireless connectivity.

Summary of Contents for CES700M2NS5

Page 1: ...Owner s Manual...

Page 2: ...le Oven Controls 12 Options 13 Settings 13 Sabbath Mode 15 Oven Racks 16 Aluminum Foil and Oven Liners 16 Cookware 16 Cooking Modes 16 Probe 18 Cooking Guide Single Oven 19 Cooking Guide Double Oven 2...

Page 3: ...u will too Among other things registration of your appliance ensures that we can deliver important product information and warranty details when you need them Register your Caf appliance now online He...

Page 4: ...8VH WKLV DSSOLDQFH RQO IRU LWV LQWHQGHG SXUSRVH DV described in this Owner s Manual H VXUH RXU DSSOLDQFH LV SURSHUO LQVWDOOHG DQG grounded by a qualified installer in accordance with the provided ins...

Page 5: ...burns WARNING COOKTOP SAFETY INSTRUCTIONS 1HYHU OHDYH WKH VXUIDFH XQLWV XQDWWHQGHG RLORYHUV cause smoking and greasy spillovers that may catch on fire 1HYHU OHDYH RLO XQDWWHQGHG ZKLOH IU LQJ I DOORZH...

Page 6: ...See the Cleaning the glass cooktop section for detailed instructions WARNING OVEN SAFETY INSTRUCTIONS 6WDQG DZD IURP WKH UDQJH ZKHQ RSHQLQJ WKH RYHQ door Hot air or steam which escapes can cause EXUQV...

Page 7: ...pe on new appliances is an application of a household liquid dishwashing detergent Apply with a soft cloth and allow to soak NOTE The adhesive must be removed from all parts It cannot be removed if it...

Page 8: ...Power level can be selected in any of the following ways 1 Swipe the gray arc on the graphics to the desired power level There is no sensor on the LEDs or 2 Touch Anywhere along the gray arc or 3 Touc...

Page 9: ...cover should be vented to allow moisture to escape The initial temperature type and amount of food type of pan and the time held will affect the quality of the food Always use pot holders or oven mit...

Page 10: ...isappear in a short time NOTE On models with light colored glass cooktops it is normal for the cooking zones to change color when hot or cooling down This is temporary and will disappear as the glass...

Page 11: ...ty pans can cause permanent damage to cooktop glass The enamel can melt and bond to the ceramic cooktop Glass ceramic Poor performance Will scratch the surface Stoneware Poor performance May scratch t...

Page 12: ...ctivate the controls Press and hold the 0 pad for three seconds to lock or unlock the control Cancel Off is always active even when the control is locked 9 Options and Settings The Options and Setting...

Page 13: ...one on the cooktop 7 Timer Works as a countdown timer Press the Timer pad and number pads to program the time in hours and minutes Press the Start pad The timer countdown is complete To turn the timer...

Page 14: ...oking Modes Section for more information The probe can only be used with Bake Convection Bake and Convection Roast Settings The Options and Settings pads open up more detailed menus in the display tha...

Page 15: ...ructions included with the mating Chef Connect enabled product The range will cancel pairing mode after two minutes if no mating device is detected Select Remove to confirm product is paired or to un...

Page 16: ...mber pads to select a different preset cooking temperature and press Start Enter 2 Since no feedback is given during temperature change an oven thermometer can be used to confirm temperature changes S...

Page 17: ...educe bottom browning HHS FRRNZDUH FOHDQ WR SURPRWH HYHQ KHDWLQJ CAUTION Do not use any type of foil or oven liner to cover the oven bottom These items can trap heat or melt resulting in damage to the...

Page 18: ...or immediately upon starting this mode Use Frozen Pizza Multi when cooking on two racks simultaneously This mode includes a preheating cycle to prepare the oven for multi rack baking Press Options an...

Page 19: ...Bake or Convection Roast pad and enter the desired cooking temperature with the number pads 2 Insert the probe into the food see Proper Probe Placement 3 Once the oven is preheated place the food in t...

Page 20: ...de down first Watch food closely when broiling For best performance when broiling center food below the broil heater Boneless chicken breasts Broil Low Bake 3 0RYH IRRG GRZQ IRU PRUH GRQHQHVV OHVV VHD...

Page 21: ...side down first Watch food closely when broiling For best performance when broiling center food below the broil heating element Boneless chicken breasts Broil Low Bake Upper Lower 1 3 If breaded or co...

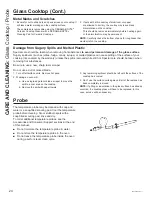
Page 22: ...r for best results Spillage of marinades fruit juices tomato sauces and basting liquids containing acids may cause discoloration and should be wiped up immediately Let hot surfaces cool then clean and...

Page 23: ...k is left in the oven during a self clean cycle the rack may become difficult to slide See the Oven Racks section for instructions on how to improve IMPORTANT The health of some birds is extremely sen...

Page 24: ...as needed 4 If any residue remains repeat the steps listed above as needed 5 For additional protection after all residue has been removed polish the entire surface with CERAMA BRYTE Ceramic Cooktop C...

Page 25: ...ot Special care should be taken when removing hot substances Be sure to use a new sharp razor scraper Do not use a dull or nicked blade 1 Turn off all surface units Remove hot pans 2 Wearing an oven m...

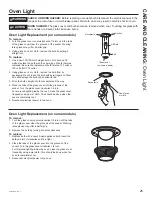
Page 26: ...when the oven is completely cool 5 Reconnect electrical power to the oven WARNING SHOCK OR BURN HAZARD Before replacing oven light bulb disconnect the electrical power to the range at the main fuse or...

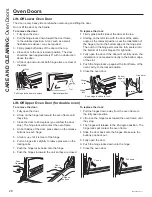
Page 27: ...against the front frame of the oven cavity to the locked position 5 Close the oven door Removal position Hinge lock Slot Pull hinge locks down to unlock Push hinge locks up to lock Hinge lock Hinge ar...

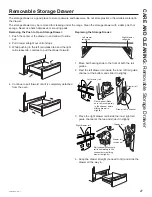
Page 28: ...e drawer forward 4 Continue to pull forward until it is completely detached from the oven Replacing the Storage Drawer 1 Move ball bearing slide to the front of both the rail guides 2 Rest the left dr...

Page 29: ...aned before next use See the Cleaning the glass cooktop section Hot surface on a model with a light colored cooktop This is normal The surface may appear discolored when it is hot This is temporary an...

Page 30: ...heating elements by turning relays on and off to maintain the oven temperature This is normal Clock and timer do not work A fuse in your home may be blown or the circuit breaker tripped Replace the fu...

Page 31: ...6HH WKH Special Features section Oven or cooktop will not stay set Function error Disconnect all power for at least 30 seconds and then reconnect power If repeating call for service Power outage clock...

Page 32: ...awer and push it all the way in See the Care and cleaning of the range section Drawer is over loaded or load is unbalanced Reduce weight Redistribute drawer contents Steam from the vent When using the...

Page 33: ...32 49 2000386 Rev 1 Notes...

Page 34: ...49 2000386 Rev 1 33 Notes...

Page 35: ...DXVHG DIWHU GHOLYHU 3URGXFW QRW DFFHVVLEOH WR SURYLGH UHTXLUHG VHUYLFH 6HUYLFH WR UHSDLU RU UHSODFH OLJKW EXOEV H FHSW IRU LED lamps Caf Electric Range Limited Warranty EXCLUSION OF IMPLIED WARRANTIES...

Page 36: ...Cleaning Pads for Ceramic Cooktops CERAMA BRYTE Ceramic Cooktop Cleaner CERAMA BRYTE Ceramic Cooktop Scraper LW LW LQFOXGHV FUHDP DQG FRRNWRS VFUDSHU 7KH ODUJH EURLOHU SDQ GRHV QRW ILW LQ UDQJHV 7KH...

Page 37: ...warranty and learn about special discounts that are available while your warranty is still in effect You can purchase it on line anytime Caf Service will still be there after your warranty expires In...

Page 38: ...del Horno Simple 11 Controles del Horno Doble 12 Options Opciones 13 Settings Configuraciones 13 Modo Sab tico 15 Estantes del Horno 16 Papel de Aluminio y Cobertores del Horno 16 Utensilios 16 Modos...

Page 39: ...gistro de su electrodom stico asegura que podamos entregarle informaci n importante del producto y detalles de la garant a cuando los necesite Registre su electrodom stico Caf ahora a trav s de Intern...

Page 40: ...IXH creado como se describe en este Manual del Propietario VHJ UHVH GH TXH XQ WpFQLFR FDOLILFDGR UHDOLFH XQD correcta instalaci n y puesta a tierra del artefacto de acuerdo con las instrucciones de i...

Page 41: ...LOS SIGUIENTES PASOS PARA EVITAR LA PROPAGACI N DEL FUEGO 1R XWLOLFH DJXD HQ LQFHQGLRV GH JUDVD 1XQFD OHYDQWH una sart n en llamas Apague los controles Apague una sart n en llamas sobre una unidad de...

Page 42: ...HO mismo El aire caliente o el vapor que sale puede causar TXHPDGXUDV HQ ODV PDQRV URVWUR X RMRV 1R XVH HO KRUQR VL XQ HOHPHQWR GH FDOHQWDPLHQWR JHQHUD un punto brillante durante el uso o aparecen otr...

Page 43: ...haya da os sobre el acabado del producto la forma m s segura de retirar el adhesivo de la cinta de embalaje en electrodom sticos nuevos es aplicando un detergente l quido hogare o para lavar platos A...

Page 44: ...ne una tecla El nivel de potencia puede ser seleccionado de cualquiera de las siguientes formas 1 Deslice su dedo sobre el arco gris en los gr ficos hasta el nivel de potencia deseado No hay sensor en...

Page 45: ...o papel de aluminio Al calentar pasteles o panes la tapa se deber ventilar para dejar que la humedad salga La temperatura inicial el tipo y la cantidad de comida el tipo de pan y el tiempo afectar n...

Page 46: ...modelos con estufas de vidrio de color claro es normal que las zonas de cocci n cambien de color cuando est n calientes o enfri ndose Esto es temporal y desaparecer a medida que el vidrio se enfr e a...

Page 47: ...es vac os puede provocar da os permanentes al vidrio de las estufas El esmalte puede derretirse y adherirse a la estufa cer mica Vidrio cer mico Desempe o pobre Raya la superficie Cer mica Desempe o p...

Page 48: ...aga la luz es del horno 8 Lock Controls Controles de Bloqueo Bloquean el control de modo que al presionar las teclas no se activen los controles Mantenga presionada la Lock Controls Controles de Bloqu...

Page 49: ...po 6 Cancel Off Cancelar Apagar Cancelar TODAS las operaciones del horno excepto el reloj y el temporizador 7 Timer Temporizador Funciona como un temporizador con cuenta regresiva Presione la tecla Ti...

Page 50: ...V IXQFLRQHV DNH RUQHDU RQYHFWLRQ DNH RUQHDU por Convecci n y Convection Roast Dorar por Convecci n Settings Configuraciones Las teclas Options Opciones y Settings Configuraciones abren men s m s detal...

Page 51: ...to luego de dos minutos si no es detectado ning n dispositivo para emparejar Seleccione Remove Retirar para confirmar que el producto est emparejado o para desemparejar el mismo de su cocina La Sonda...

Page 52: ...temperatura de cocci n actual diferente y presione Start Enter Iniciar Ingresar 2 Debido a que no hay ninguna indicaci n durante el cambio de temperatura se puede usar un term metro para horno para co...

Page 53: ...m s pareja PRECAUCI N No use ning n tipo de aluminio o cobertor de horno para cubrir el fondo del horno Estos tems pueden atrapar el calor o derretirse ocasionando da os sobre el producto y el riesgo...

Page 54: ...ciar el modo Use el modo Frozen Pizza Pizza Congelada al cocinar en dos estantes de forma simult nea Este modo incluye un ciclo de precalentamiento para preparar el horno para hornear en m ltiples est...

Page 55: ...a sonda en la comida consulte sobre la Ubicaci n Correcta de la Sonda 3 Una vez que el horno fue precalentado coloque la comida en el mismo y conecte la sonda en su correspondiente tomacorriente asegu...

Page 56: ...de la piel hacia abajo primero Preste atenci n a la comida al asarla Para un mejor rendimiento al asar centre la comida debajo del elemento que emite calor para asar Pechugas de pollo deshuesadas Asa...

Page 57: ...ste atenci n a la comida al asarla Para un mejor rendimiento centre la comida debajo del elemento calentador para asar Dorados Hornear Dorado por Convecci n Horno Inferior 2 o 3 Use una olla chata tal...

Page 58: ...iadores en el interior o el exterior del horno Limpie el mismo con agua y jab n o una soluci n de vinagre y agua Enjuague con agua limpia y seque con una tela seca Al limpiar supeficies aseg rese de q...

Page 59: ...s del Horno IMPORTANTE Las emanaciones producidas por el ciclo de autolimpieza de cualquier horno afectan la salud de algunas aves de manera notoria Procure llevar sus aves a otra habitaci n bien vent...

Page 60: ...sucia aplicando presi n seg n sea necesario 4 Si quedan restos repita los pasos indicados con anterioridad 5 Para protecci n adicional despu s de haber quitado todos los restos pula toda la superfici...

Page 61: ...r sustancias calientes Aseg rese de utilizar un raspador nuevo y afilado No utilice hojas desafiladas o da adas 1 Apague todas las unidades de superficie Quite las ollas calientes 2 Utilizando un guan...

Page 62: ...de duraci n 3 Empuje la bombilla en l nea recta dentro del recept culo hasta el tope 4 Coloque las leng etas de la cubierta de vidrio dentro de los surcos del portal mparas Gire la cubierta de vidrio...

Page 63: ...a puerta del horno Puerta del Horno Posici n de retiro Bloqueo de la bisagra Ranura Empuje los bloqueos de la bisagra hacia abajo para desbloquear Extremo inferior de la ranura Bloqueo de la bisagra B...

Page 64: ...el caj n hacia adelante 4 Contin e empujando hacia adelante hasta que se separe completamente del horno Reemplazo del Caj n de Almacenamiento 1 Mueva las correderas de bolillas hacia el frente de amb...

Page 65: ...un modelo con una estufa de color claro Esto es normal La superficie puede parecer decolorada cuando est caliente Esto es temporal y desaparecer a medida que se enfr a el vidrio Pl stico derretido sob...

Page 66: ...El fusible puede haberse quemado o el interruptor de circuitos puede haber saltado Cambie el fusible o vuelva a configurar el interruptor de circuitos El enchufe de la cocina no est introducido del to...

Page 67: ...e el disyuntor El reloj est apagado Consulte la secci n Funciones Especiales El horno se encuentra en Sabbath Mode Modo Sab tico Verifique que el horno no est en Sabbath Mode Modo Sab tico Consulte la...

Page 68: ...Redistribuya el contenido del caj n Emisi n de vapor desde la ventilaci n Cuando se utilizan los hornos es normal ver una emisi n de vapor de la ventilaci n del horno A medida que el n mero de bandej...

Page 69: ...32 49 2000386 Rev 1 Notas...

Page 70: ...49 2000386 Rev 1 33 Notas...

Page 71: ...QVHFXHQWHV FDXVDGRV SRU SRVLEOHV defectos sobre este producto DxR FDXVDGR GHVSXpV GH OD HQWUHJD 3URGXFWR QR DFFHVLEOH SDUD EULQGDU HO VHUYLFLR UHTXHULGR 6ROLFLWH HO VHUYLFLR WpFQLFR SDUD UHSDUDU R UHH...

Page 72: ...CERAMA BRYTE para Placas de Cocci n Cer micas Limpiador de la Placa de Cocci n de Cer mica CERAMA BRYTE Esp tula para Placa de Cocci n Cer mica CERAMA BRYTE LW HO NLW LQFOX H FUHPD HVSiWXOD SDUD SODF...

Page 73: ...especiales que est n disponibles mientras su garant a a n est vigente La puede adquirir en cualquier momento a trav s de Internet Los servicios de Caf a n estar n all cuando su garant a caduque En EE...

Reviews: