24
12345678901234567890123456789012123456789012345678
12345678901234567890123456789012123456789012345678
12345678901234567890123456789012123456789012345678
12345678901234567890123456789012123456789012345678
12345678901234567890123456789012123456789012345678
12345678901234567890123456789012123456789012345678
12345678901234567890123456789012123456789012345678
12345678901234567890123456789012123456789012345678
12345678901234567890123456789012123456789012345678
12345678901234567890123456789012123456789012345678
12345678901234567890123456789012123456789012345678
12345678901234567890123456789012123456789012345678
12345678901234567890123456789012123456789012345678
12345678901234567890123456789012123456789012345678
12345678901234567890123456789012123456789012345678
12345678901234567890123456789012123456789012345678
PRO FARMER TRIPLEX
PRO FARMER TRIPLEX
PRO FARMER TRIPLEX
PRO FARMER TRIPLEX
PRO FARMER TRIPLEX
PRO FARMER / TS • GENIUS
PRO FARMER / TS • GENIUS
PRO FARMER / TS • GENIUS
PRO FARMER / TS • GENIUS
PRO FARMER / TS • GENIUS
STANDARD FOX
STANDARD FOX
STANDARD FOX
STANDARD FOX
STANDARD FOX
USO E MANUTENZIONE
USO E MANUTENZIONE
USO E MANUTENZIONE
USO E MANUTENZIONE
USO E MANUTENZIONE
OPERATING AND SERVICE
OPERATING AND SERVICE
OPERATING AND SERVICE
OPERATING AND SERVICE
OPERATING AND SERVICE
Rev. 02
If the cardan shaft is too long, cut metal and
protection pipes till the correct dimension is
obtained, than carefully deburr pipes, remove
slags and grease abundantly.
3)
Connect the cardan shaft with the sprayer by
pushing the universal joint until the pin enters
into the locking spline of of the sprayer P.T.O.
shaft.
4)
Let the tractor get near the sprayer, move to
a correct coupling position, stop the engine
and remove the key from the ignition. En-
gage the tractor parking brake, go down the
tractor, couple the lifting arms with the
sprayer pins
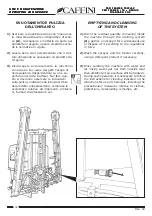
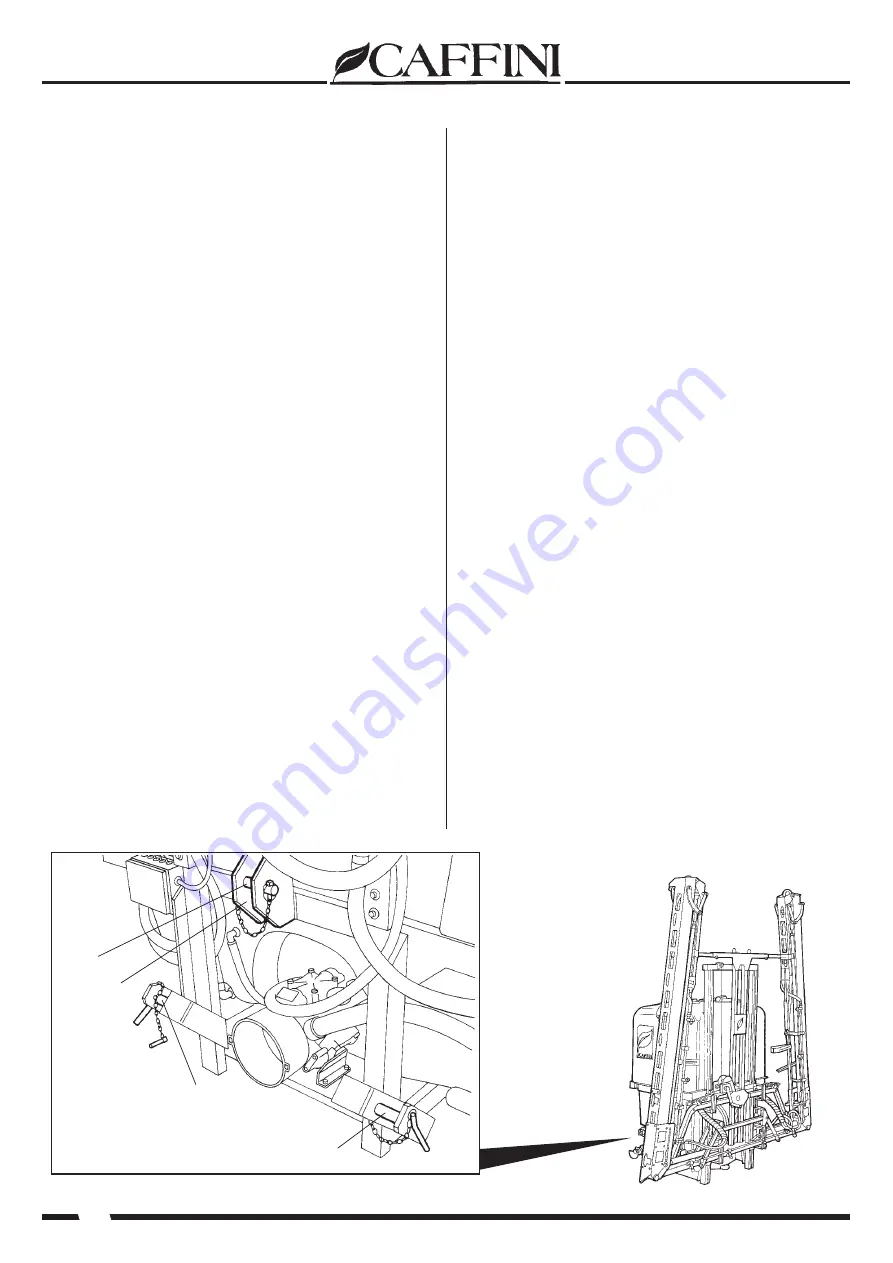
(A - Fig 6)
and insert safety
springs on pins. Couple the third point arm
with the fork
(B)
positioned on the top of
the sprayer frame by inserting the coupling
pin
(C)
and than the safety spring. It is clear
that the tractor/sprayer connection will be
easier and quicker in tractors equipped with
quick coupling.
5)
At last adjust the sprayer inclination by acting
on the the third point arm in a way that the
sprayer position becomes perfectly vertical.
6)
With disengaged P.T.O. insert the
universal joint in the tractor propeller shaft
and make sure that the pin has entered into
the locking spline of the tractor P.T.O. shaft.
7)
At the end of this stage, secure the cardan
shaft guard to the tractor and sprayer by means
of two chains, in order to prevent that the
cardan shaft, when turning, causes the rotation
of its guard. The chains should be fastened in
such a way to allow the articulation of transmis-
sion under any operation and transport
conditions.
Fig. 6
A
A
C
B
Nel caso il cardano fosse lungo, tagliare i tubi
metallici e quelli di protezione fino a che la misura
non sia corretta, quindi sbavare accuratamente i
tubi e pulirli dalle scorie, procedendo con un buon
ingrassaggio.
3)
Innestare il cardano al polverizzatore spingen-
do il giunto cardanico fino a che il perno rientra
nella scanalatura di bloccaggio dell’albero della pre-
sa di forza del polverizzatore.
4)
Avvicinarsi al polverizzatore con il trattore, por-
tarsi in posizione corretta per l’aggancio, spegne-
re il motore ed estrarre la chiave. Azionare il freno
di stazionamento del trattore, scendere, aggan-
ciare i bracci di sollevamento ai perni del
polverizzatore
(A - Fig.6)
e inserire le molle di
sicurezza sui perni. Agganciare il braccio del 3°
punto alla forcella
(B)
posta in alto sul telaio del
polverizzatore inserendo il perno di accoppiamen-
to
(C)
e poi la molla di sicurezza. Chiaramente nei
trattori dotati di innesto rapido, il collegamento
trattore-polverizzatore, sarà notevolmente più
agevole e rapido.
5)
Regolare infine l’inclinazione del polverizzatore
agendo sul braccio del 3° punto affinchè la posi-
zione del polverizzatore diventi perfettamente ver-
ticale.
6)
Con la presa di forza disinserita innestare il giun
to cardanico nell’albero di trasmissione del tratto-
re, assicurandosi che il perno sia entrato nella sca-
nalatura di bloccaggio dell’albero della presa di forza
del trattore.
7)
Ultimata questa fase, assicurare la protezione
del cardano con le due catenelle al trattore ed al
polverizzatore, onde evitare che il cardano porti in
rotazione anche la sua protezione.Fissare le cate-
ne in modo che permettano l’articolazione della
trasmissione in ogni condizione di lavoro e
di trasporto.


