background image

2

0

English

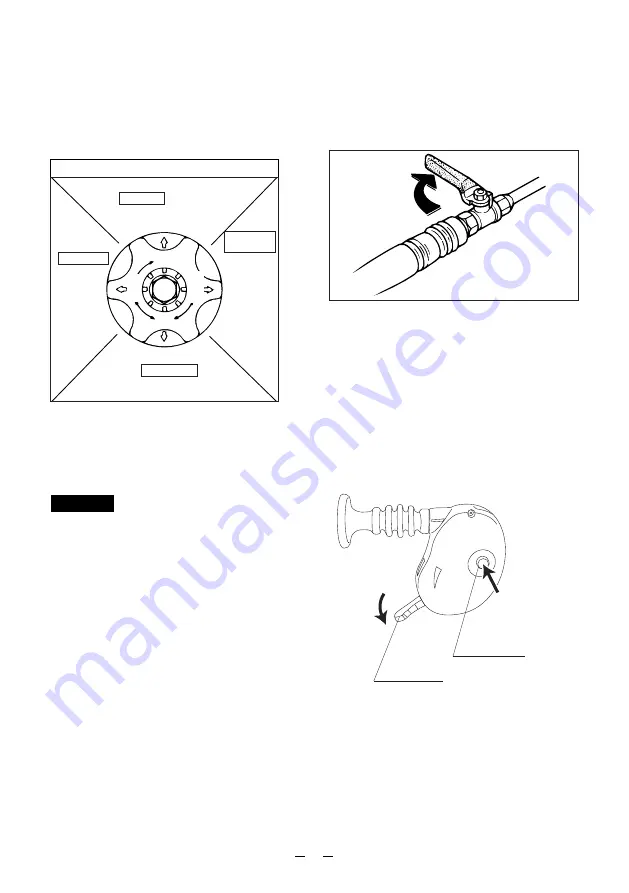
Handle of pressure control valve

STARTING

When engine is started and

when pump starts suction.

HERBICIDE

When low-

pressure spray

is required.

(Spray of weed

killer, etc.) 

HIGH
PRESSURE

When high
pressure is
required in
particular. 

When this
machine is
set at a fixed
position and
longer hose
than 
standard is
used. 

INSECTICIDE

Normal spraying work

Operation

Turn the handle of the pressure control
valve until there is sufficient pressure for
work such as spraying weeds (fixed

1

Close ball cock.

1

After confirming proper pump and spray
operation in the machine, move the throttle
lever to high-speed position.

2

When opening ball cock, chemicals will be
sprayed from nozzle in a mist. 

3

(fixed position)

When setting the pressure control valve handle
to "INSECTICIDE", "HERBICIDE" with throttle
fully open at the "HIGH PRESSURE" position of
pressure control valve handle, engine
revolutions increase as pressure decreases.
When using this machine at the "INSECTICIDE",
"HERBICIDE" position, use at a position little bit
back from full open throttle. 

CAUTION

Stop

Return throttle lever to low speed.

2

Push stop button to stop engine.

3

H

L

Push

Throttle lever

Stop button

STARTING

HERBICIDE

HIGH

PRESSURE

INSECTICIDE

Summary of Contents for Fog King PS25

Page 1: ...FOG KING PS25...

Page 2: ...RUS 1 1 2 3 4 5 6 7 9 10 10 11 11 12 Caiman 1...

Page 3: ...RUS 2 2009 128 21 2009...

Page 4: ...Fog King PS25 Maruyama 3 5 7 1 1930 MARUYAMA BE230P 2 22 5 0 9 7000 25 1 NGK BPMR6Y 350 465 595 8 8 25 0 8 32 3...

Page 5: ...1 2 3 1 2 3 4 15 3 101 0047 29 141408 0 8 Fog King PS25 2017 4...

Page 6: ...1 2 5...

Page 7: ...1 2 25 2 1 6...

Page 8: ...STARTING HERBICIDE HIGH PRESSURE INSECTICIDE H L Close 5 6 1 2 3 4 STARTING 2 3 1 2 3 4 5 6 10 7...

Page 9: ...H L 2 1 1 2 3 3 STARTING HERBICIDE HIGH PRESSURE INSECTICIDE 8...

Page 10: ...Caiman 0 6 0 7 0 6 0 7 1 2 3 9 15 20...

Page 11: ...STARTING 1 2 3 4 10 Caiman 1 2 3 4 1 2 3 4 1 2 3 4 5 6 7 8 1 2 3 4 5 6 7 8...

Page 12: ...20 150 30 1 12 1 12 3 10 11 2011 924 10 04 2012 08 693 11...

Page 13: ...1 2 3 10 483 438 30 10 12...

Page 14: ...this product It is not a toy Never allow adults to operate the unit without first reading the Owner s Operator s Manual Become familiar with the controls and know how to stop the engine quickly Keep t...

Page 15: ...ng medium to the surface to be treated than necessary After each use empty the sprayer and clean it thoroughly with water Make sure that no pollution of the environment is caused Do not spill the pest...

Page 16: ...continuous output kw min 1 PS rpm Fuel Ignition system Spark plug Stating system 350 465 595 13 8 18 3 23 4 8 8 19 4lbs 25 6 6gal 0 8 0 21gal US 32 meshes Maruyama twin piston 3 5 7 1 1930 MARUYAMA BE...

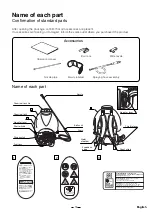
Page 17: ...ere you purchased the product Name of each part Accessories Operation manual Ball cock Wide nozzle Nozzle pipe Spraying hose assembly Waist stabilizer Nozzle Ball cock Chest strap Drain Throttle lever...

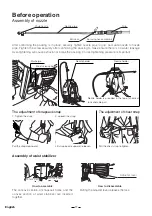
Page 18: ...waist stabilizer The concave section of knapsack frame and the convex section of waist stabilizer are inserted together Pulling the adjuster lever releases the lock Before operation Assembly of nozzle...

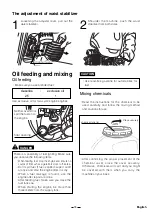
Page 19: ...sure no source of fire such as cigarette is close to the area Don t spill fuel If fuel is spilled wipe it all off at once and start the engine after it is dry When a fuel leakage is found use the engi...

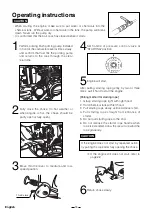
Page 20: ...still does not start refer to page 22 Return choke slowly 6 Operating instructions CAUTION When starting the engine make sure to put water or chemicals into the chemical tank Without water or chemica...

Page 21: ...1 After confirming proper pump and spray operation in the machine move the throttle lever to high speed position 2 When opening ball cock chemicals will be sprayed from nozzle in a mist 3 fixed positi...

Page 22: ...nance consult with the sales outlet where you purchased the prod uct or sales office Drain Make sure to drain otherwise the pump might be damaged by freezing in winter Remove drain cap of chemical tan...

Page 23: ...valve portion 1 Tighten sufficiently 2 Disassemble and clean 3 Replace with new parts 4 Disassemble and clean 1 Wear to piston packing 2 Scratch on the inside surface of cylinder 3 Scratch on deliver...

Page 24: ...4 15 3 101 0047 134459 00 20170116 NK...

Reviews: