Personal Ambulatory Oxygen System
Provider Technical Manual
76
Electronics
REMOVE AND REPLACE THE CONTROL BOARD ASSEMBLY
1. Remove the Unit Cover as described in the section Remove and Replace the Unit Cover.
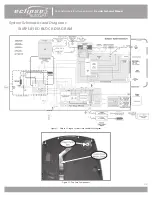
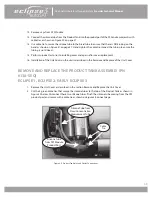
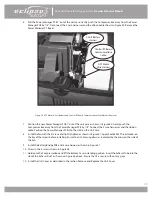
Figure 51: Control Board Removal (ATF Module not shown for clarity).
2. Remove the 2 screws (M3x10 Plastite Screw, P/N 6950-310-SEQ) holding the Control Board Assembly to the
Unit Case as shown in Figure 51.
3. Lift the Control Board Assembly and disconnect the Inlet Air Temperature, Data Commun-ications Port, Power
Manager PC Board Communications, Proportional Valve wire harness, and Buzzer wire harnesses as shown in
Figure 51.
Cable Tie
Screw
Tube from
Product Tank
Tube from
the Proportional
Valve
Buzzer
Connector
Air Inlet
Temperature
Data
Communications
Port
Power
Manager PC Board
Communications
Proportional
Valve Connector
NOTE:
The Control Board Assembly is factory calibrated as a single unit. Do
not disassemble the Control Board Assembly.
CAUTION
The Eclipse contains electrostatic sensitive components.
Do not open or handle except at a static free workstation.
NOTE:
Use a magnetized Phillips #1 screwdriver to remove the screws. This
greatly reduces the chances of dropping a screw in the Unit Case.

