background image

email:  sales@cairn-research.co.uk   tech@cairn-research.co.uk 

+44(0)1795 590140   www.cairn-research.co.uk


Resolution

•  Please refer to the guidelines below: ‘Focussing the Camera on the Aperture’ to identify the 

adjustment required. Please note the rotation of the focus ring required to bring the aperture 
blades into fine focus is minimal as each unit is pre-set prior to shipping.

•  It is best practice to adjust the focus ring whilst the sample image is out of focus; concentrate 

only on bringing the aperture blades into focus. It may be useful to zoom in on one aperture 
edge using your imaging software.

Focussing the Camera on the Aperture

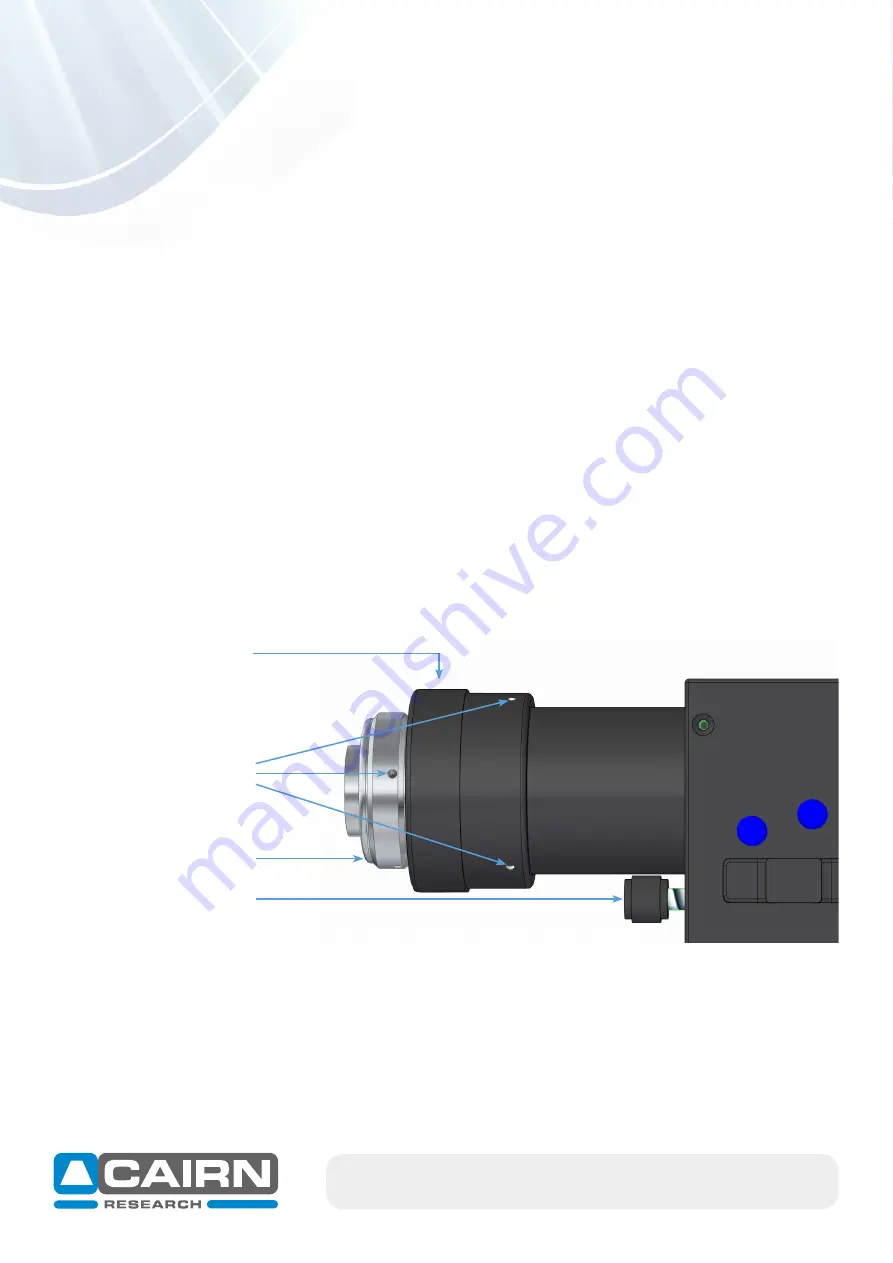
If the Optosplit II aperture is not in sharp focus, then adjust the fine focus on the camera as follows:
•  Set an aperture size of less than half the width of the camera frame.
•  Loosen the two hex screws on the Focus ring
•  Separate the two images slightly with the Split control.
•  Loosen the C-mount hex screws.
•  Adjust the focus by turning the focus ring whilst ensuring the optosplit is secure, and holding the 

camera, until the aperture edges are in sharp focus. 

•  Then, lock off the focus ring by re-tightening the hex screws. Ensure the camera is again lined up 

with its top orientated the same way as the top of the Optosplit II and then lock off the Camera 
C-mount.

Focus ring

Hex screws

Camera C-mount

Split adjuster

Summary of Contents for OptoSplit II

Page 1: ...annel images rather than just the overlay Calibrate the unit as per the set up guide and approach troubleshooting firstly with the calibration cube supplied consisting of a 50 50 mirror Make a detaile...

Page 2: ...rs darker on one side known as vignetting Often observed when changing from split mode to single channel bypass mode due to sub optimal mirror positioning Resolution Locate the Trim adjustment on the...

Page 3: ...cause Illumination is inconsistent over both images Often symptomatic of a poorly aligned light source which has not been setup for K hler illumi nation unrelated to the image splitter Resolution Remo...

Page 4: ...ty can be affected Split control should always be turned ANTI CLOCKWISE i e this moves the two images apart for the best split results Resolution Identify which is the reflected shorter wavelength ima...

Page 5: ...email sales cairn research co uk tech cairn research co uk 44 0 1795 590140 www cairn research co uk Flowchart for confirming camera orientation is correct and images are split correctly...

Page 6: ...research co uk 4 Edges of the OptoSplit aperture appear rough Observations likely cause Rough non uniform feature in focus on diaphragm aperture blade Most likely cause is dirt highly magnified on the...

Page 7: ...instructions below This adjustment is required if when initially installed the aperture blades are slightly out of focus due to the individual position of the camera sensor However this adjustment is...

Page 8: ...ing your imaging software Focussing the Camera on the Aperture If the Optosplit II aperture is not in sharp focus then adjust the fine focus on the camera as follows Set an aperture size of less than...

Page 9: ...dentify this error is if the V control moves an image horizontally which indicates the camera is in the incorrect orientation 6 Two emission channels are non parallel Resolution Refer to the OptoSplit...

Page 10: ...al These LS units include longer focal length custom lenses to minimise image distortion and can be used with any camera sensor size Resolution If you are unsure whether you have an LS OptoSplit Large...

Page 11: ...d by differences in intensity of the emitted fluorophores Resolution The OptoSplit can be supplied with an additional Neutral Density kit to reduce the intensity of the brightest channel Four neutral...

Page 12: ...han being caused by it Resolution The OptoSplit can be supplied with a Corrector Lens kit as an additional accessory Three weak crown glass lenses are typically supplied labelled as follows IO137 Foca...

Reviews: