background image

WARNING

If  the  information  in  this  manual  is  not  fol-

lowed exactly, a fire or explosion may result 

causing property damage, personal injury or 

loss of life.

Do  not  store  or  use  gasoline  or  other  flam

-

mable vapors and liquids in the vicinity of this 

or any other appliance.

Do not store an LP cylinder not connected for 

use in the vicintiy of this or any other appli

-

ance. A fire resulting in serious injury or death 

may occur.
If you are installing a natural gas grill, you are 

responsible for ensuring that the natural gas 

line installed is safe to use. LMS, Inc. will not 

be held responsible for an improperly installed 

gas line.

Safety Instructions  .  .  .  .  .  .  .  .  .  .  .  .  .  .  .  .  .  .  . 1
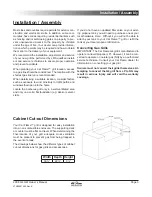
Installation / Assembly .  .  .  .  .  .  .  .  .  .  .  .  .  .  .  . 3

Cabinet Cut-out Dimensions .  .  .  .  .  .  .  .  .  .  .  .  .  .  .  .3
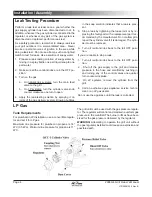
Leak Testing Procedure .  .  .  .  .  .  .  .  .  .  .  .  .  .  .  .  .  .  .  .4
LP Gas .  .  .  .  .  .  .  .  .  .  .  .  .  .  .  .  .  .  .  .  .  .  .  .  .  .  .  .  .  .  .  .  .  .4
Natural Gas .  .  .  .  .  .  .  .  .  .  .  .  .  .  .  .  .  .  .  .  .  .  .  .  .  .  .  .  .  .5
Installing the Grill in a Barbecue Island .  .  .  .  .  .  .6

Using Your Grill   .  .  .  .  .  .  .  .  .  .  .  .  .  .  .  .  .  .  .  .  . 7

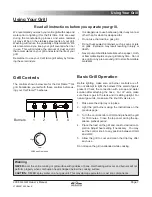
Grill Controls   .  .  .  .  .  .  .  .  .  .  .  .  .  .  .  .  .  .  .  .  .  .  .  .  .  .  .  .7
Basic Grill Operation  .  .  .  .  .  .  .  .  .  .  .  .  .  .  .  .  .  .  .  .  .  .7
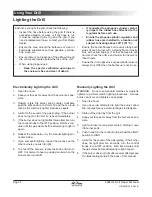
Lighting the Grill   .  .  .  .  .  .  .  .  .  .  .  .  .  .  .  .  .  .  .  .  .  .  .  .  .8

Cleaning and Maintenance   .  .  .  .  .  .  .  .  .  .  .  . 9

Drip Pan   .  .  .  .  .  .  .  .  .  .  .  .  .  .  .  .  .  .  .  .  .  .  .  .  .  .  .  .  .  .  .  .9
Care of Stainless Steel   .  .  .  .  .  .  .  .  .  .  .  .  .  .  .  .  .  .  .  .9
Covering Your Grill   .  .  .  .  .  .  .  .  .  .  .  .  .  .  .  .  .  .  .  .  .  .  .9
After Use Care   .  .  .  .  .  .  .  .  .  .  .  .  .  .  .  .  .  .  .  .  .  .  .  .  .  .  .9

Appendix  .  .  .  .  .  .  .  .  .  .  .  .  .  .  .  .  .  .  .  .  .  .  .  .  .  . 10

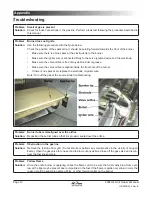
Troubleshooting .  .  .  .  .  .  .  .  .  .  .  .  .  .  .  .  .  .  .  .  .  .  .  .  .10
Replacement Cover  .  .  .  .  .  .  .  .  .  .  .  .  .  .  .  .  .  .  .  .  .  .11
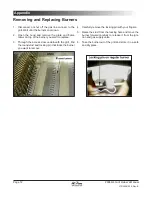
Removing and Replacing Burners  .  .  .  .  .  .  .  .  .  .12
2008 Warranty .  .  .  .  .  .  .  .  .  .  .  .  .  .  .  .  .  .  .  .  .  .  .  .  .  .  .13
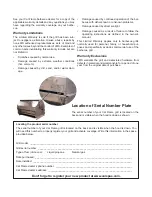
Location of Serial Number Plate .  .  .  .  .  .  .  .  .  .  .  .14

Read all instructions before you 

operate your grill .

Save these instructions!

Copyright  2008  LMS,  Inc. All  rights  reserved.  Duplication 

without written consent is strictly prohibited.

Cal Flame™ is registered trademark.

Due to continuous improvement programs, all models, op

-

eration, and/or specifications are subject to change without 

prior notice.

LTR20081050, Rev. B 

8/4/08

 CONTACT INFORMATION

For  customer  service,  please  contact  your  authorized 

dealer  immediately.  If  you  need  additional  information 

and/or assistance, please contact:
LMS Customer Service Department


1462 East Ninth Street 

Pomona, CA  91766.

Toll Free: 1-800-CAL-SPAS


Fax: 1-909-629-3890

Summary of Contents for G4 2008

Page 1: ...LTR20081050 Rev B 8 4 08 ...

Page 2: ...rbecue Island 6 Using Your Grill 7 Grill Controls 7 Basic Grill Operation 7 Lighting the Grill 8 Cleaning and Maintenance 9 Drip Pan 9 Care of Stainless Steel 9 Covering Your Grill 9 After Use Care 9 Appendix 10 Troubleshooting 10 Replacement Cover 11 Removing and Replacing Burners 12 2008 Warranty 13 Location of Serial Number Plate 14 Read all instructions before you operate your grill Save these...

Page 3: ...plicable To prevent fire and smoke damage remove all pack aging material before operating grill Before you start cooking clean the entire grill thor oughly with hot soapy water This is necessary to remove residual solvents oil and grease used in the manufacturing process The grates should also be thoroughly cleaned in the same manner Operation Do not use grill for oth er than intended use In the e...

Page 4: ...o not heat any unopened glass or metal container of food on the grill Pressure may build up and cause the container to burst possibly resulting in serious personal injury or damage to the grill Do not reach over your grill or any other surfaces when hot or in use Maintenance and Repair Spiders and other i nsects can nest in the burners of the grill and block the gas and airflow to the burner ports...

Page 5: ...in a well ventilated area and only on a solid flat foundation e g deck or cement slab If you do not have an updated filler valve on your exist ing propane tank you will need to purchase one at your local hardware store Without it you will not be able to attach your tank to your Cal Flame grill or refill the tank at your local propane refill station Converting Gas Grills IMPORTANT The Cal Flame G4 ...

Page 6: ... leak is pres ent Stop a leak by tightening the loose joint or by re 5 placing the faulty part with a replacement part rec ommended by the manufacturer Do not attempt to repair the cylinder valve if it is damaged The cylin der must be replaced Turn all control knobs back to the full OFF posi 6 tion If you are unable to stop a leak Turn all control knobs back to the full OFF posi 1 tion Shut off th...

Page 7: ...dewall there shall be at least two openings The bot tom of the openings shall be at floor level and the upper edge no more than 5 inches 127 mm above the floor The openings shall be equally sized spaced at 180º 3 14 rad and unobstruct ed Every opening shall have minimum dimensions c so as to permit the entrance of a 1 8 inch 3 2 mm diameter rod Transporting and Storing LP Gas Transport only one cy...

Page 8: ...ul attention to the location of the gas line It should be routed away from sources of heat and should make as few bends as possible Check to see if the gas line connection will be accessible when grill is installed If the gas line connection is not easily accessible when the grill is installed support the grill above counter level and attach the gas line to the grill When the gas connection is mad...

Page 9: ...ontainers such as cans or jars on grills Explosion may result resulting in injury or death Never put combustible material such as paper cloth or flammable liquids on your grill at any time Do not use grill or any area around grill to store flammable materials Grill Controls The controls shown below are for the Cal Flame G4 grill Familiarize yourself with these controls before us ing your Cal Flame...

Page 10: ...ockwise 3 past the light position to HIGH You will hear a loud click as the electronic lighter produces a spark Listen for the sound of the gas igniting If the burner 4 does not light on the first try repeat immediately If the burner does not light after three attempts turn 5 the control knobs to the OFF position Wait five min utes until the gas clears before attempting to light it again Repeat th...

Page 11: ...d the location of the igniters Drip Pan The full width drip pan will collect grease from the main grill area The pan should be cleaned after every use to avoid the possibility of a grease fire Be sure to allow the drip pan to cool prior to cleaning You may clean the drip pan with a solution of warm soapy water Make sure to rinse thoroughly to avoid staining Care of Stainless Steel Do NOT use wire ...

Page 12: ...s aligned inside the front hole of the burner If there is no spark at all replace the electrode or igniter wire Note Turn off the gas at the source while troubleshooting Problem Burner tube is misaligned over the orifice Solution Reposition the burner tube so that it is properly seated over the orifice Problem Obstruction in the gas line Solution Remove the fuel line from grill Do not smoke or per...

Page 13: ...per sparking The ignition wire should be connected firmly to the valve ignition device and electrode Replace the ignition wire if it is frayed or cracked With the gas supply closed and all control knobs set to the off position check each position igniter individually for the presence of a spark at the electrode Push each knob in fully and rotate it about 1 4 turn to the left counter clockwise unti...

Page 14: ... you want to replace Through the access door underneath the grill find 3 the round stud and locking pin that locks the burner you want to remove Carefully remove the locking pin with your fingers 4 Raise the stud from the locking hole and move the 5 burner forward carefully to release it from the igni tion and gas supply valve Take the burner out of the grill and store it in a safe 6 and dry place...

Page 15: ...arranty repair and or replacement is the sole discretion of LMS and this warranty does not cover costs therein including but not limited to freight removal re installation etc This warranty is non transferable and may not be extended beyond the above mentioned time frames under any circumstances by any LMS representative Warranty Limitations This warranty is void if the barbecue grill has been sub...

Page 16: ...u may have regarding the warranty coverage on your barbe cue Warranty Limitations The Limited Warranty is void if the grill has been sub ject to negligence alteration misuse abuse repairs by non LMS authorized representatives acts of God and any other cases beyond the control of LMS Examples of common acts invalidating this warranty include but are not limited to Scratches caused by normal use Dam...

Reviews: