

2008 G4 Grill Owner’s Manual
Page 5
LTR20081050, Rev. B
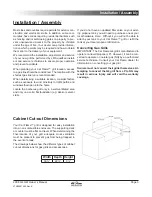
Installation / Assembly
Cylinder Specification
Any LP gas supply cylinder used with this grill must be:
Constructed and marked in accordance with the
•
Specifications for LP-Gas Cylinders
of the U.S. De-
partment of Transportation or the National Standard
of Canada,
CAN/CSA-B339, Cylinders, Spheres
and Tubes for Transportation of Dangerous Goods;
and Commission
, as applicable.
Approximately 12 inches in diameter and 18 inches
•
high.
The maximum fuel capacity is 20 lbs. of propane, or 5
gallons. Full cylinder weight should be approximately
38 lbs. (43.7 lbs. nominal water capacity.) Never fill the
cylinder beyond 80% full.
Place the dust cap on the cylinder valve outlet whenever
the cylinder is not in use. Only install the type of dust
cap on the cylinder valve outlet that is provided with the
cylinder valve. Other types of caps or plugs may result
in leakage of propane.
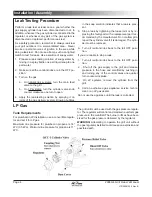
LP Gas Hook Up
An enclosure for an LP gas cylinder shall be vented by
openings at the level of the cylinder valve and at floor
level. The effectiveness of the openings for purposes of
ventilation shall be determined with the LP-gas supply
cylinder in place. This shall be accomplished in one of
the following manners:
One side of the enclosure shall be completely
1.
open.
Enclosures that have four sides, complete with a top
2.
and bottom:
At least two ventilation openings at cylinder
a.
valve level shall be provided in the sidewall,
equally sized, spaced at 180º (3.14 rad), and
unobstructed. Each opening shall have a total
free area of not less than one square inch per
pound (7.1 cm²/kg) of stored fuel capacity, and
not less than a total free area of 10 square inch
-
es (64.5 cm²).
Ventilation openings shall be provided at floor
b.
level and shall have a total free area of not less
than one square inch per pound (7.1 cm²/kg)
of stored fuel capacity and not less than a total
free area of 10 square inches (64.5cm²). If ven
-
tilation openings at floor level are in a sidewall,
there shall be at least two openings. The bot
-
tom of the openings shall be at floor level and
the upper edge no more than 5 inches (127 mm)
above the floor. The openings shall be equally
sized, spaced at 180º (3.14 rad) and unobstruct
-
ed.
Every opening shall have minimum dimensions
c.
so as to permit the entrance of a 1/8 inch (3.2
mm) diameter rod.
Transporting and Storing LP Gas
Transport only one cylinder at a time. Ensure the cyl
-
inder is secured in an upright position with the control
valve turned off and the dust cap in place. Store cylin
-
ders outdoors and out of reach of children. Do not store
cylinders in a building, garage, or any other enclosed
area.
Natural Gas
Requirements
Always ch
eck the rating plate to make sure the gas
supply you are hooking up to is the gas type the grill is
manufactured for.
IMPORTANT: Never connect the grill to an unregulated
gas supply.
The installation of this appliance must conform with lo
-
cal codes or, in the absence of local codes, to the na-
tional fuel gas code, ANSI Z223.1a-1998. Installation in
Canada must be in accordance with the standard CAN/
CGA-B149.2, Propane Installation Code.
A licensed contractor or local gas company representa
-
tive must perform all natural gas connections.
Ensure that the service supplying the grill is fitted with a
shut off valve conveniently positioned near the grill and
giving ease of access.
The grill must be isolated from the gas supply piping sys
-
tem by closing its individual manual shutoff valve during
any pressure testing of the gas supply piping system at
test pressures equal to or less than 0.5 psi (3.5 kPa).
The grill and its individual shutoff valve must be discon-
nected from the gas supply piping system during any
pressure testing of that system at test pressure in ex
-
cess of 0.5 psi (3.5 kPa).
Your Cal Flame™ grill for use with natural gas comes
equipped with its own regulator that MUST NOT be re
-
moved. If, this regulator needs to be replaced use only
the type specified by Cal Flame™ for this applianc
e.
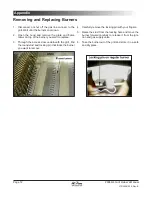
Connection
Remove the rear panel from the barbecue to gain
1.
access to the regulator and gas connection point.
Connect a suitable flex connector to the grill regula
-
2.
tor.
Summary of Contents for G4 2008
Page 1: ...LTR20081050 Rev B 8 4 08 ...