Assembly instructions
1
B
C
4 or 5
K
G
I
6
H
2 or 3
8
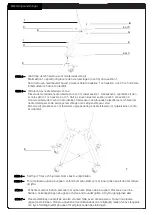
STEP 2 -
(Joining the two halves assembled in step l) Stand the section 1 upright and place the upper cross
braces (4&5) close to section 1. Inserting truss head screw C through the hole of section1
and section 4&5 and install K Keps nut and tighten securely.
(Installing the lower cross braces and casters) Place the assembled lower cross braces (2&3) under section 1,
Stand the section 6 upright to make it close to section 1 and section 4&5. Inserting screw B through
STEP 3 -
section 4&5 and section 6, install G Keps nut and tighten securely. Next insert the threaded caster stem
through the hole in the end of the lower cross brace then through the riser and finally the riser brace.
Install (H) flat washer and (l) Keps nut, repeat this at the remaining (3) aster locations and securely tighten.
8
7
STEP 4 -
STEP 5 -
STEP 6 -
STEP 7 -
As picture, put wheels 7 in front, and wheels with brake at the back.
To place the Oven on the cart first remove all items that are inside of the grill to make lifting easier.
Use a minimum of two people when lifting the Oven onto the cart. Place one of your hands in the bottom
vent of the Oven and the other under the grill. Lifting by the hinge or the side tables could result in injury
and damage to the product.
Position the nest upright on a flat level surface with the help of an assistant you can now place the oven
into the nest. Position the oven so the vent door is accessible between two of the risers and gently push
downward on the oven to seat it in the nest.
Asennusohjeet
VAIHE 4
–
Asenna pyörät 7 eteen ja jarrulliset pyörät 8 taakse.
VAIHE 2
–
(Vaiheessa 1 asennettujen puoliskojen yhdistäminen)
Nosta osio 1 pystyyn ja aseta ylemmät poikkituet (4 ja 5) lähelle osiota 1.
Työnnä kuusiokoloruuvi C osan 1 ja osien 4 ja 5 reikien läpi ja asenna Keps-mutteri K ja kiristä
tiukalle.
VAIHE 3
–
(Alempien poikkitukien ja pyörien asentaminen)
Aseta asennetut alemmat poikkituet (2 ja 3) osion 1 alle. Nosta osio 6 pystyyn niin, että se on
lähellä osiota 1 ja osioita 4 ja 5. Työnnä ruuvi B osioiden 4 ja 5 ja osion 6 läpi, asenna Keps-
mutteri G ja kiristä tiukalle. Asenna seuraavaksi pyörän kierrevarsi ensin alemman poikkituen
päässä olevan reiän, sitten pystyputken ja lopuksi pystyputken tuen läpi.
Asenna litteä aluslevy H ja Keps-mutteri I. Toista kolmelle (3) muulle pyörälle ja kiristä tiukalle.
VAIHE 7
–
Nosta grillipesä pystyasentoon tasaiselle alustalle toisen henkilön avustuksella. Uunin voi nyt laittaa
grillipesään. Aseta uuni siten, että uuninluukku on käytettävissä kahden pystyputken välissä, ja
paina uunia varovasti alaspäin, jotta se asettuu paikalleen grillipesään.
VAIHE 5
–
Aseta uuni vaunun päälle, mutta irrota kaikki grillin sisällä olevat osat, jotta nosto käy helpommin.
VAIHE 6
–
Uunin nostamiseen vaunuun tarvitaan vähintään kaksi henkeä. Aseta yksi käsi uunin pohjan ilma-
aukkoon ja toinen grillin alle. Saranasta tai sivupöydistä nostaminen voi aiheuttaa vamman ja


