background image

2009 Genesis Portable Spa

LTR20091058, Rev. A

Cleaning and Maintenance

www.calspas.com

19

Winterizing (Cold Climate Draining)

In many areas of the country, the temperature drops 

below 32˚F (0°C). We recommend that you always 

have your spa full of water and running at normal spa 

temperatures (80˚F to 100˚F, 26.7°C to 37.8°C). This 

will help reduce the risk of freezing in your spa and 

your spa’s equipment.

Warning: If you find the need to drain your spa, 

please be aware of the potential of freezing in 

your spas equipment and plumbing . Even if the 

directions below are followed perfectly, there 

is  no  guarantee  that  your  spa  will  not  suffer 

freeze damage .
Freeze  damage  is  not  covered  by  your 

warranty .

Open all filter covers.

1. 

Remove the filter baskets and filters.

2. 

Drain  your  spa  completely  as  described  in  the 

3. 

instructions above.
Remove  drain  plugs  from  the  front  of  the 

4. 

pumps.
Disconnect  the  unions  from  both  sides  of  the 

5. 

pump.
Use  a  wet/dry  vacuum  to  blow  any  remaining 

6. 

water out of the jets and equipment area.

Cover  your  spa  with  a  good  spa  cover  and  an  all-

weather  tarp  to  ensure  that  neither  rain  nor  snow 

enters the spa.

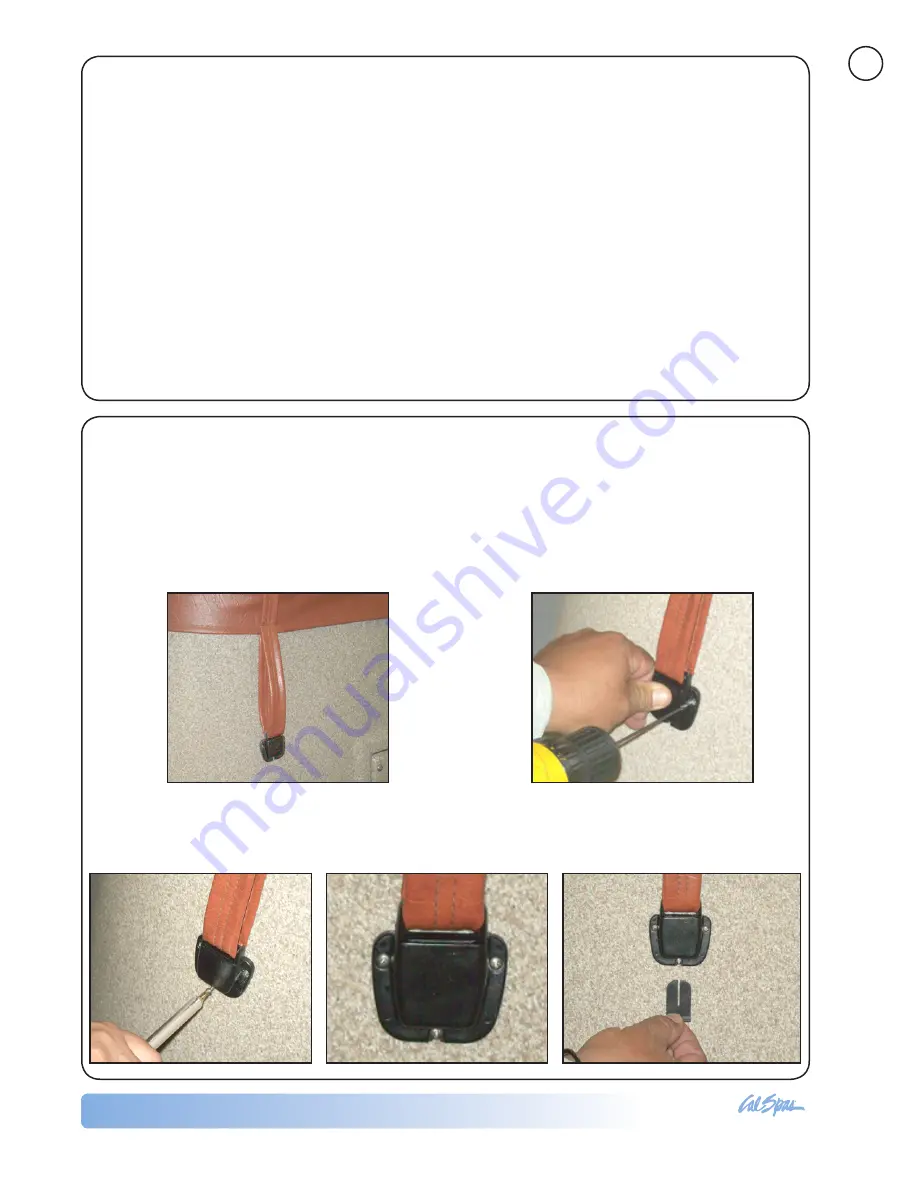
Installing Cover Latches

You will need a drill with a 3/32” drill bit and a Phillips screwdriver. 
Your cover will have four clips attached to the ends of the four latches, two on each end of the spa cover. 

There will also be a small bag with 12 screws. 

Place the cover on the spa with the latches placed 

1. 

where you want to mount them on the spa.

Using  the  latch  clips  as  a  guide,  drill  three 

2. 

holes for the mounting screws.

Insert three screws in the latch clip and fasten it to the spa shell. 

3. 

Make sure they are snug, but do not overtighten them. Do the 

same for the remaining latches. Drill and attach latch clips to the 

shell 

one at a time

.

When you have finished inserting 

4. 

all  of  the  screws,  use  the  latch 

key to unlock the cover latches.

Summary of Contents for Genesis Portable Spa

Page 1: ...LTR20091058 Rev A 1 16 09...

Page 2: ...ng and Adjusting Spa Water 11 Sanitation 12 Cleaning the Filter 14 Cleaning the Filter Basket 14 Bather Load 14 Starting the Spa with Fresh Water 15 Maintenance Schedule 16 Troubleshooting Water Clari...

Page 3: ...device from inside the spa WARNING RISK OF INJURY The spa water should never exceed 104 F 40 C Water temperatures between 100 F 38 C and 104 F 40 C are considered safe for a healthy adult Lower water...

Page 4: ...or rains frequently place the spa near a house entry By doing this you will have a place to change clothes and not be uncomfortable Consider Your Privacy In a cold weather climate bare trees won t pr...

Page 5: ...amp breaker Always use a weatherproof covered receptacle Receptacle shall be located not less than 5 feet 1 5 m from and not exceeding 10 feet 3 0 m from the inside wall of the spa NEC 680 43 A Do no...

Page 6: ...d be an air pocket at the suction side of the pump Shut off power to the spa and loosen the pump union on the suction side of the pump to bleed the air When air is bled turn power back on Install the...

Page 7: ...will also only activate the heater during the filtering cycles but will only heat the water to within 20 F 10 C of the set temperature Like Economy mode SL will display solid when temperature is not...

Page 8: ...d temperature Doing this will increase your operating cost and makes your heater work more than necessary Your spa is programmed to filter twice a day The first cycle will begin 6 minutes after the sp...

Page 9: ...llow directions for dr message and press any button to reset spa Spa will not automatically reset when dry or dY is displayed Ec Indicates heater is in Economy Mode None Temperature unknown After the...

Page 10: ...your spa is first actuated it will go into priming mode The priming mode will last for up to four minutes and then the spa will begin to heat and maintain the water temperature in the Standard mode S...

Page 11: ...the topside control panel to turn the spa light on If your spa has LED lights they will also light up at the same time as the spa light The LED lights operate in three three modes Cycle 1 The first t...

Page 12: ...sequamconum nis eu feugiamet vent et wisis ero dolore dip exeraestie estie vel inisci elisl ut diat cons aut alit lut lore tin hent adiam iustrud molor sustis essit wis cilit wisi Chemical Balance Ing...

Page 13: ...tal alkalinity is 80 120 ppm If the TA is too low the pH level will fluctuate widely from high to low Low TA can be corrected by adding Cal Spas pH Alkalinity Up If the TA is too high the pH level wil...

Page 14: ...to dissolve too quickly It will cause damage to your spa and will void your warranty Sanitizers kill bacteria and other organic waste by breaking them down to non harmful levels and are filtered out M...

Page 15: ...or Spa must be running with all of the jets on high for 30 minutes with the cover open If necessary repeat oxidizer shock in 30 minute intervals Chemical Safety Do not exceed chemical dosages as recom...

Page 16: ...g off the filter weekly to remove surface debris your filter should be deep cleaned periodically to dissolve scale and particles that get lodged deep within the filter fibers and impede the filtration...

Page 17: ...Purpose Cleaner Apply a protective coat of Cal Spas Fast Sheen 2 to the acrylic surface Fill the spa to the proper water level with normal 3 tap water Do not use soft water Use test strip and balance...

Page 18: ...ter Follow filter cleaning instruction at beginning of Clear Water Plan Every two to four months Drain and clean your spa with Multi Purpose Cleaner Polish the acrylic surface with Fast Sheen Clean an...

Page 19: ...nd refill the spa Organic buildup scum ring around spa Buildup of oils and dirt Wipe off scum with clean rag if severe drain the spa use a spa surface and tile cleaner to remove the scum and refill th...

Page 20: ...k up the female end of a garden hose to the drain 5 fitting Place the other end of the garden hose where you would like 6 the water to drain to Twist the hose bib fixture counterclockwise to open the...

Page 21: ...drain plugs from the front of the 4 pumps Disconnect the unions from both sides of the 5 pump Use a wet dry vacuum to blow any remaining 6 water out of the jets and equipment area Cover your spa with...

Page 22: ...aning and Replacing the Filter Filtration is one of the most important steps you can take to ensure clean clear water It is far less expensive to fix water clarity problems by filtering your spa than...

Page 23: ...a clean soft cloth 2 Wipe spa thoroughly with a wet sponge rinsing 3 often in a bucket of clean water Cal Spas Multi Purpose Cleaner should not be sprayed directly into the spa water Incorrect usage o...

Page 24: ...Stainless steel PLU21703631 OZ 2 Ozone Injector Standard gray PLU21700818 Drain Main Drain Super Hi Flo Suction 2 Silver PLU21400132 Waterfall Waterfall PLU21800700 Filters Filter Cartridge 50 Sq Ft...

Page 25: ...cturer Warranty Spa cover warranty is extended through the manufacturer of the product Spa cover is warranted for 90 days unless otherwise specified For more information see their warranties in the ow...

Page 26: ...instructions as defined within this owner s manual Damage caused by incorrect electrical installation electrical brownout voltage spikes or operation of spa out of voltage range by more than 10 Spas i...

Page 27: ...2009 Genesis Portable Spa LTR20091058 Rev A Appendix www calspas com 25 Cal Spas Chemicals...

Page 28: ..._________________________________________ Date Purchased _ _____________________________________________ Date Installed ________________________________________________ Dealer s Phone Number _________...

Reviews: