background image


12

8. INITIAL PROGRAMMING MODE AND PROGRAMMING MODE 

A touch to any element "ON" key  

  or to the “FAN” key

 will activate “Initial 

Programming Mode”.  Initial Programming Mode is active for a period of 10 seconds from that 
first touch. Once a level has been selected, the Programming Mode is active for an additional 5 
seconds period from the last key touched.  When in Programming and Initial Programming 

Modes, the LED under the “ON/ADJUST” key 

 will flash.  

 
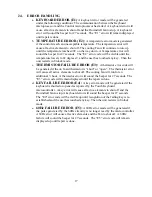
9. INDIVIDUAL BURNER FUNCTION CONTROL 

Each burner has an “ON/ADJUST” key 

 with an LED in the center, an ‘OFF’ key  

, a 

seven segment digit display representing the power setting and 3 round LED's to represent ¼; ½; 
¾ heat settings beside each digit.  The dual burner has a dual toggle key        , beneath which two 
LED’s indicate the dual or single state of the burner.  Hot light indicators are located beside the 
burners and are independently driven from the control. There is one centralized power 
adjustment with the keys 0, L, 1, 2, 3, 4, 5, 6, 7, 8, 9, and H. 
 

10. SELECTING AN ELEMENT 

To select an element, the corresponding on/adjust symbol 

 must be touched. A touch to that 

symbol will cause the selected element to enter “Initial programming mode”, the corresponding 

LED digit to display a “0” and flash the "ON" key LED.  If a power level 

or timer key   is 

not touched for an uninterrupted period of 10 seconds, the programming attempt will be 

canceled. A touch of any other element symbol 

 will cause that element to be selected while 

the previous selection is cancelled. 
 

11. SELECTING A POWER LEVEL 

After Selecting an Element


 and entering Programming Mode, you have 10 seconds to select a 

digit

 that represents the desired power setting.  A touch to ‘0’ will display ‘0’ for the 5 

seconds of Programming Mode, following the 5 seconds, if no other power setting has been 
selected, the burner will turn off.  After selecting L, 1, 2, 3, 4, 5, 6, 7, 8, 9, or H the burner will 
remain in Programming Mode for an additional 5 seconds in case you would like to select a 
different setting or a Detailed Power Level. 
 

12. SELECTING DETAILED POWER 

While in Programming Mode of an element and after having selected a power level, if the same 
power level key is touched again the selected element will enter detail mode. Multiple touches 
will turn the “detail” setting up and down with the following pattern: ¼, ½, ¾, back to ½, ¼, 
none, back to ¼…etc.  This provides a total of 44 settings per burner so you can find that perfect 
simmer or melted chocolate setting. 
 

13. TURNING ELEMENTS OFF (4 methods) 

a) Touching the OFF key 

 for the corresponding element will turn off the selected element. 

b) Selecting the ‘0’ and no subsequent power setting for five seconds, while in programming 
mode of an element, will turn off the selected element. 

Summary of Contents for SMt364

Page 1: ...C A L D E R A Please Read and Save for Future Reference Caldera Corporation Waterbury Center VT 05677 USA 800 725 7711 www calderacorp com Fax 800 962 3072...

Page 2: ......

Page 3: ...hope you enjoy your purchase REGISTRATION We encourage you to register your cooktop so you may take advantage of our full two year warranty and limited five year warranty should the need ever arise R...

Page 4: ...cting an Element 11 Selecting a Power Level 12 Selecting Detailed Power 13 Turning Elements Off 4 methods 14 Dual Element Operation 15 Warmer Simmer Burner 16 Recall Feature for Elements 17 Exhaust Op...

Page 5: ...lectrical appliance near the cooktop be sure that the cord of the appliance does not come into contact with the burner area 5 Do not leave children unattended in an area where appliances are in use Th...

Page 6: ...t Surface Units To reduce the risk of burns ignition of flammable materials and spillage due to unintentional contact with the utensil the handle of a utensil should be positioned so that it is turned...

Page 7: ...ner off a touch the corresponding or b touch the corresponding to enter programming then the 0 Using the timer by itself touch the hourglass then the digits that represent the minutes you want to set...

Page 8: ...burner to indicate that the burner is too hot to touch The lights will remain on until the glass is safe to touch even after the burner has been turned off Limit Switches Limit switches are located i...

Page 9: ...ner Only is 1000W Rear Right 1500W Rear Left 1500W Downdraft Features 550 cfm with a built in blower and matching glass top controlled from your cooktop Energy Tips Energy Saving Tips Place a utensil...

Page 10: ...her than a sugary substance is on the hot zone do not clean until the unit is completely cooled down and follow the instructions below Clean up for burned on spillovers If you accidentally melt anythi...

Page 11: ...Sequence Other Burner Functions Unlock 1 Select Burner 2 Instant Power 3 Detailed Power 4 Timer 5 Timer minutes 6 Fan 7 Fan level 8 Burner Off 9 Switch To Inner Burner 10 Select Burner Recall 4 11 Di...

Page 12: ...Instant Off locking the unit will de energize all active burners immediately 4 LOCK MODE When the cooktop is in Lock Mode Lock LED is off the burners may not be operated The downdraft fan and the tim...

Page 13: ...el or timer key is not touched for an uninterrupted period of 10 seconds the programming attempt will be canceled A touch of any other element symbol will cause that element to be selected while the p...

Page 14: ...unctions will not work no beeps no LED s It will also determine if it is hooked to a downdraft or to a hood Hoods may not yet be available 18 DOWNDRAFT CONTROLS Fan speed Up Down control The Downdraft...

Page 15: ...2 3 H or Recall will turn the fan on to the selected level NOTE 2 The fan and the light can be independently controlled at any time regardless of the status of either of them 20 TIMER DESCRIPTION FUNC...

Page 16: ...is displayed for the 10 second duration of the Initial Programming mode while the ON key LED is flashing If no time is set for a particular element the display will go blank during the 10 second perio...

Page 17: ...ated although all keys are functioning and the display shows the selections as if the burners were active SAFE mode is a handy tool for demonstration purposes it allows demonstration of the control fe...

Page 18: ...RROR E3 A thermistor error code will be generated if the on board thermistor is short or open The thermistor error will cause all active elements to shut off The cooling fan will run for an additional...

Page 19: ...number has been altered or removed from the product REPAIR OR REPLACEMENT AS PROVIDED UNDER THIS WARRANTY IS THE EXCLUSIVE REMEDY OF THE CONSUMER CALDERA CORPORATION SHALL NOT BE LIABLE FOR ANY INCIDE...

Page 20: ...19 Part C 14 03 0 1 Revised 10 28 05...

Reviews: